How to Use Coinbase (Beginners Guide)
Stepping into the realm of cryptocurrency trading can seem like a daunting task, but Coinbase simplifies the process, making it accessible to all. As a trusted and popular platform, Coinbase allows users to buy, sell, store, and manage over 265 assets with ease. However, many don't know how to use Coinbase. That's why this guide is designed to help you get started with Coinbase.
We'll guide you through the account setup process, navigate the platform, and use its features, such as buying, selling, and staking cryptocurrency. By following these steps, you'll be ready to use Coinbase to manage your digital assets effectively and confidently.
TL;DR
Coinbase is a beginner-friendly platform for buying, selling, storing, and managing cryptocurrencies. This guide walks you through account setup, navigation, buying, selling, staking, and sending/receiving crypto. While Coinbase is easy to use and supports many assets, be mindful of its high fees and potential customer service issues.Quick Step-by-Step Flow Chart
For those looking for a quick overview, here's a step-by-step flow chart that outlines the entire process at a glance. Refer to this chart if you want a visual guide to follow alongside the detailed steps below.
Let's get started on your journey into the world of cryptocurrency!
A brief overview of Coinbase
Coinbase is an online centralised exchange that can be used to trade and store 123 different cryptocurrencies.Here are some of the pros and cons of using Coinbase.
Pros
- Very user-friendly, making it a good choice for beginners.
- Supports a good variety of cryptocurrencies.
- Provides insurance against cyberattacks.
- There's a free Coinbase Pro version for more advanced users.
Cons
- Users are often charged high transaction fees.
- Users have frequently reported issues with Coinbase's customer service.
Setting up your account
First, head over to Coinbase's website, 'https://www.coinbase.com'. Coinbase also has a smartphone app, but we'll be sticking to the website for this tutorial.
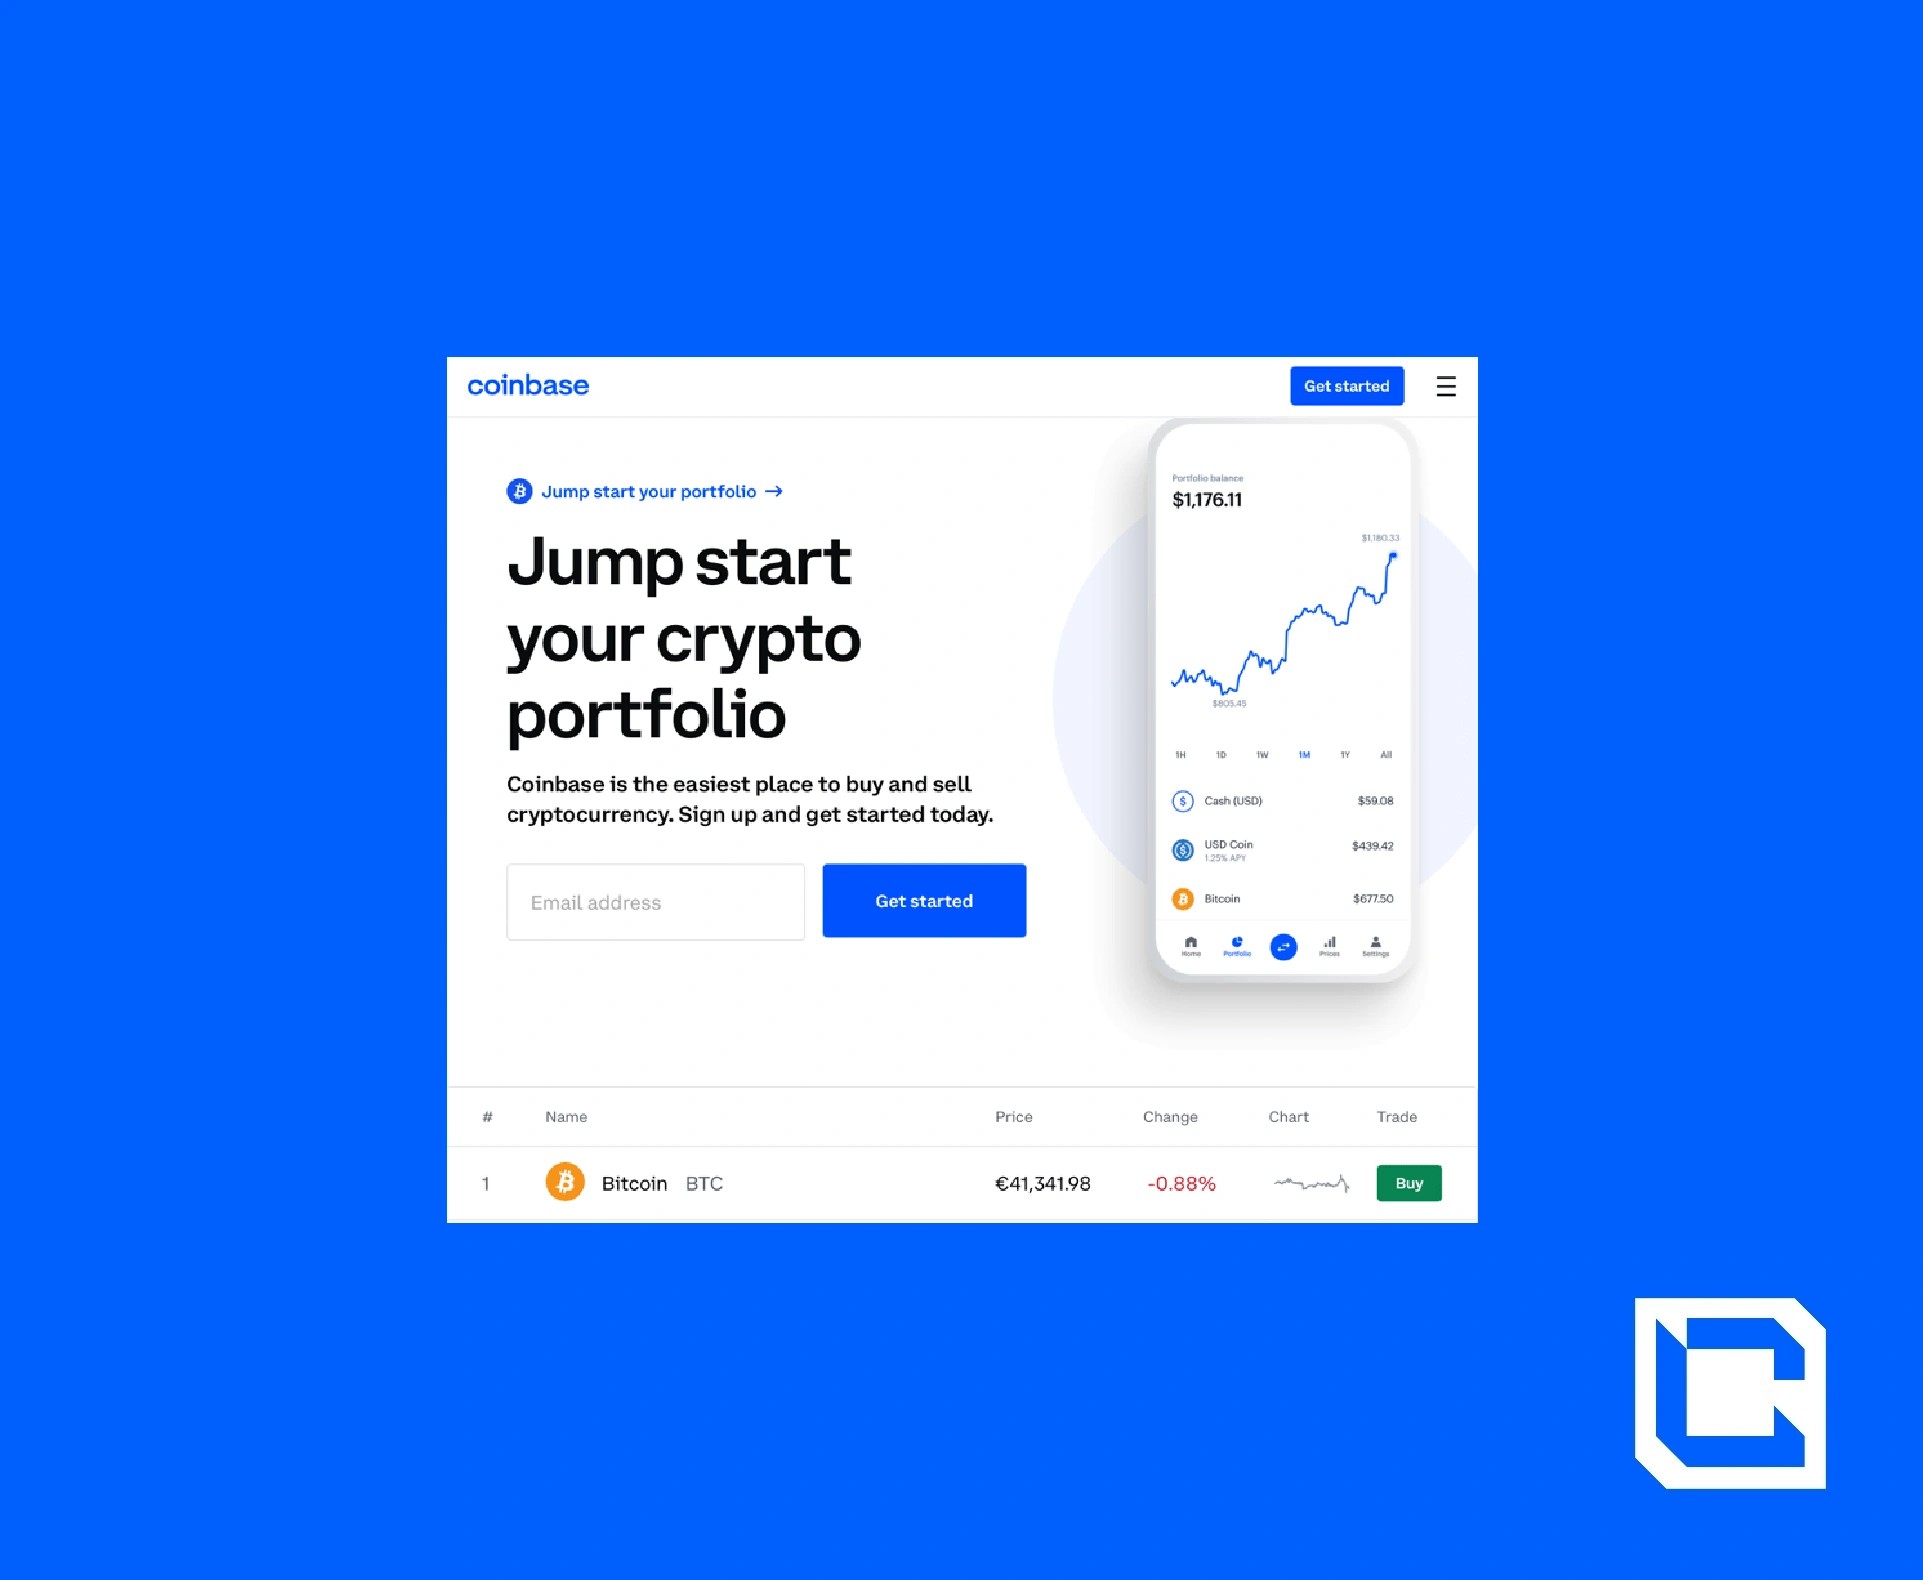
Click on the 'Get started' button and enter your details into the required fields. It's important that you enter your first and last name as they appear on your ID documents, as you will need those to verify your account later on.

Once you press 'create account', you'll need to read and acknowledge Coinbase's privacy policy. After this, you will be asked whether you want to receive email updates from Coinbase. Click 'continue'.
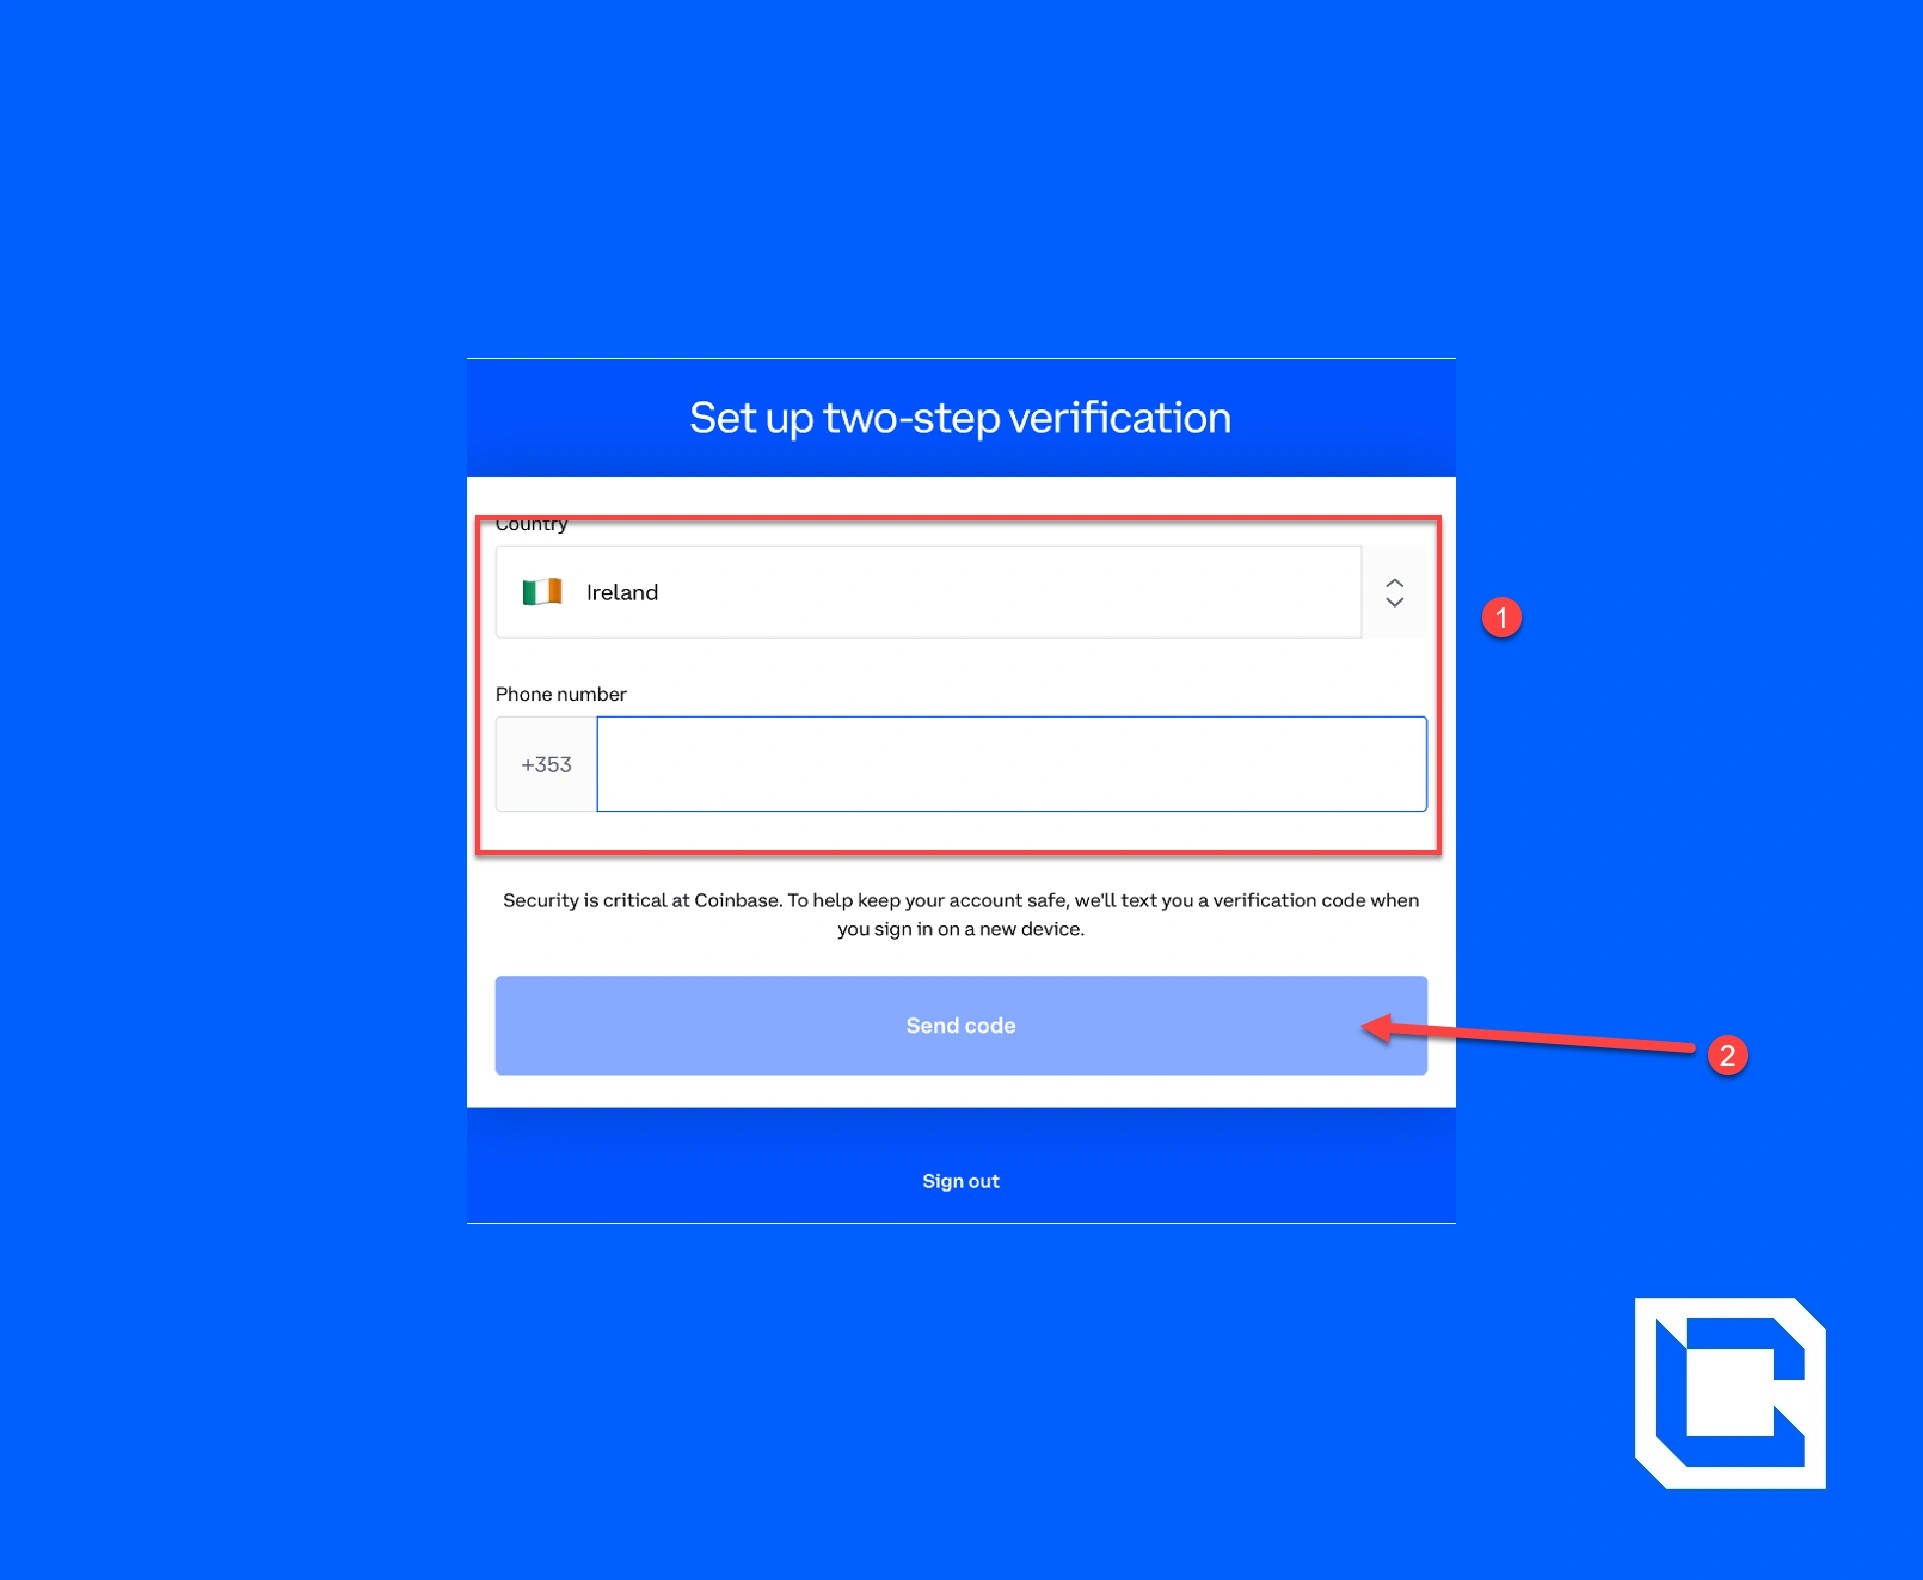
Next, you will need to verify your email address via an email that Coinbase will send to the address you entered. As part of Coinbase's two-step verification process, you'll also be required to enter a code that will be sent to your phone number.
On the next few pages, you'll be prompted to enter more details, such as your citizenship, address, date of birth, employment status and reason for using Coinbase.
Next up, you'll have to verify your identity using your passport, driver's licence or national ID card.
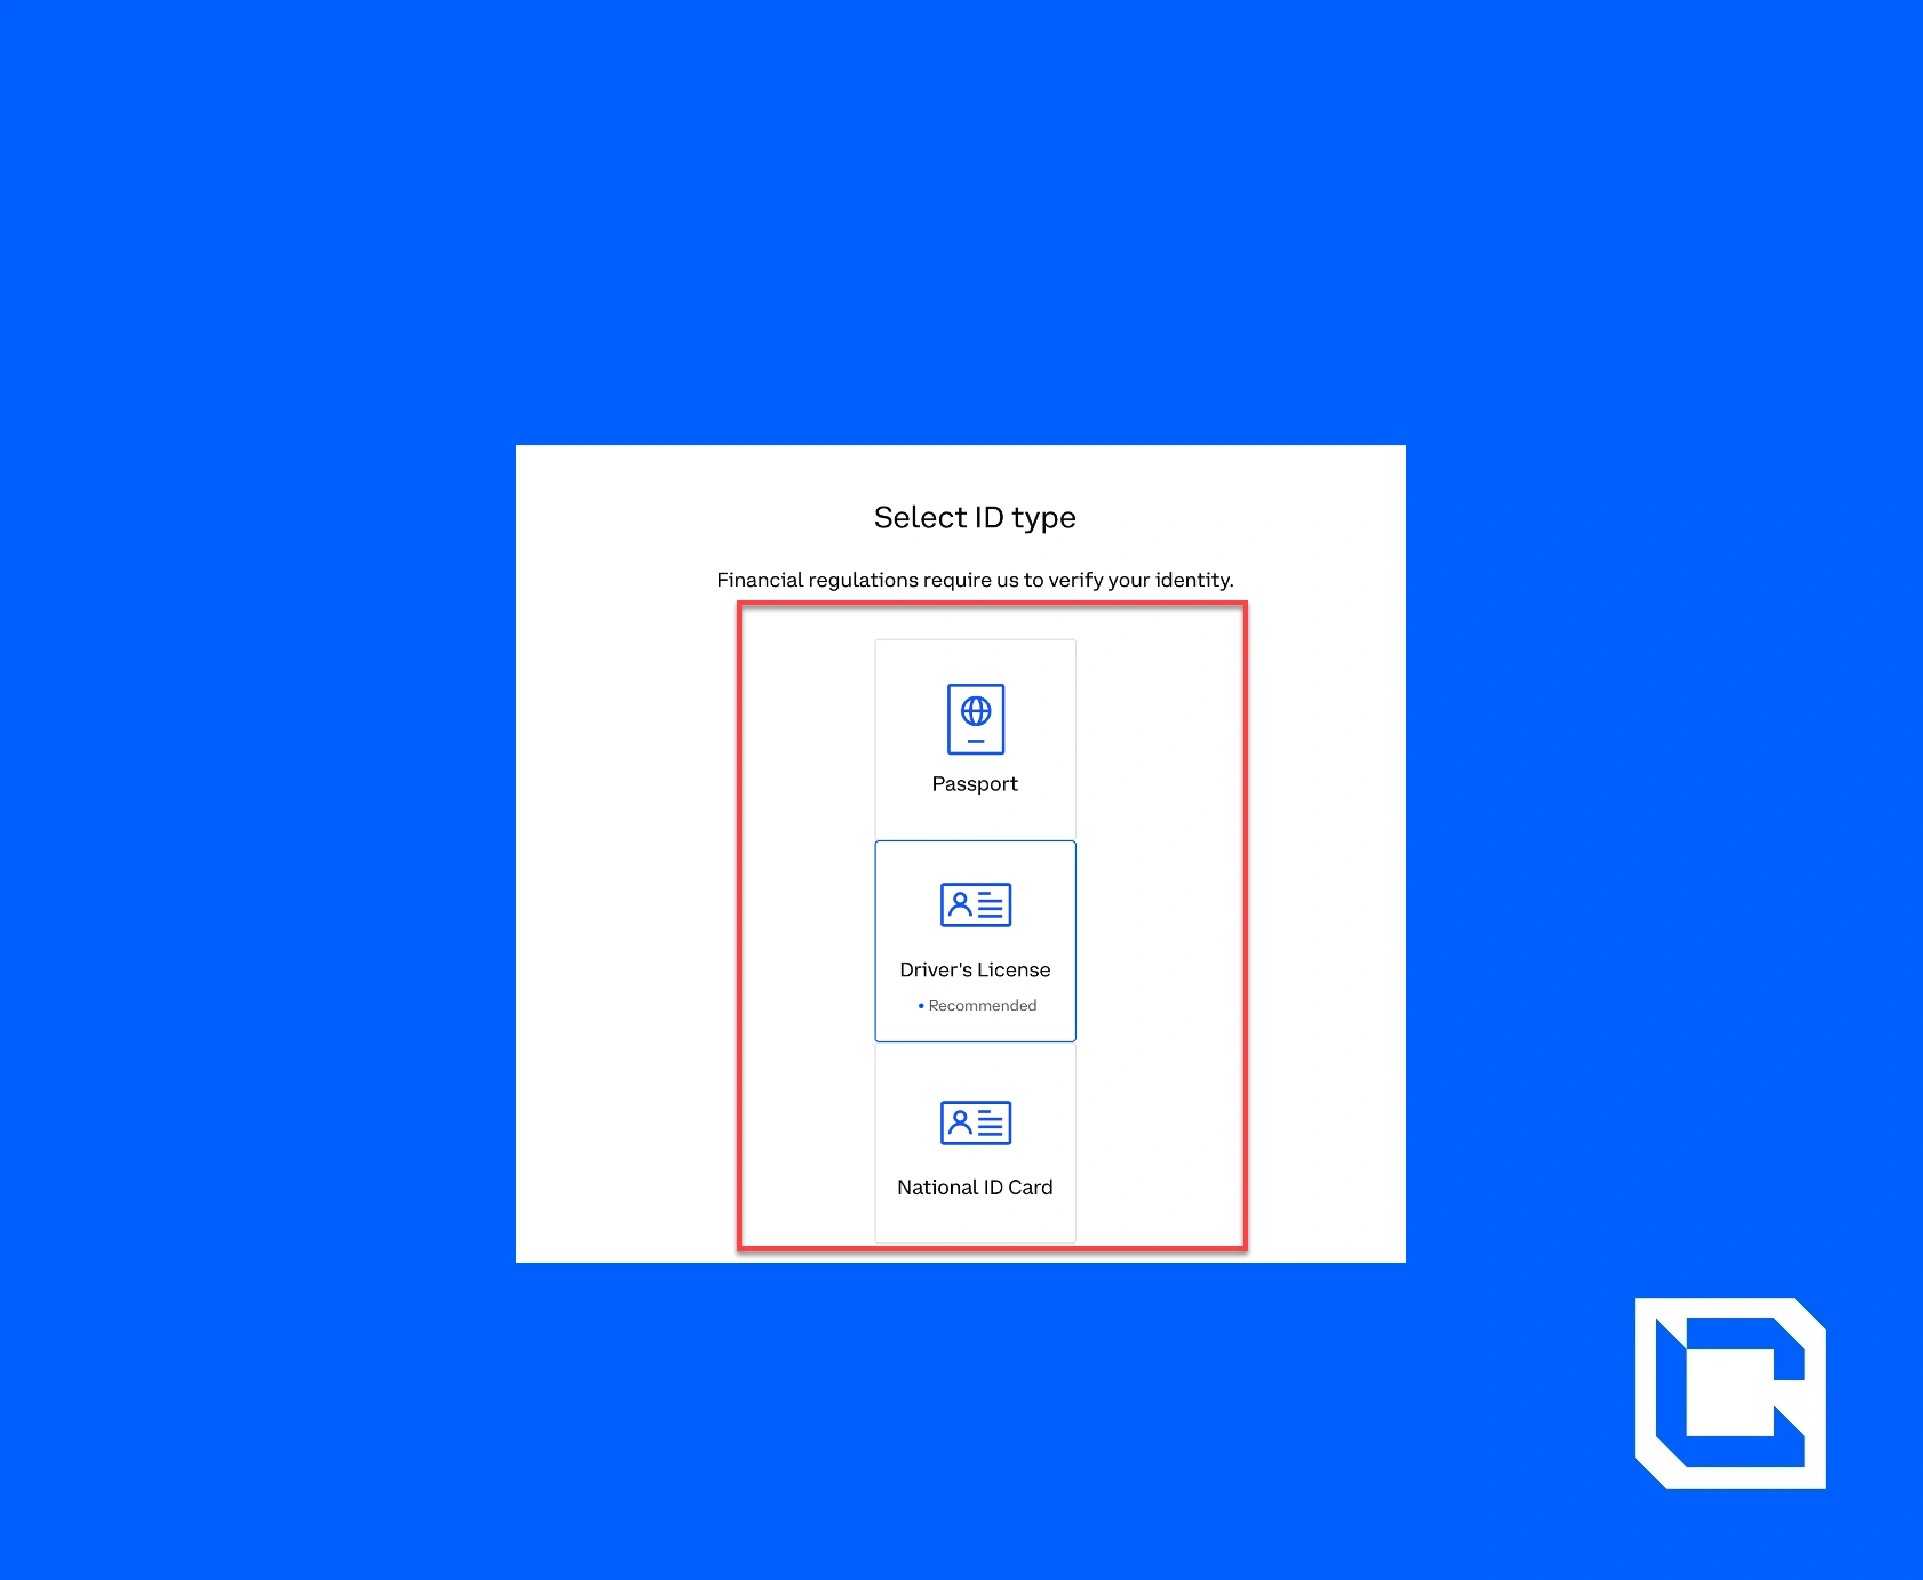
Once you've uploaded an image of your ID, Coinbase will begin the verification process.
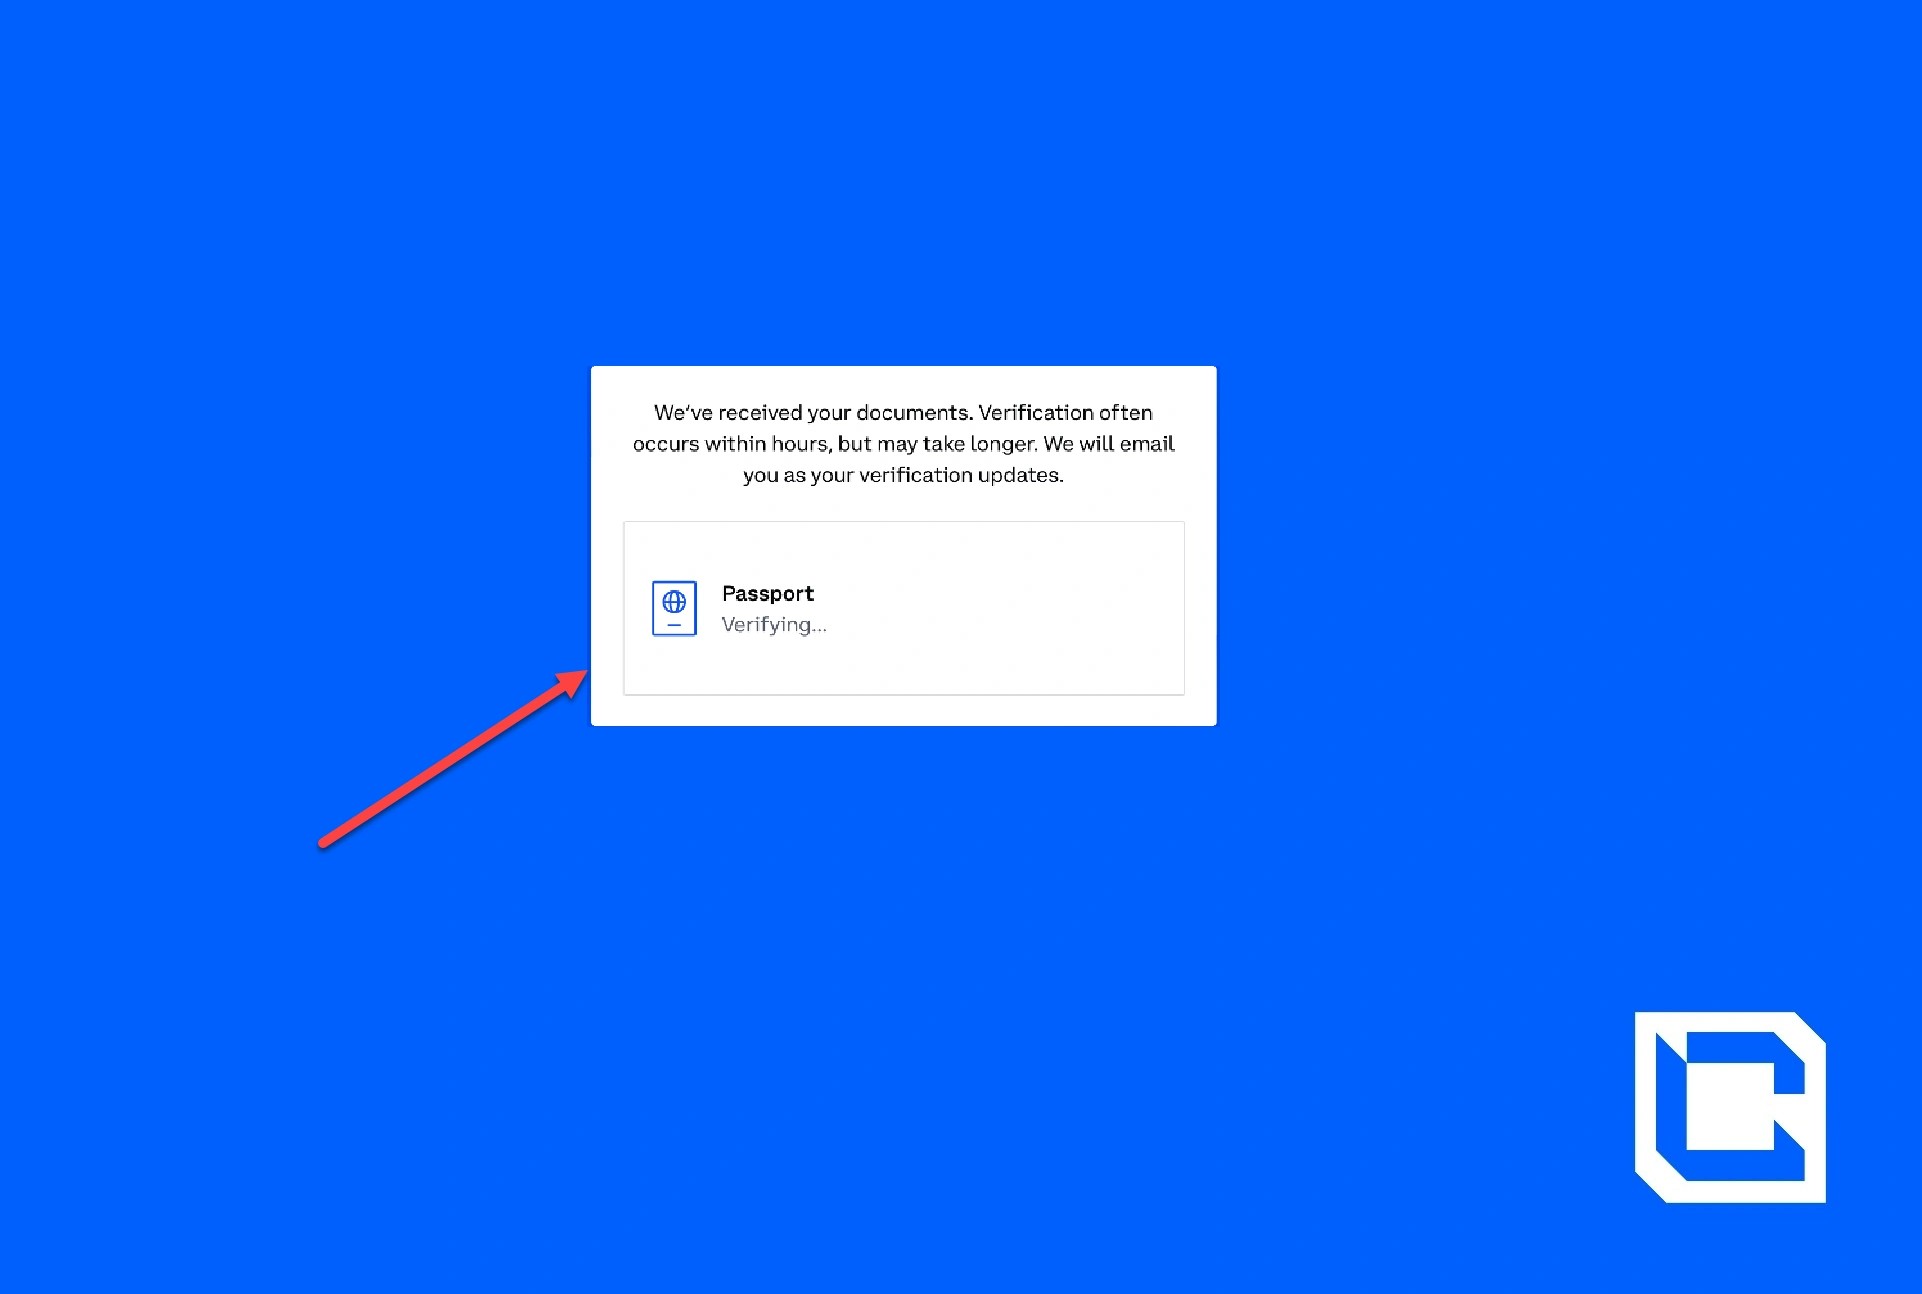
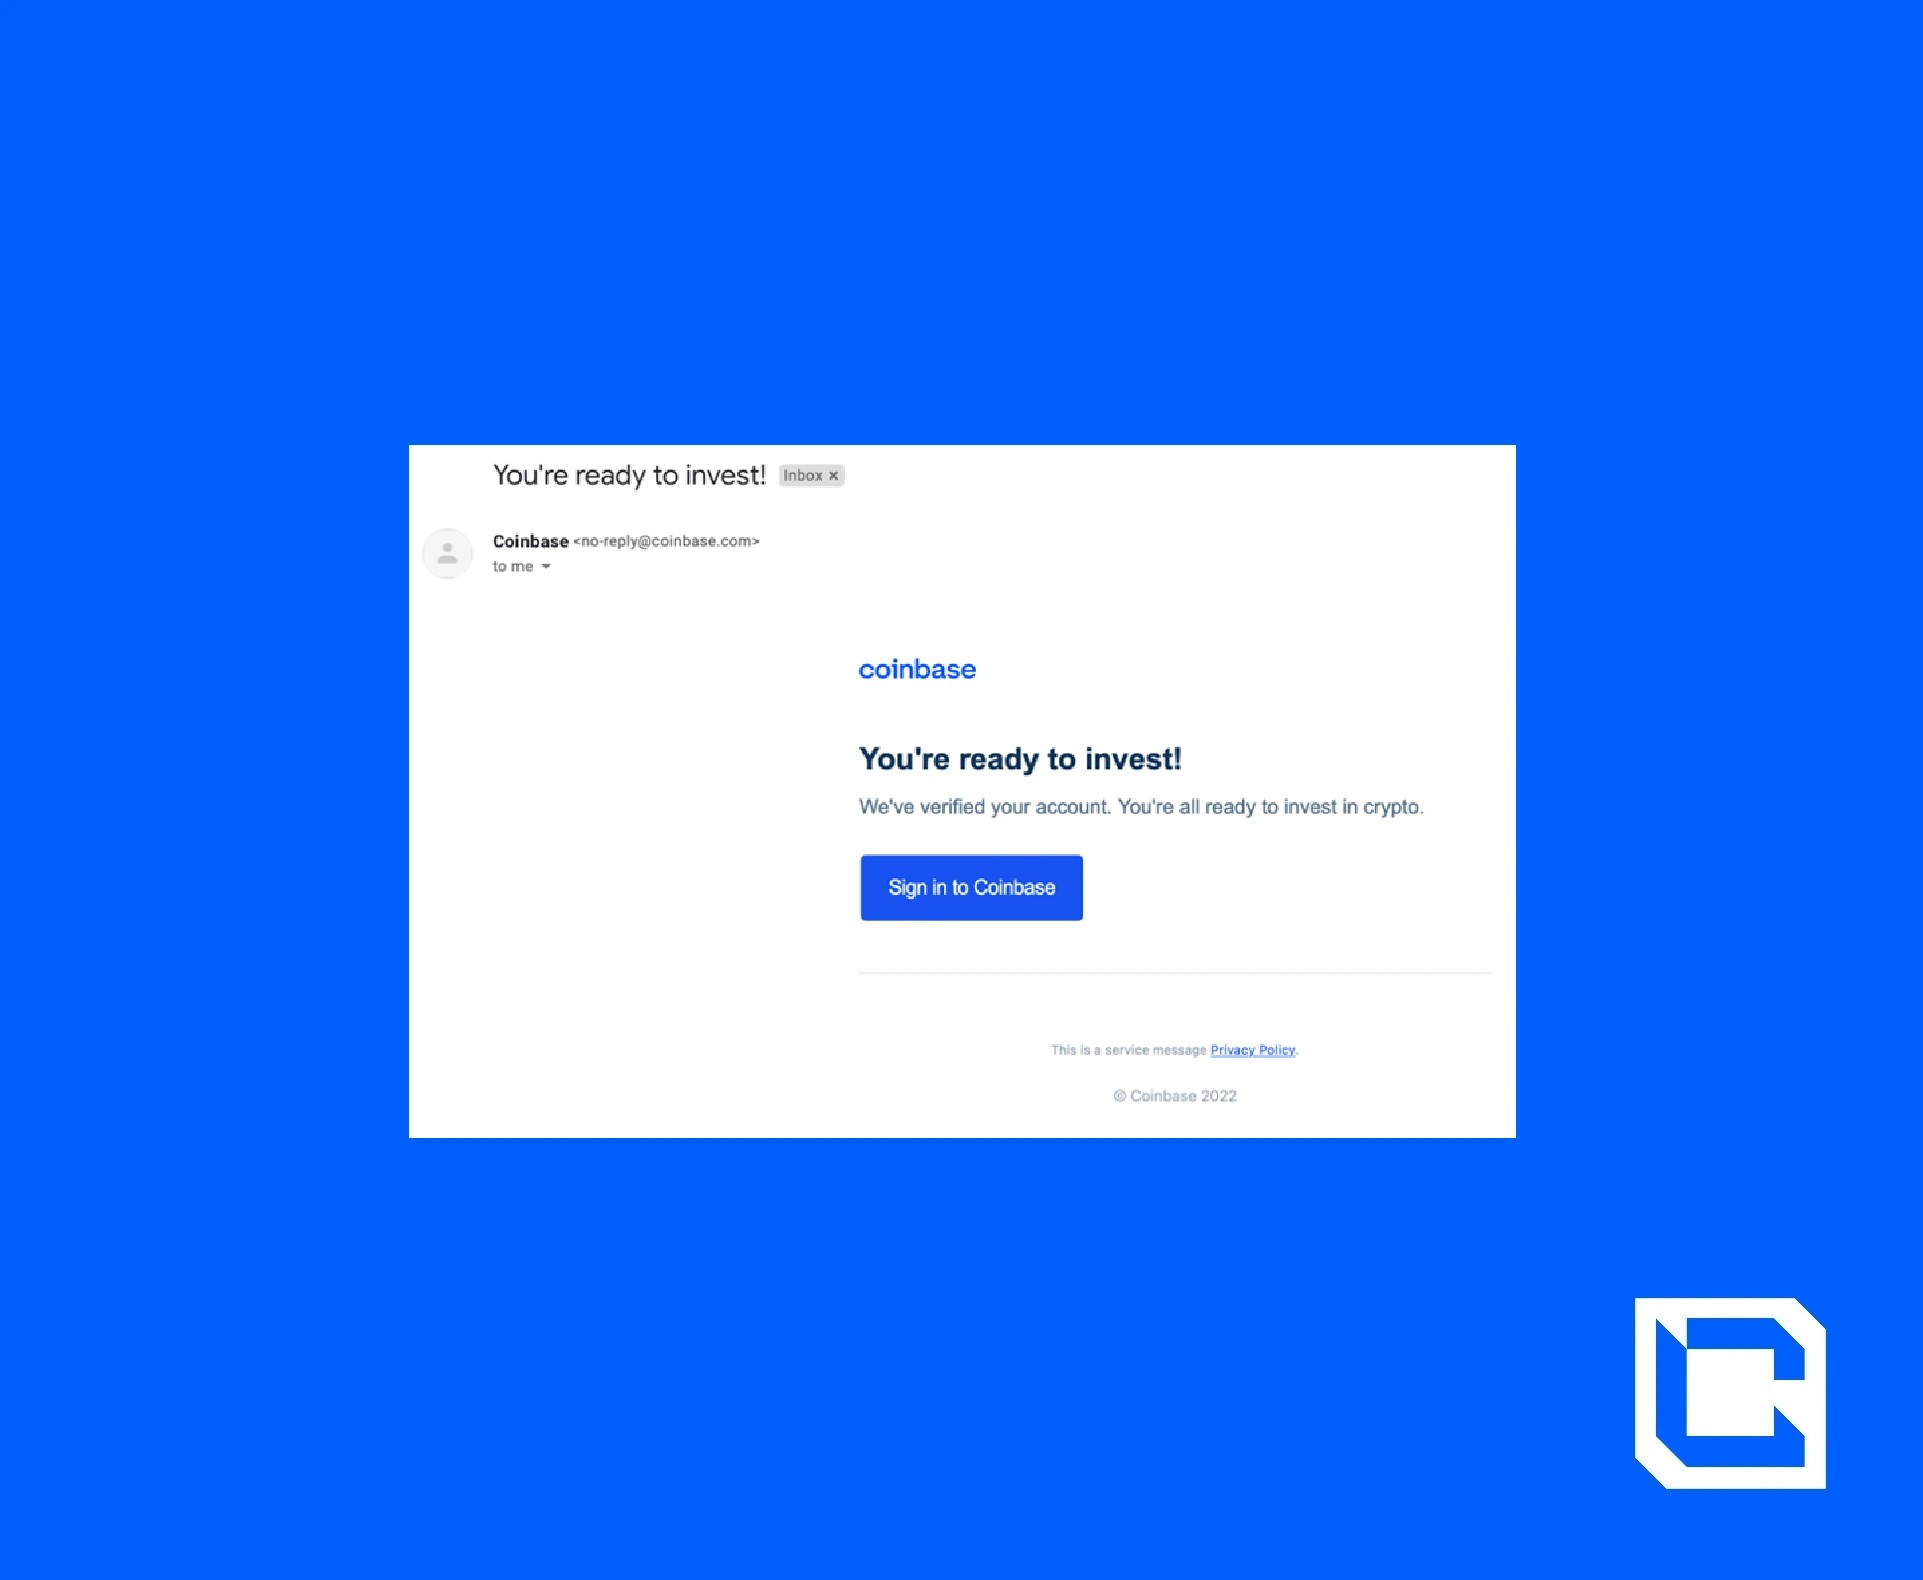
This process can take anywhere from a few minutes to a few days. You'll receive an email when the process is complete.
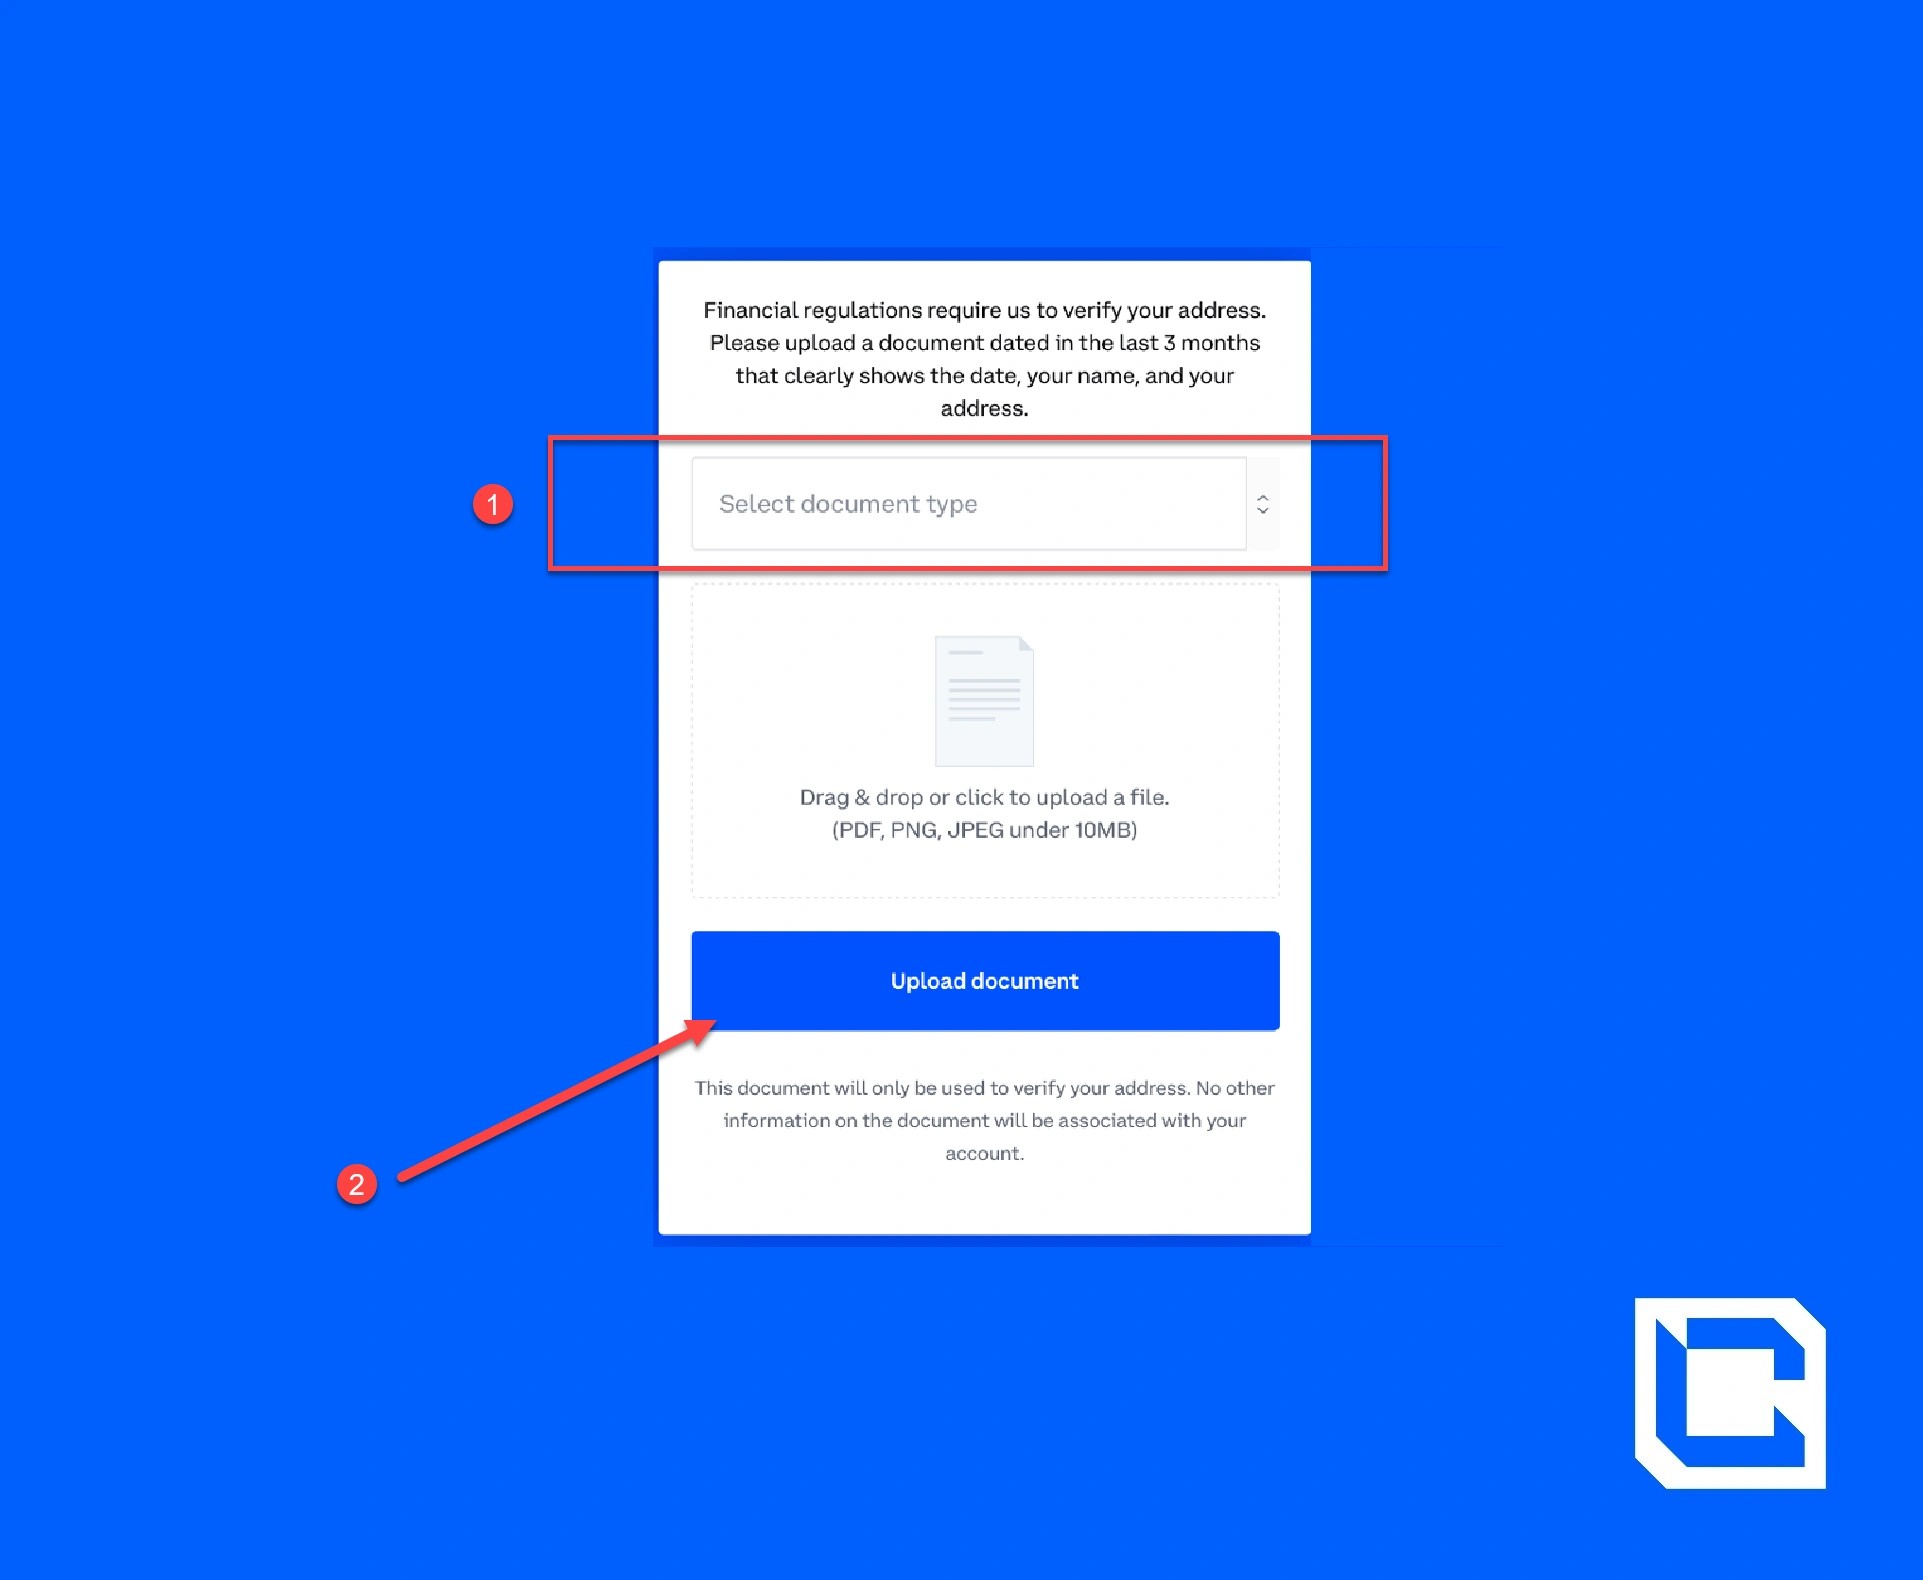
When you click on the 'sign in to Coinbase', you'll be instructed to upload an image of a document to verify your home address (utility bill or credit card statement ). Again, this can take a while to process.
When you sign back into Coinbase, your homepage should look something like this.

Next, you'll want to add your payment method. If you want to add a credit or debit card, the easiest way to do this is by clicking on the 'add payment method' button displayed on your home screen.
From here, you can enter your card details. Coinbase will automatically add the name and address you used to set up the account.
If you want to add a different payment method, click on your name in the top right-hand corner of the screen and then click 'settings'.
In the 'payment methods' tab, press the 'add payment method' button.
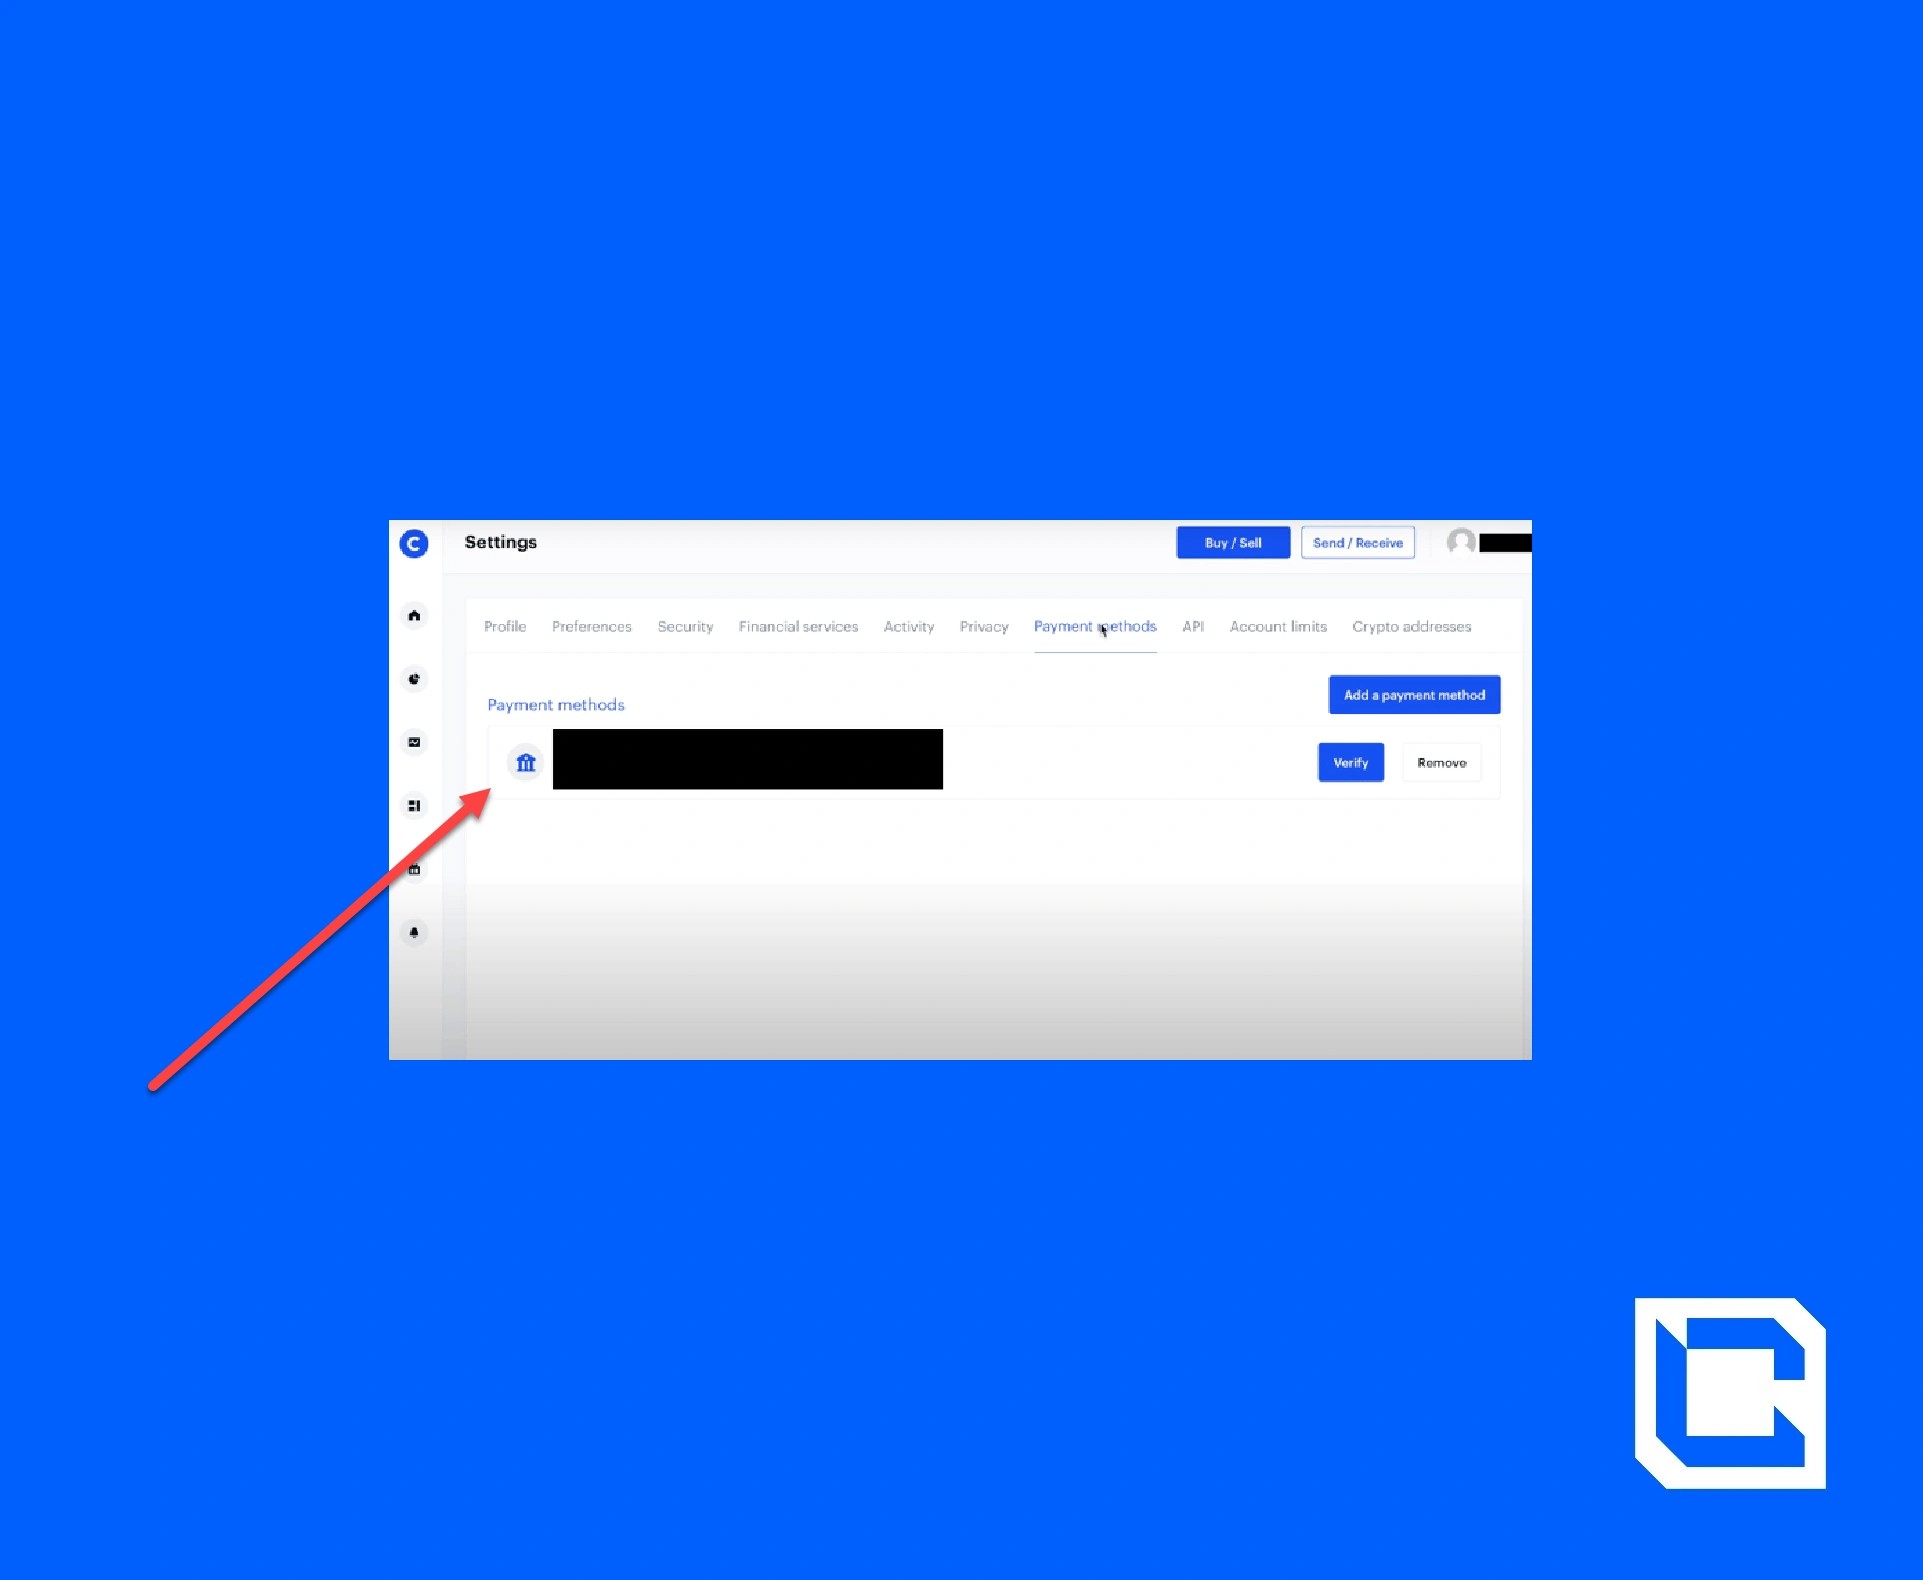
Here, you'll have the option to choose from several different methods, such as PayPal or a bank account. Simply click on the option you want to go with and follow Coinbase's prompts.
Still, in settings, the 'profile' tab is where you can change things like your display name, profile image and account passwords.
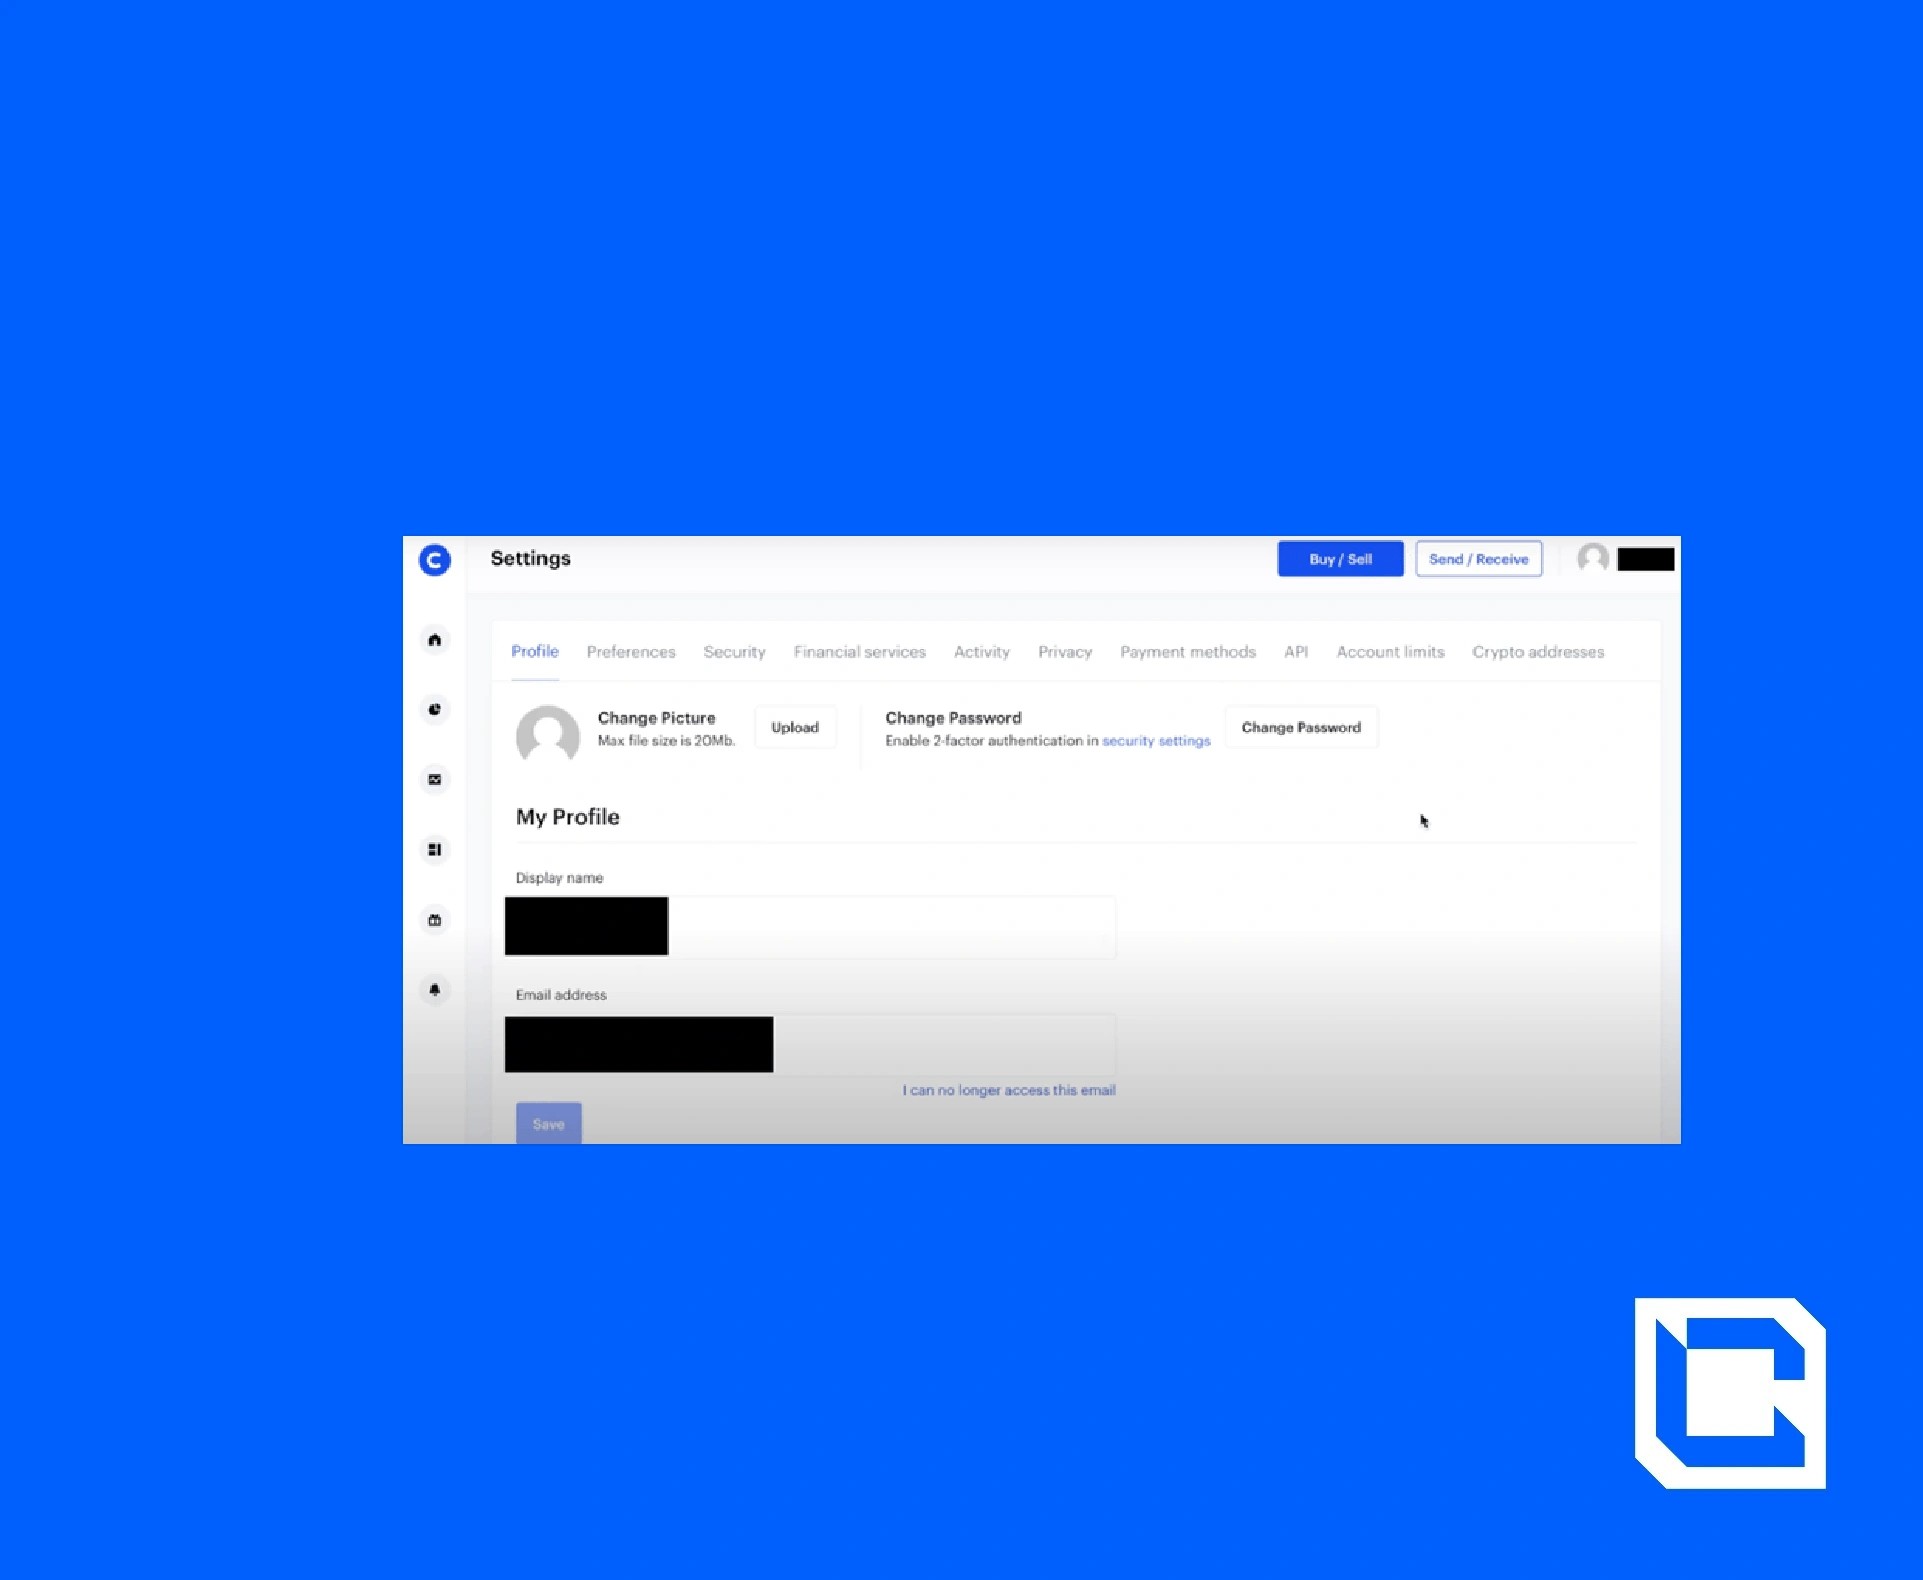
The 'security' tab is where you can select your 2-step verification method. You have the option to verify via text, an authenticator app, or your security or hardware keys.
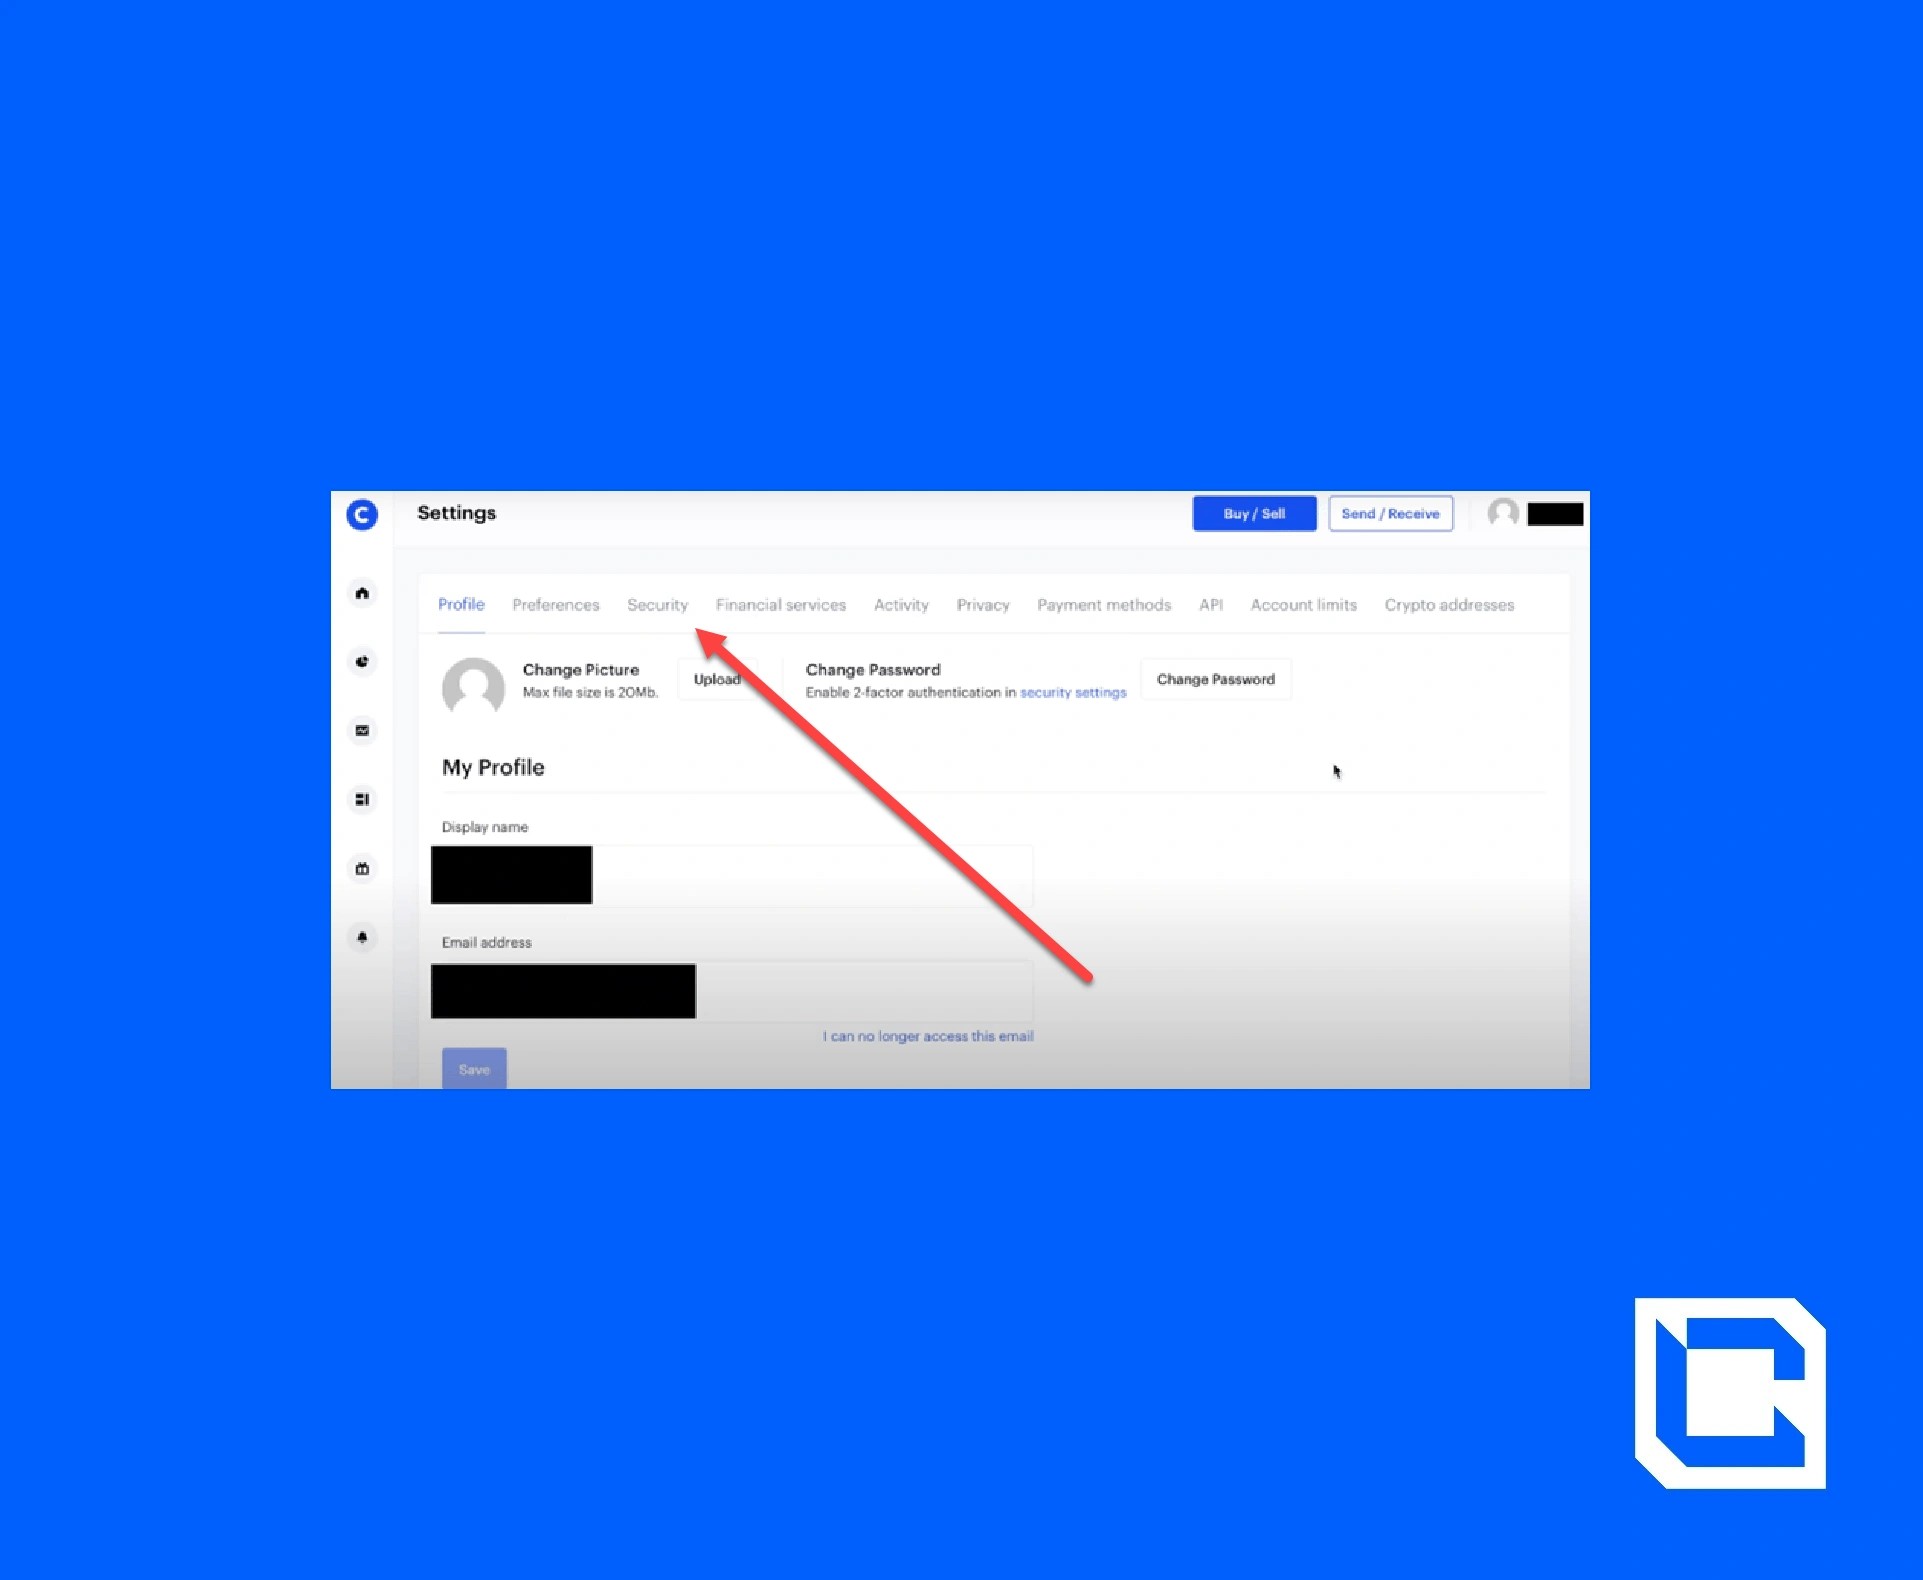
In the 'activity' tab, you will see your account login history.
Navigating your Account
Homepage
To the left of your screen, you'll notice a column of icons. The house icon will return you to your account's homepage.Portfolio page
The second icon down will bring you to your portfolio page. Here, you will be able to view all the assets (e.g. crypto coins, fiat currency) that you currently hold in your Coinbase account.
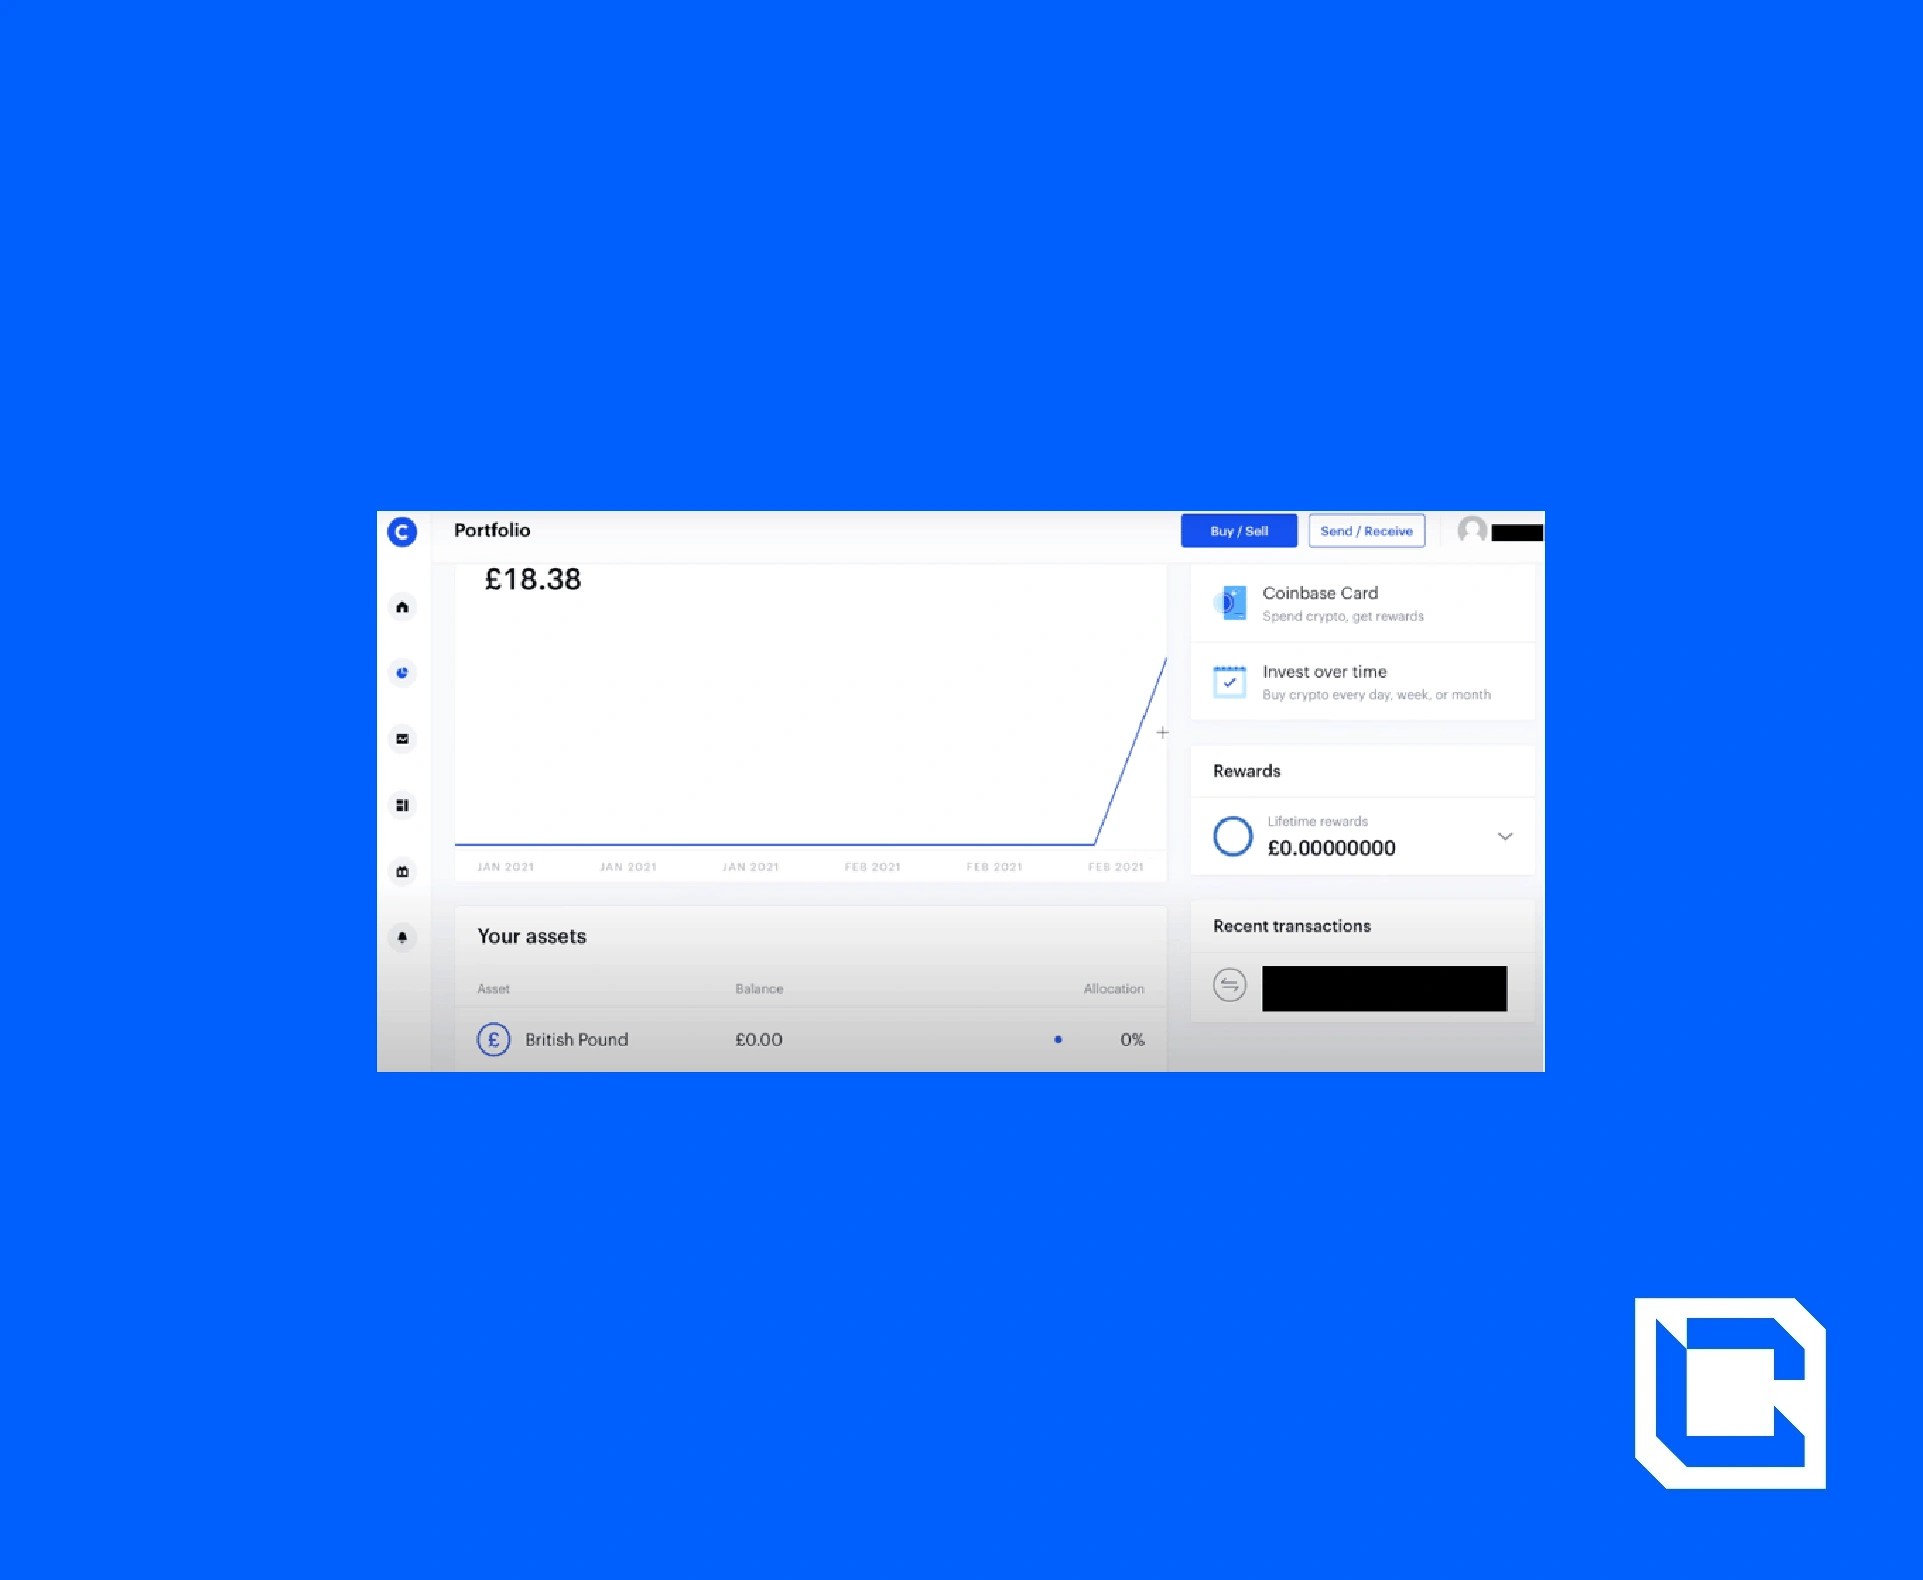
Your portfolio page is also where you can view your recent transactions as well as any rewards you might have earned via staking, which we will go into more detail on later.
Prices tab
The 3rd icon down is the 'prices' tab. This is where you can view up-to-date market values of all the cryptocurrencies that Coinbase supports.
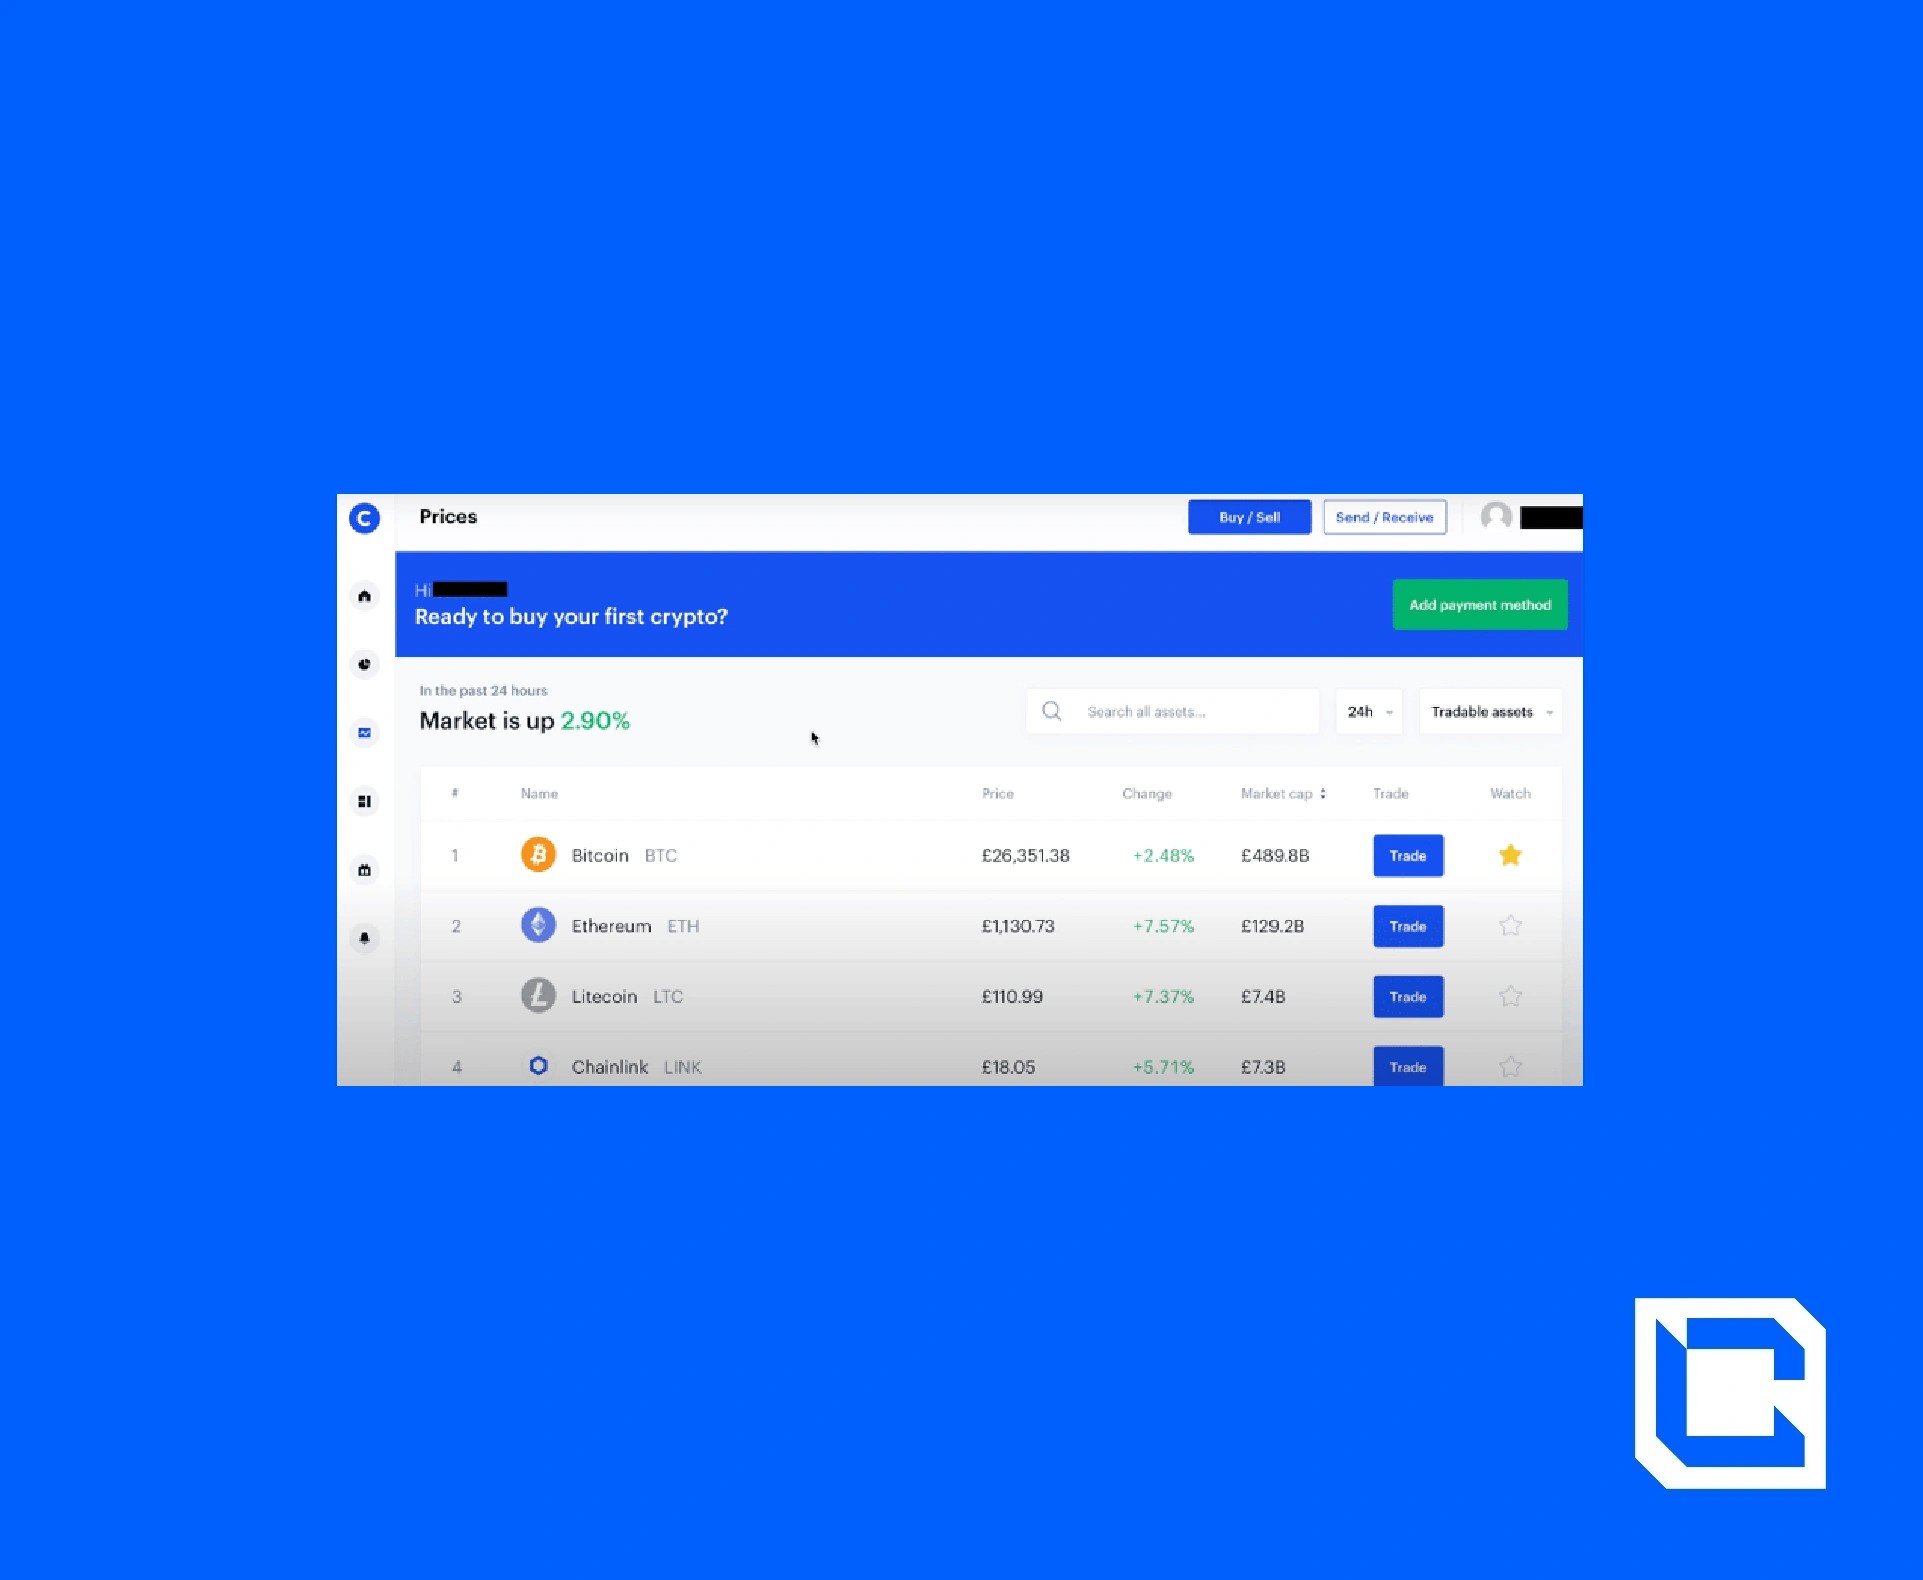
Each cryptocurrency is listed according to its market capitalisation (i.e. the current price of a single coin x number of coins in circulation). This page also tells you what percentage the overall market is up or down by over the last 24 hours.
If there is a particular cryptocurrency that you're looking for, then you can type in the name (e.g. Bitcoin) or the coin's 'ticker' (e.g. BTC) into the search bar.
When you click on a cryptocurrency, you will be brought to a page that looks like this.
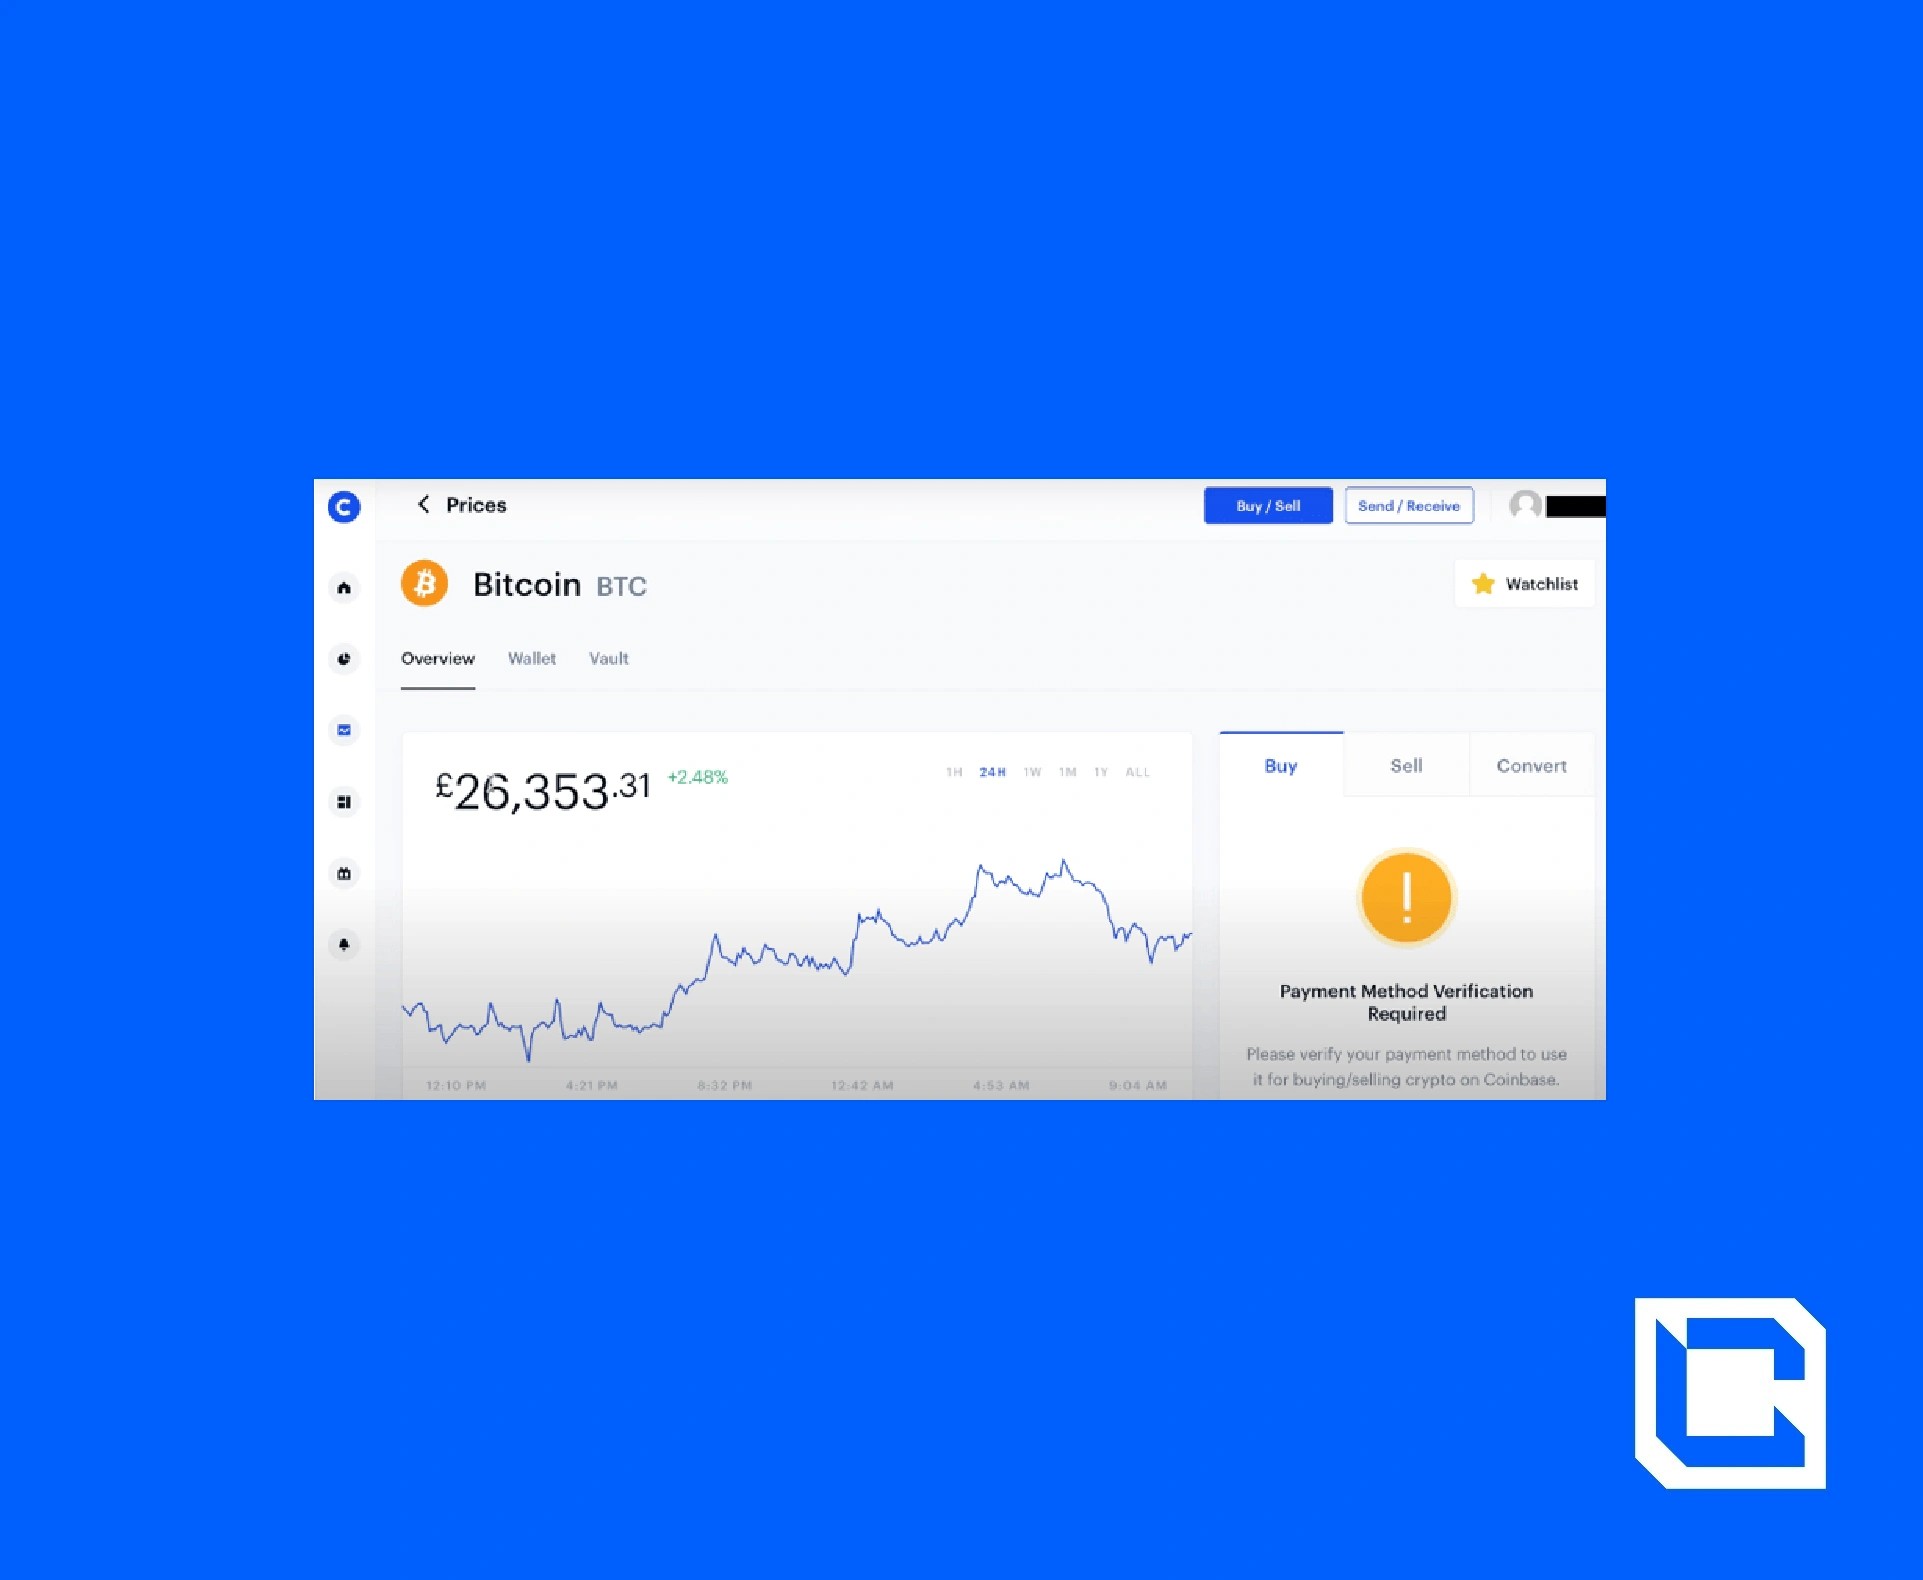
If you want to keep a close eye on a coin's market value, then you can add it to your 'watchlist', which is displayed on your account's home screen.
The main graph on the screen displays a price chart for the coin against your country's fiat currency. You can alter the time scale that the chart is presented in by clicking on the different time frame icons in the top right corner of the chart.
Below the graph, you will find some more information.
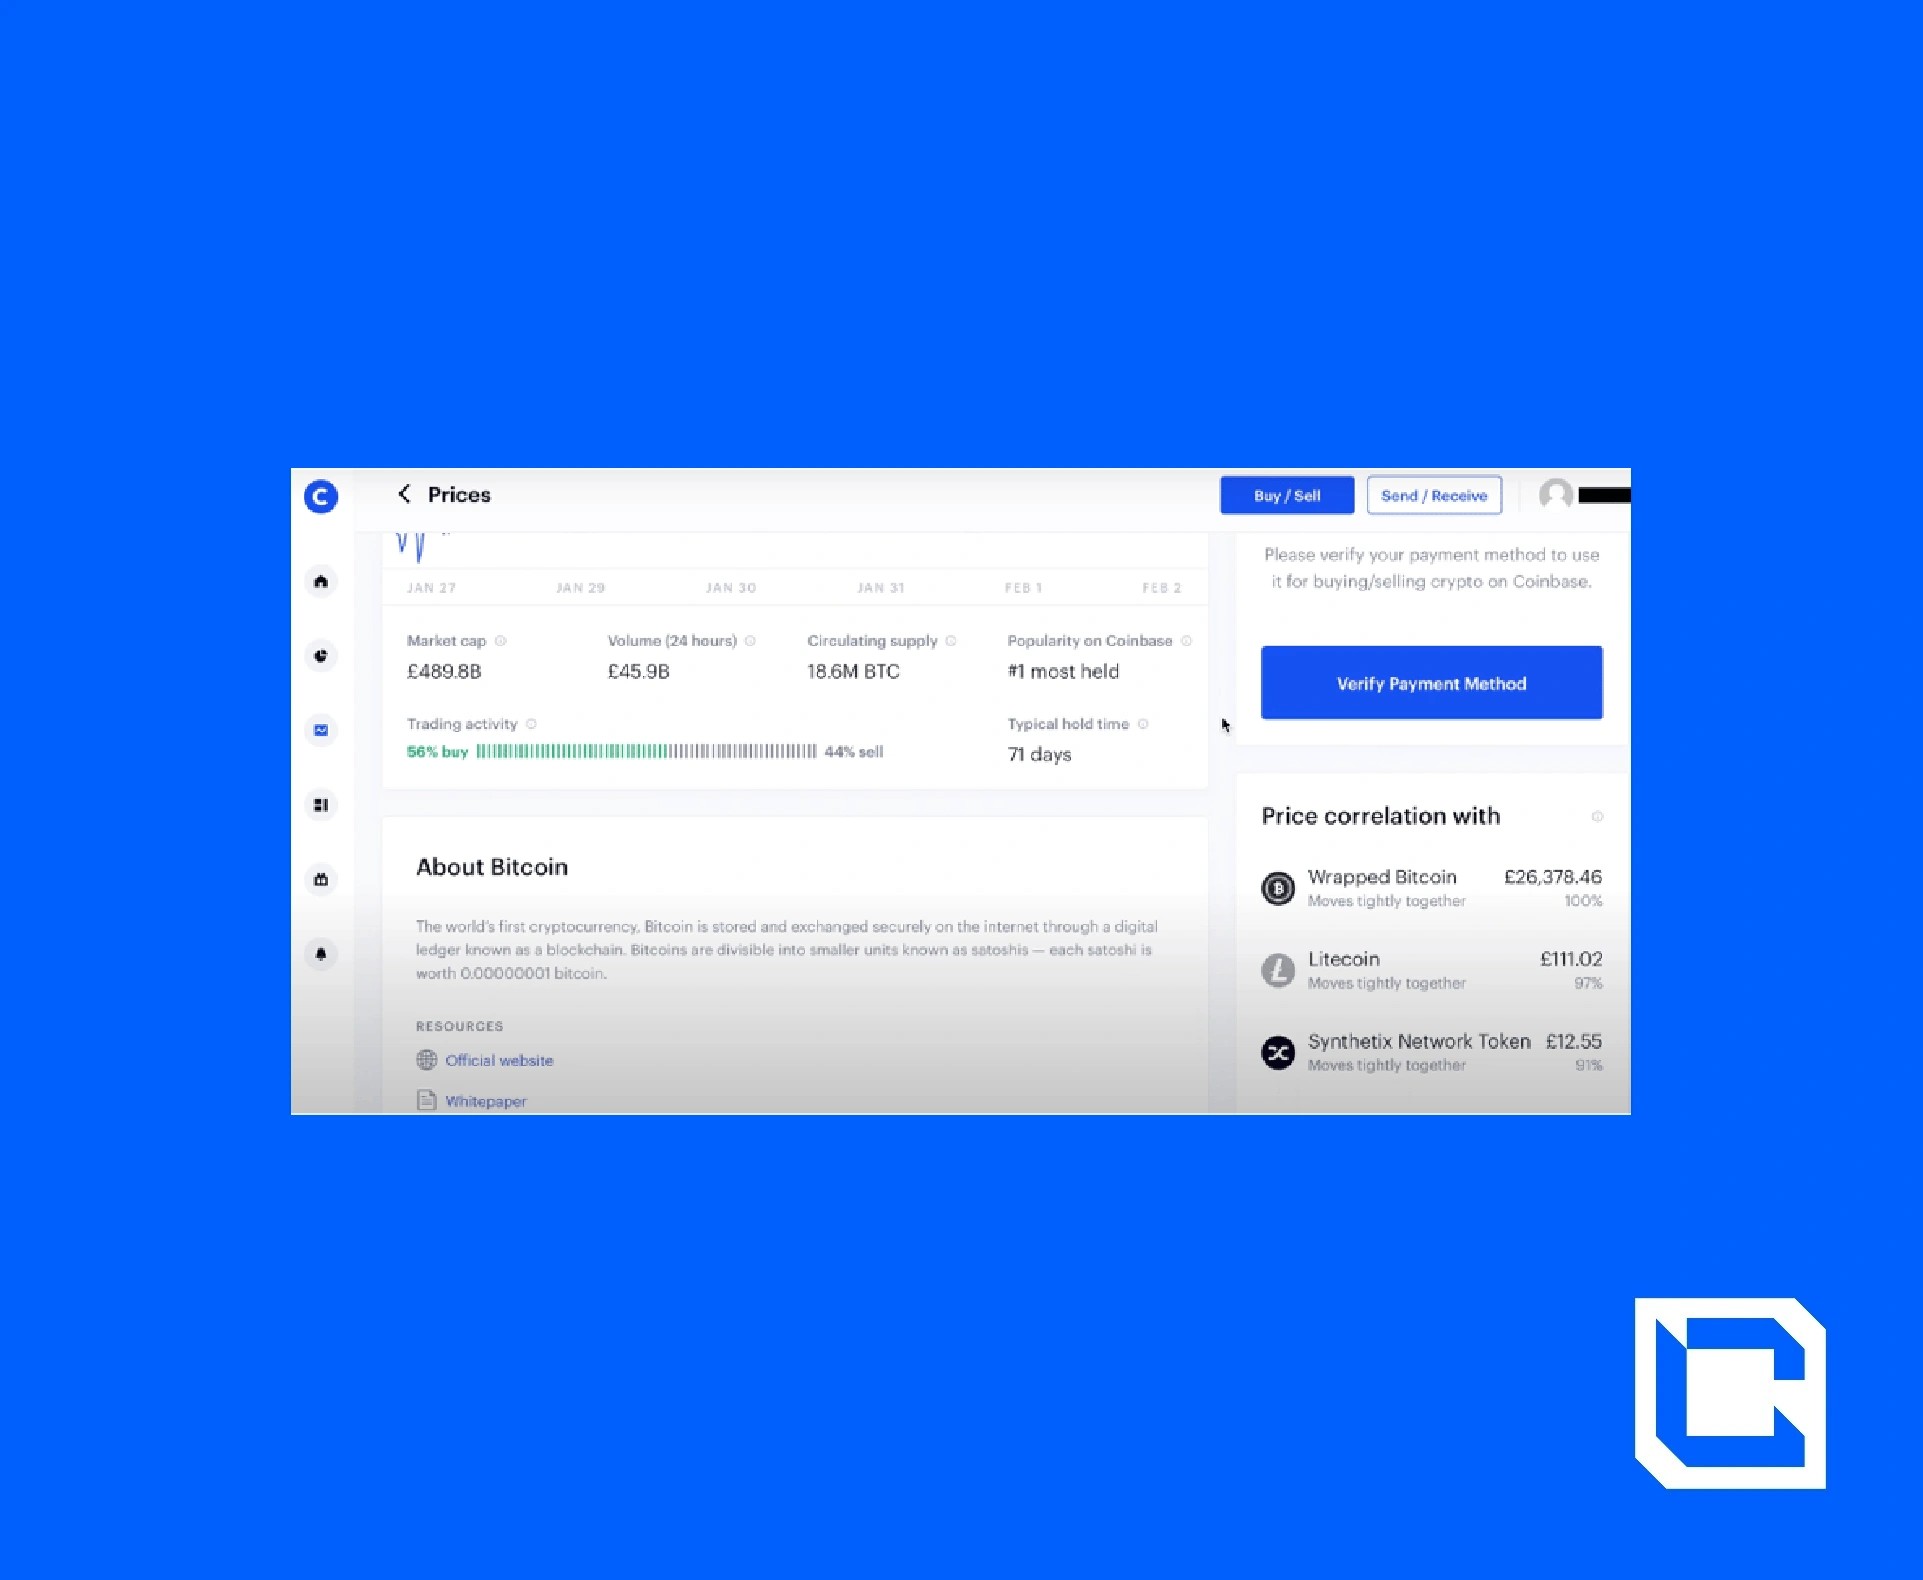
The 'volume' price indicates the amount (in fiat currency) of the cryptocurrency traded over the last 24 hours. 'Circulating supply' tells you how much of the currency is in circulation. Coinbase also ranks each coin according to its popularity.
The 'trading activity' gives you an indication of the percentage of the currency that is being bought and sold.
If you scroll down a bit further to the right of the screen, you will see a 'price correlation' section. Here, Coinbase shows you the degree to which the price fluctuation of other currencies correlates with the price fluctuation of the coin you are looking at.
For You page
The fourth icon down will bring you to your 'for you' page.
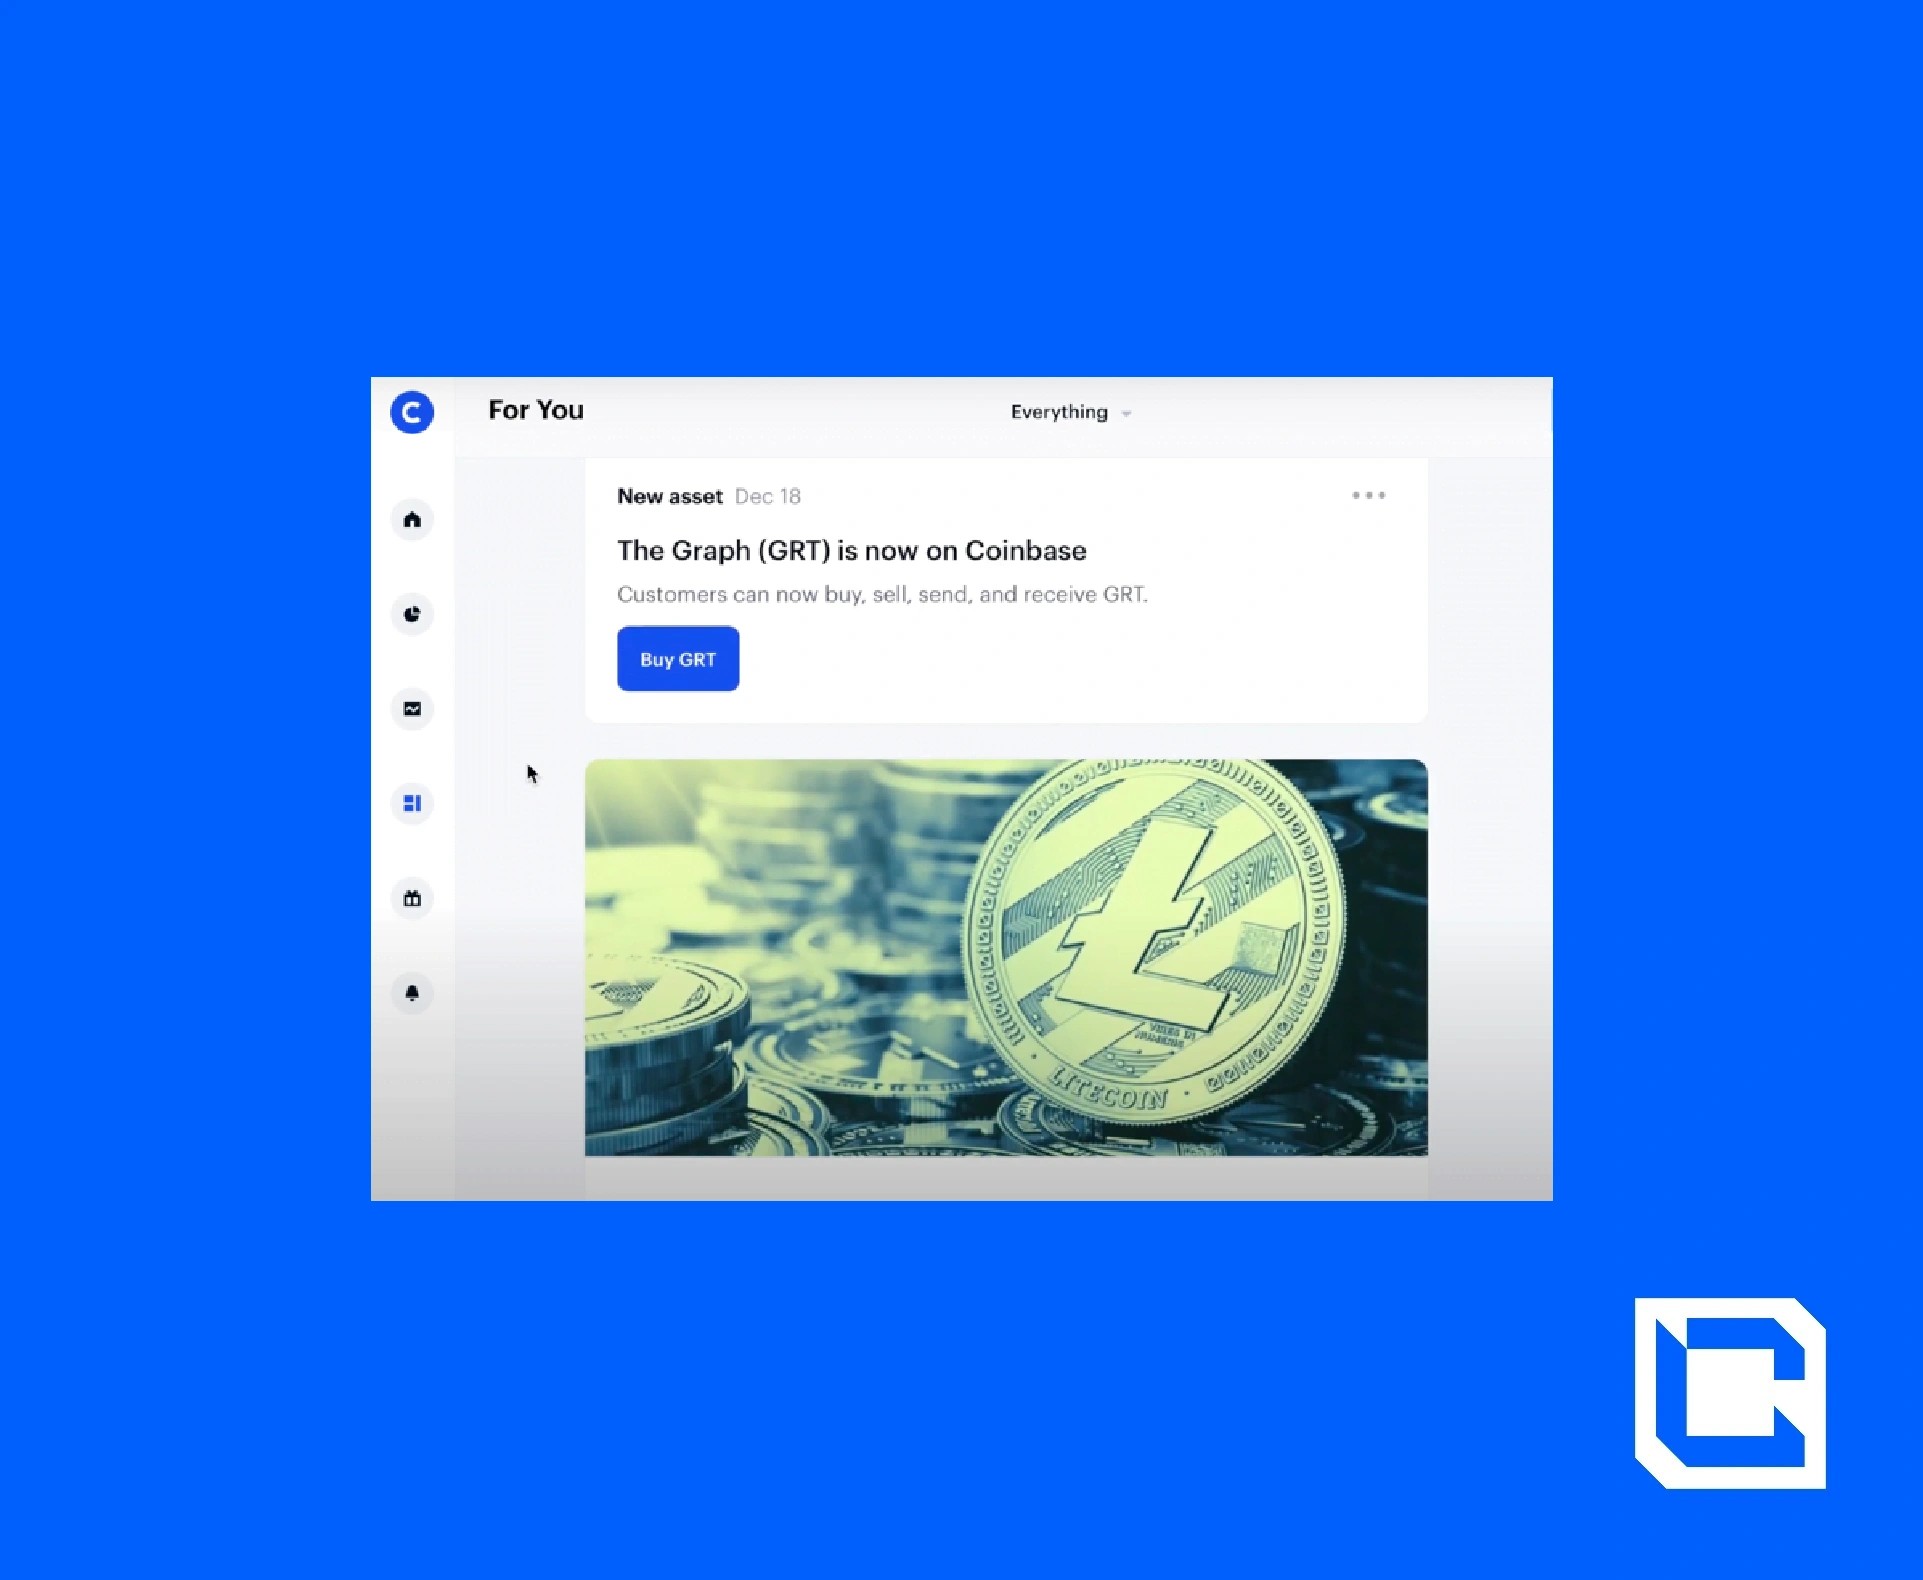
This page is where you can find Coinbase's recent articles and daily news updates.
Rewards page
The present icon will bring you to the rewards page. This page lists the different ways that you can earn rewards on Coinbase.
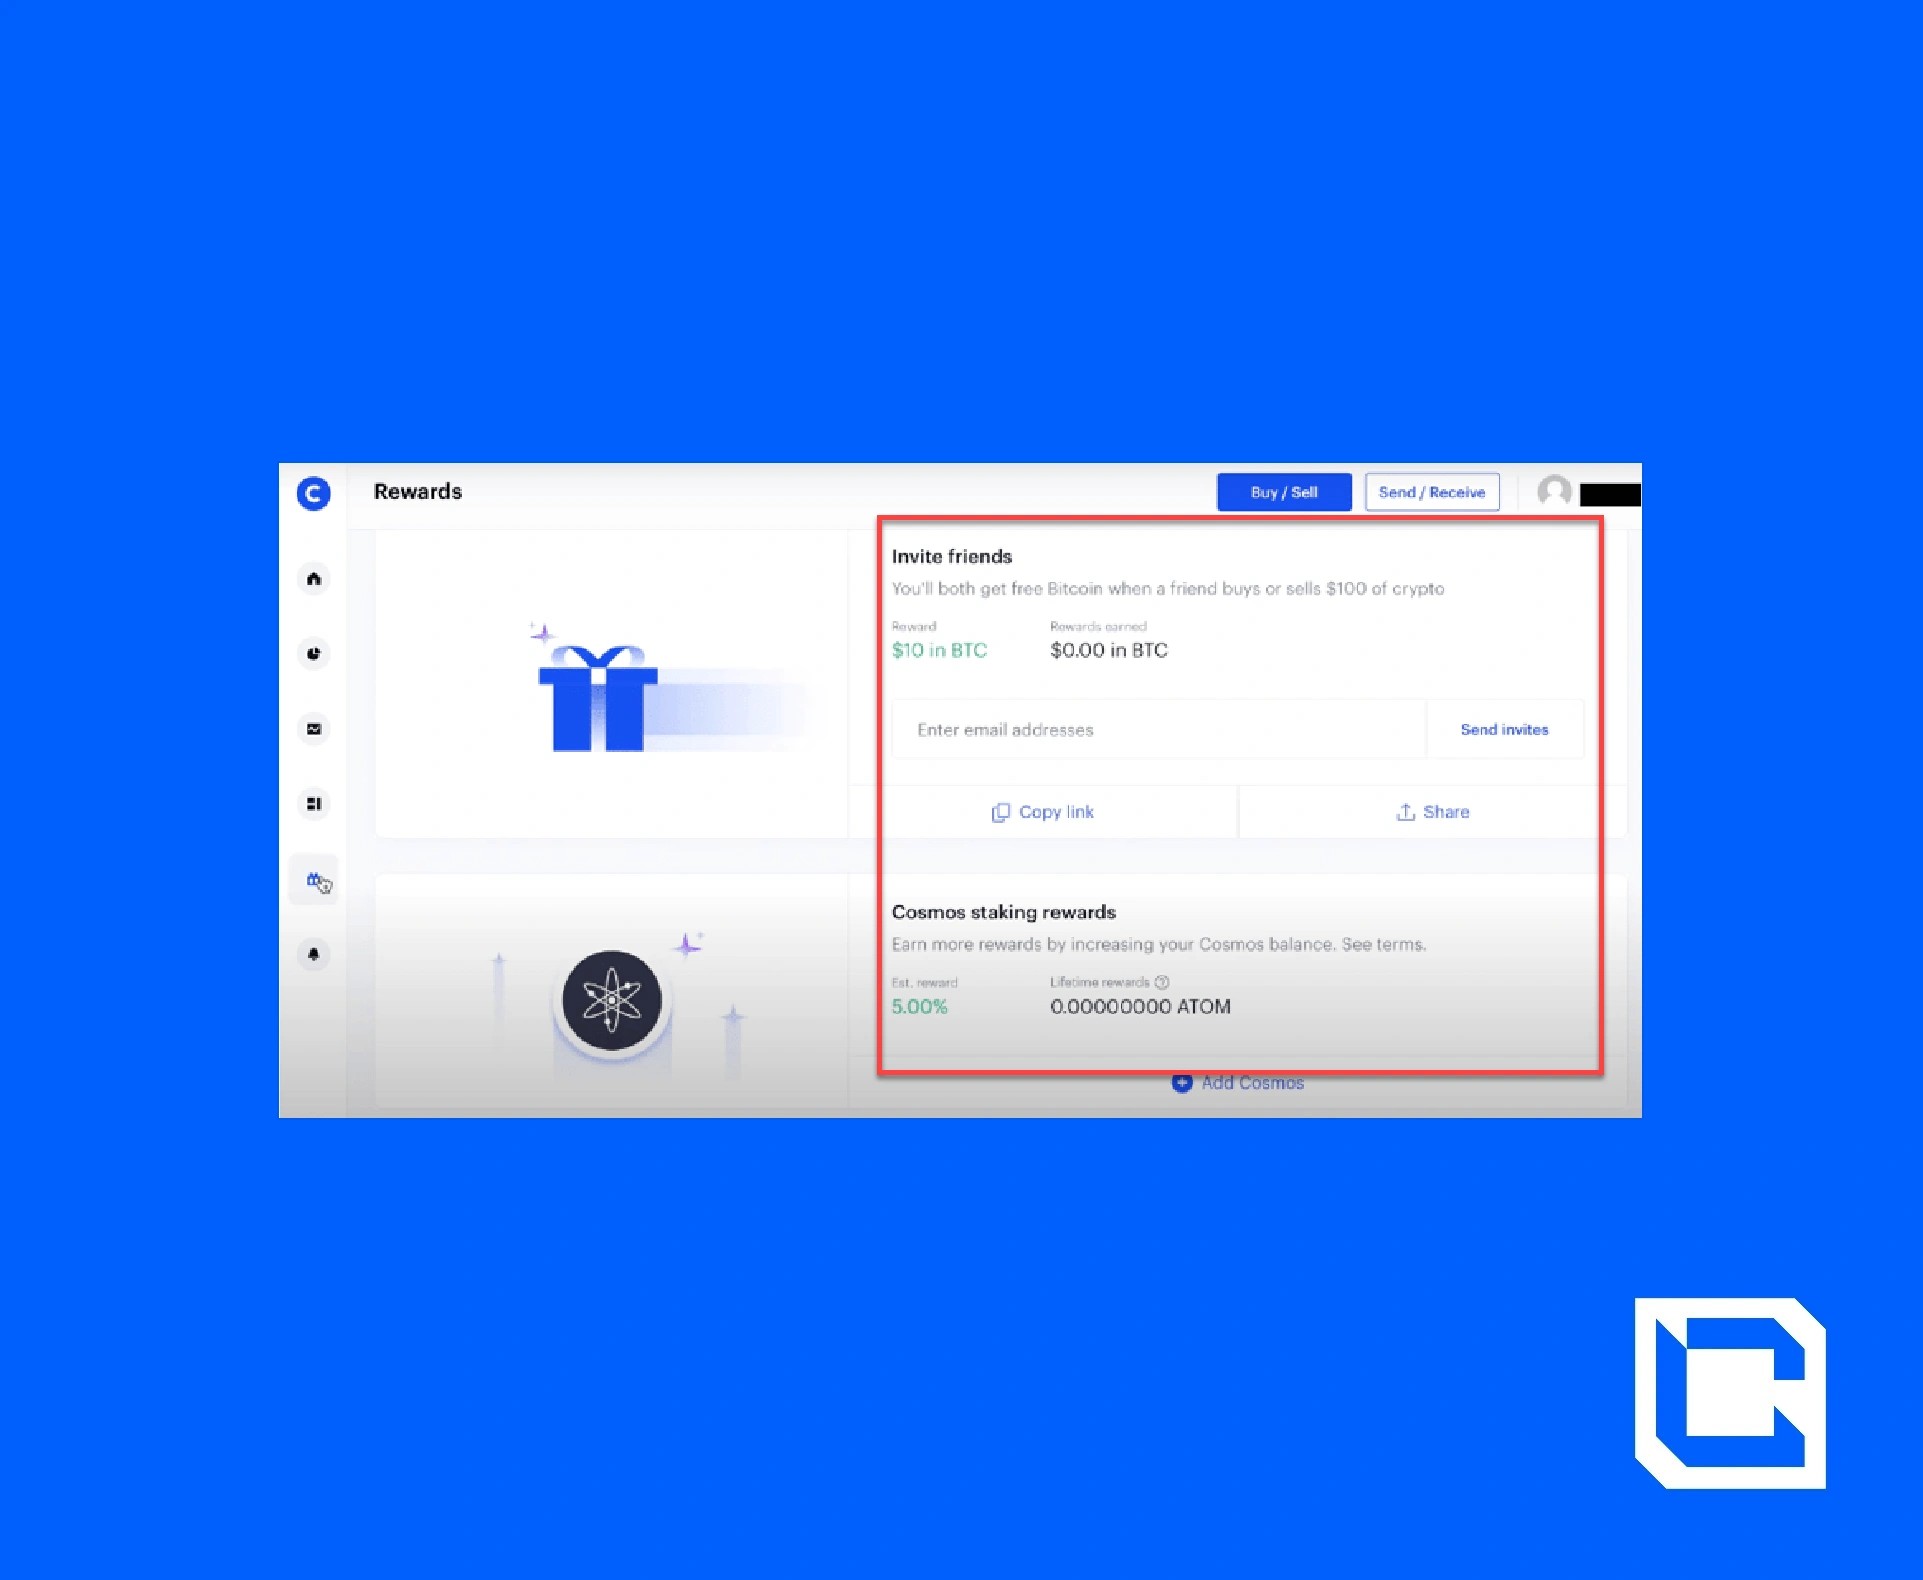
One of the main ways is by staking certain cryptocurrencies, which we'll talk about more later.
Notifications page
The bell icon is where you can view any notifications sent to your Coinbase account.Buying Crypto
To buy some crypto, click on the 'buy/sell' button at the top right of your home screen. You can also buy from the coin's info page in the 'price tag' section.If you click on the 'buy/sell' button, a pop-up screen like this will appear.
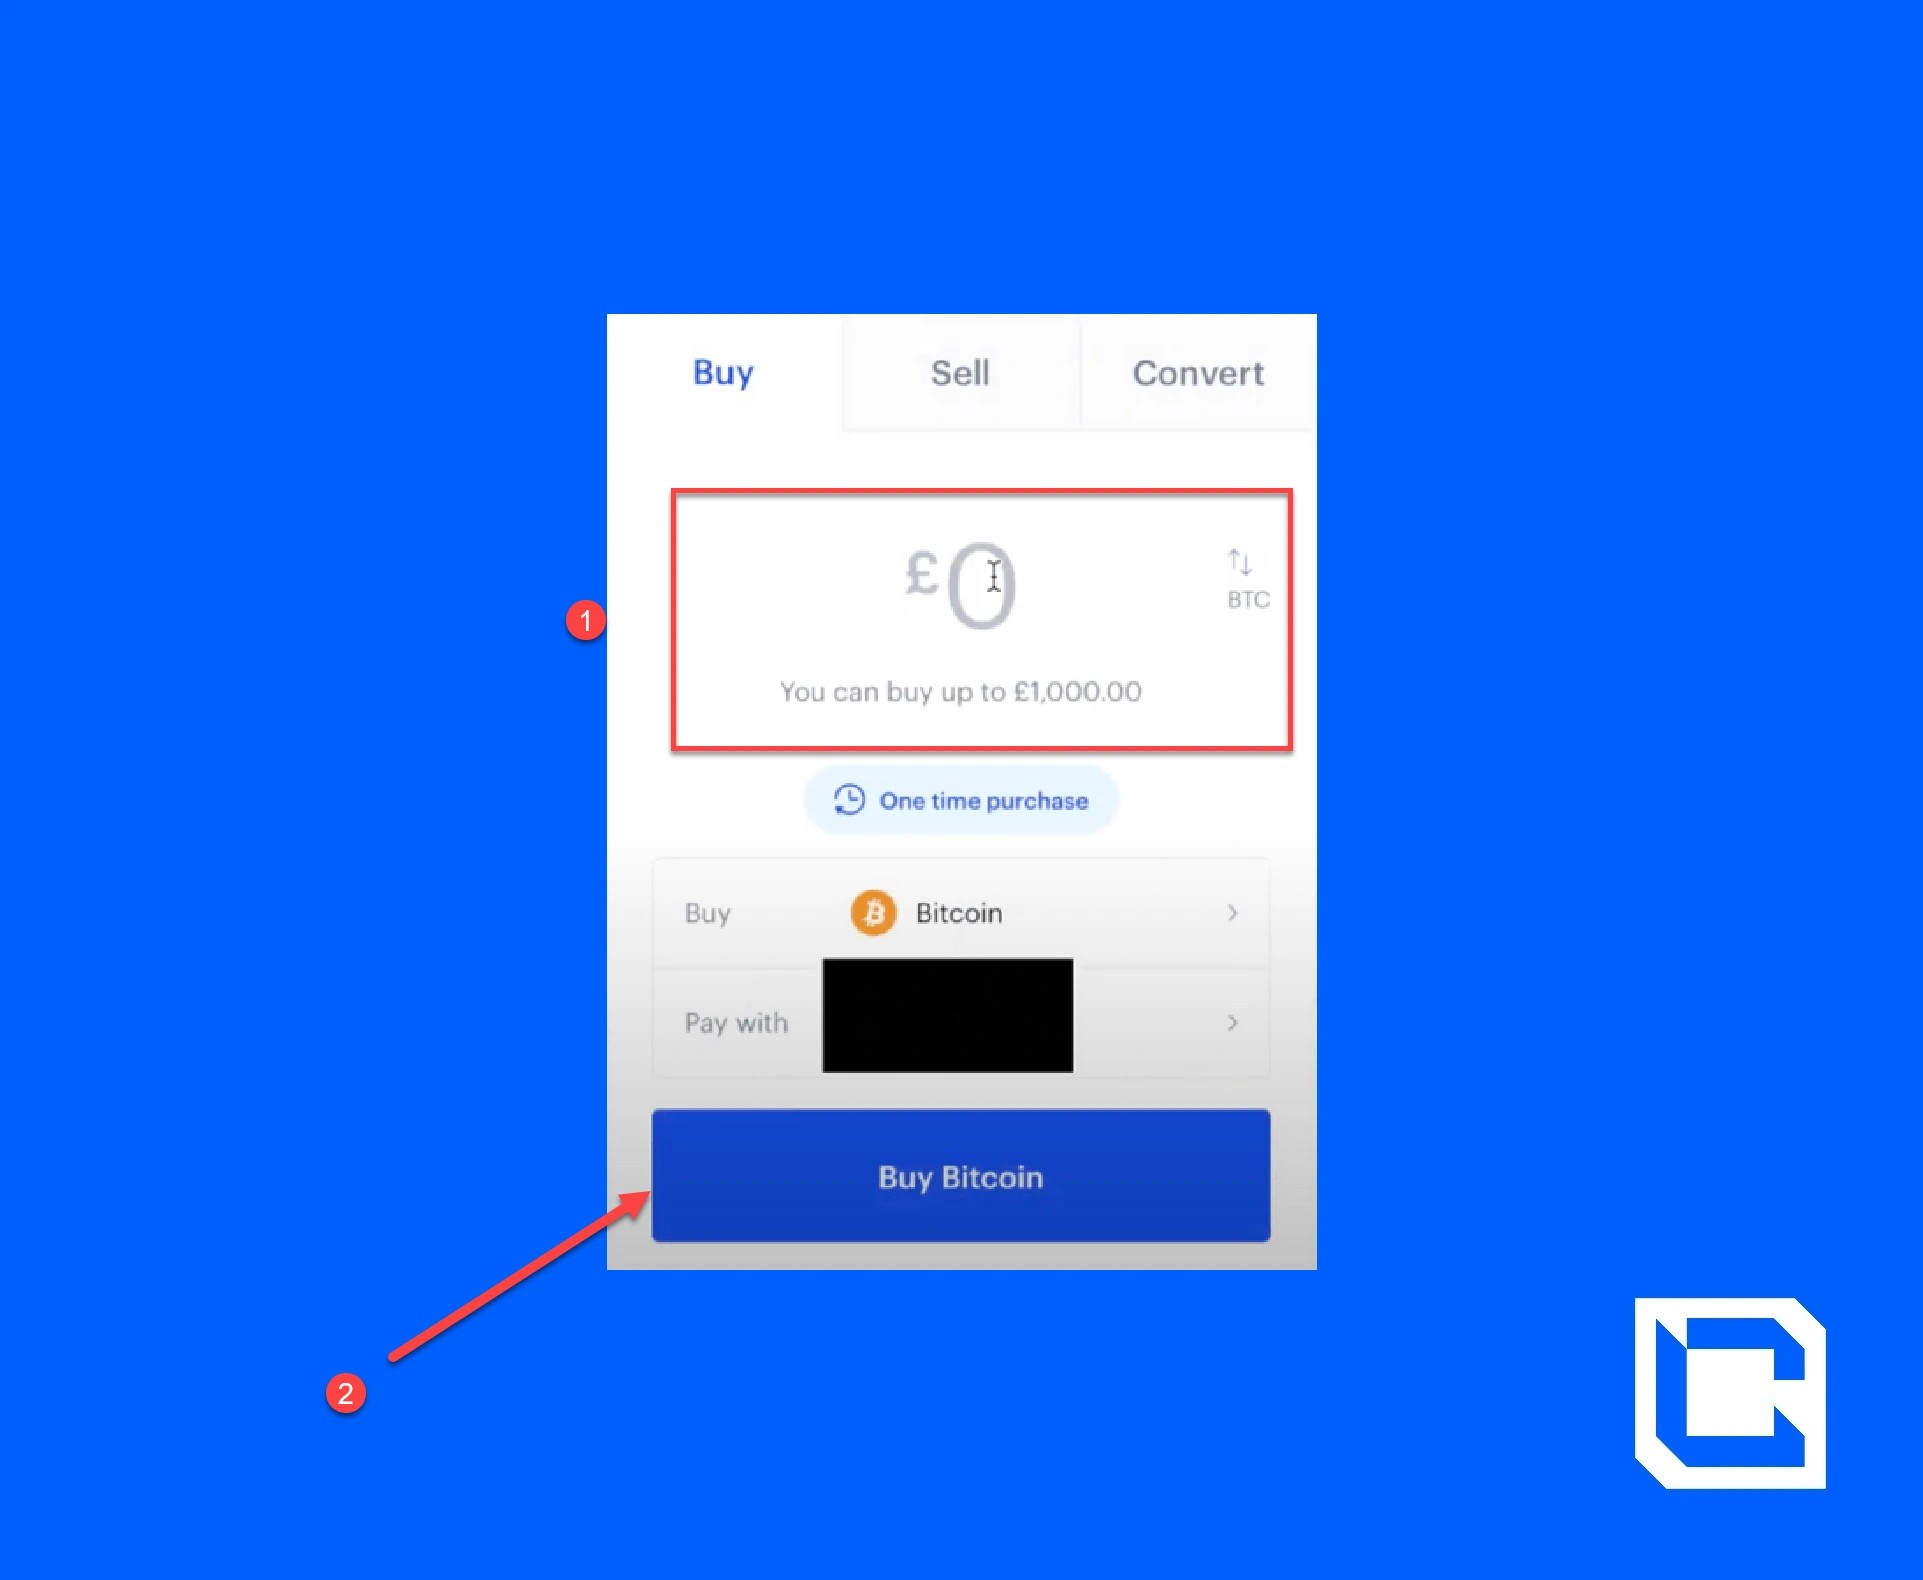
All you have to do is enter the amount of fiat currency you want to spend and select the type of cryptocurrency that you want to buy.
By clicking on the arrow icon next to your fiat currency amount in blue, you can see how much of your chosen cryptocurrency you will get in exchange. If you want to buy a certain amount of cryptocurrency, you can also change this number, and you will be charged the corresponding fiat currency amount.
Coinbase allows you to set up 'recurring buys', which is where you automatically buy some of your chosen cryptocurrency at set periods of time.
To do this, click on the 'one-time purchase' button and choose how often you would like to buy.
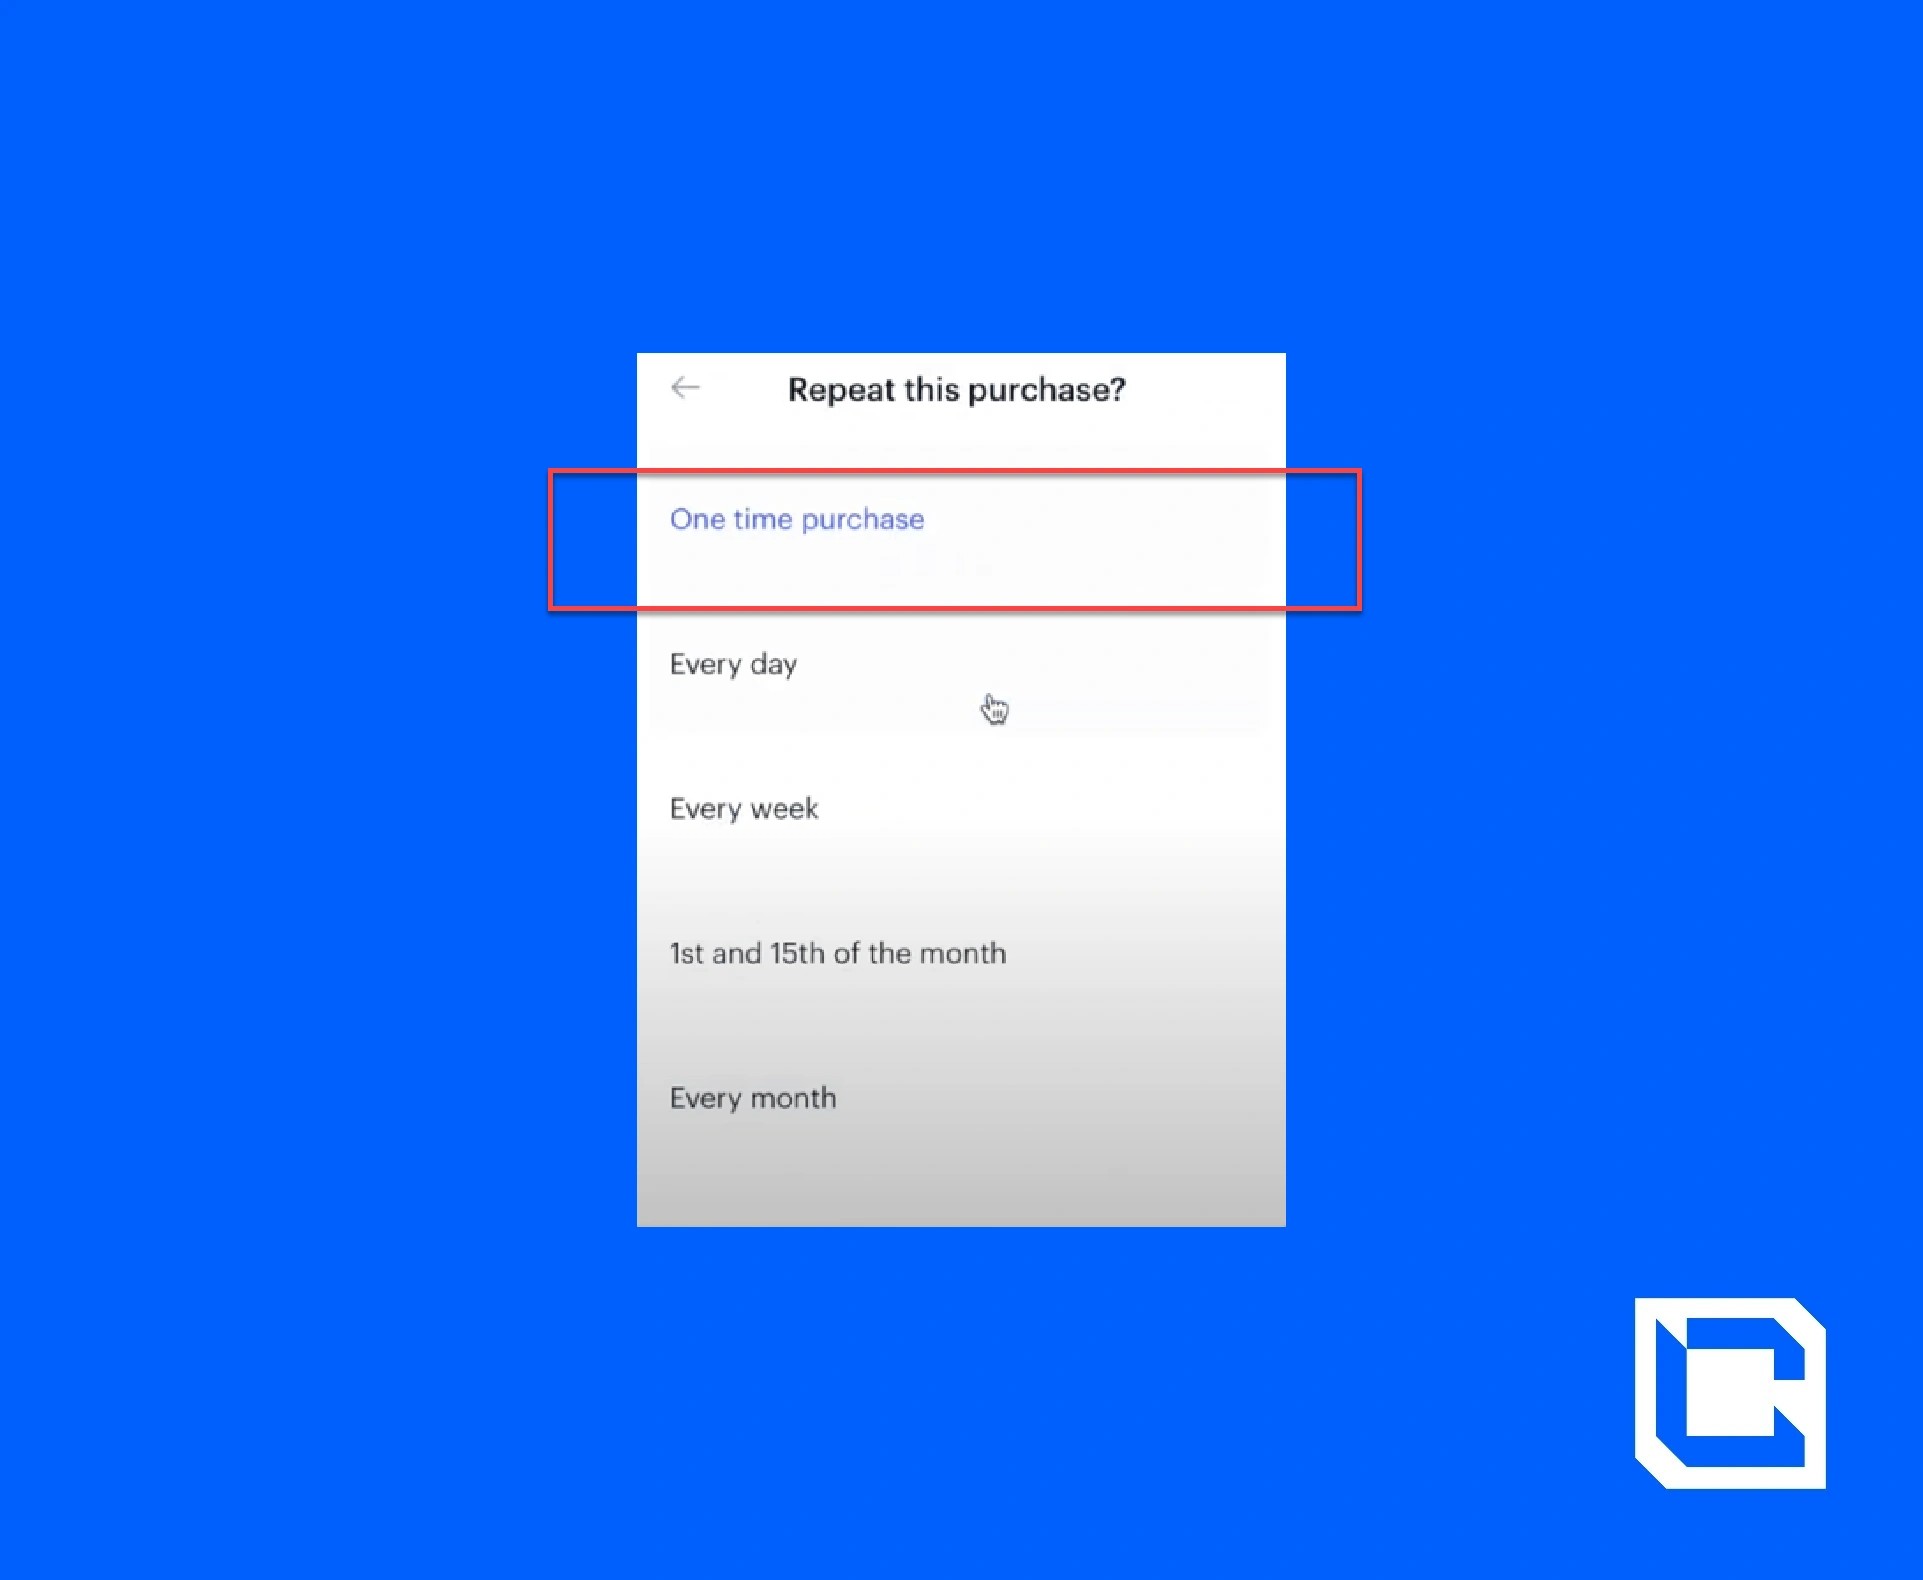
This option enables users to get a good average price for their crypto (i.e. sometimes the price will be high, other times it will be low), so some people view recurring buys as a more stable way of investing in crypto over the long term. Note that it is also possible to set up recurring buys via the 'invest over time' tab on your portfolio page.
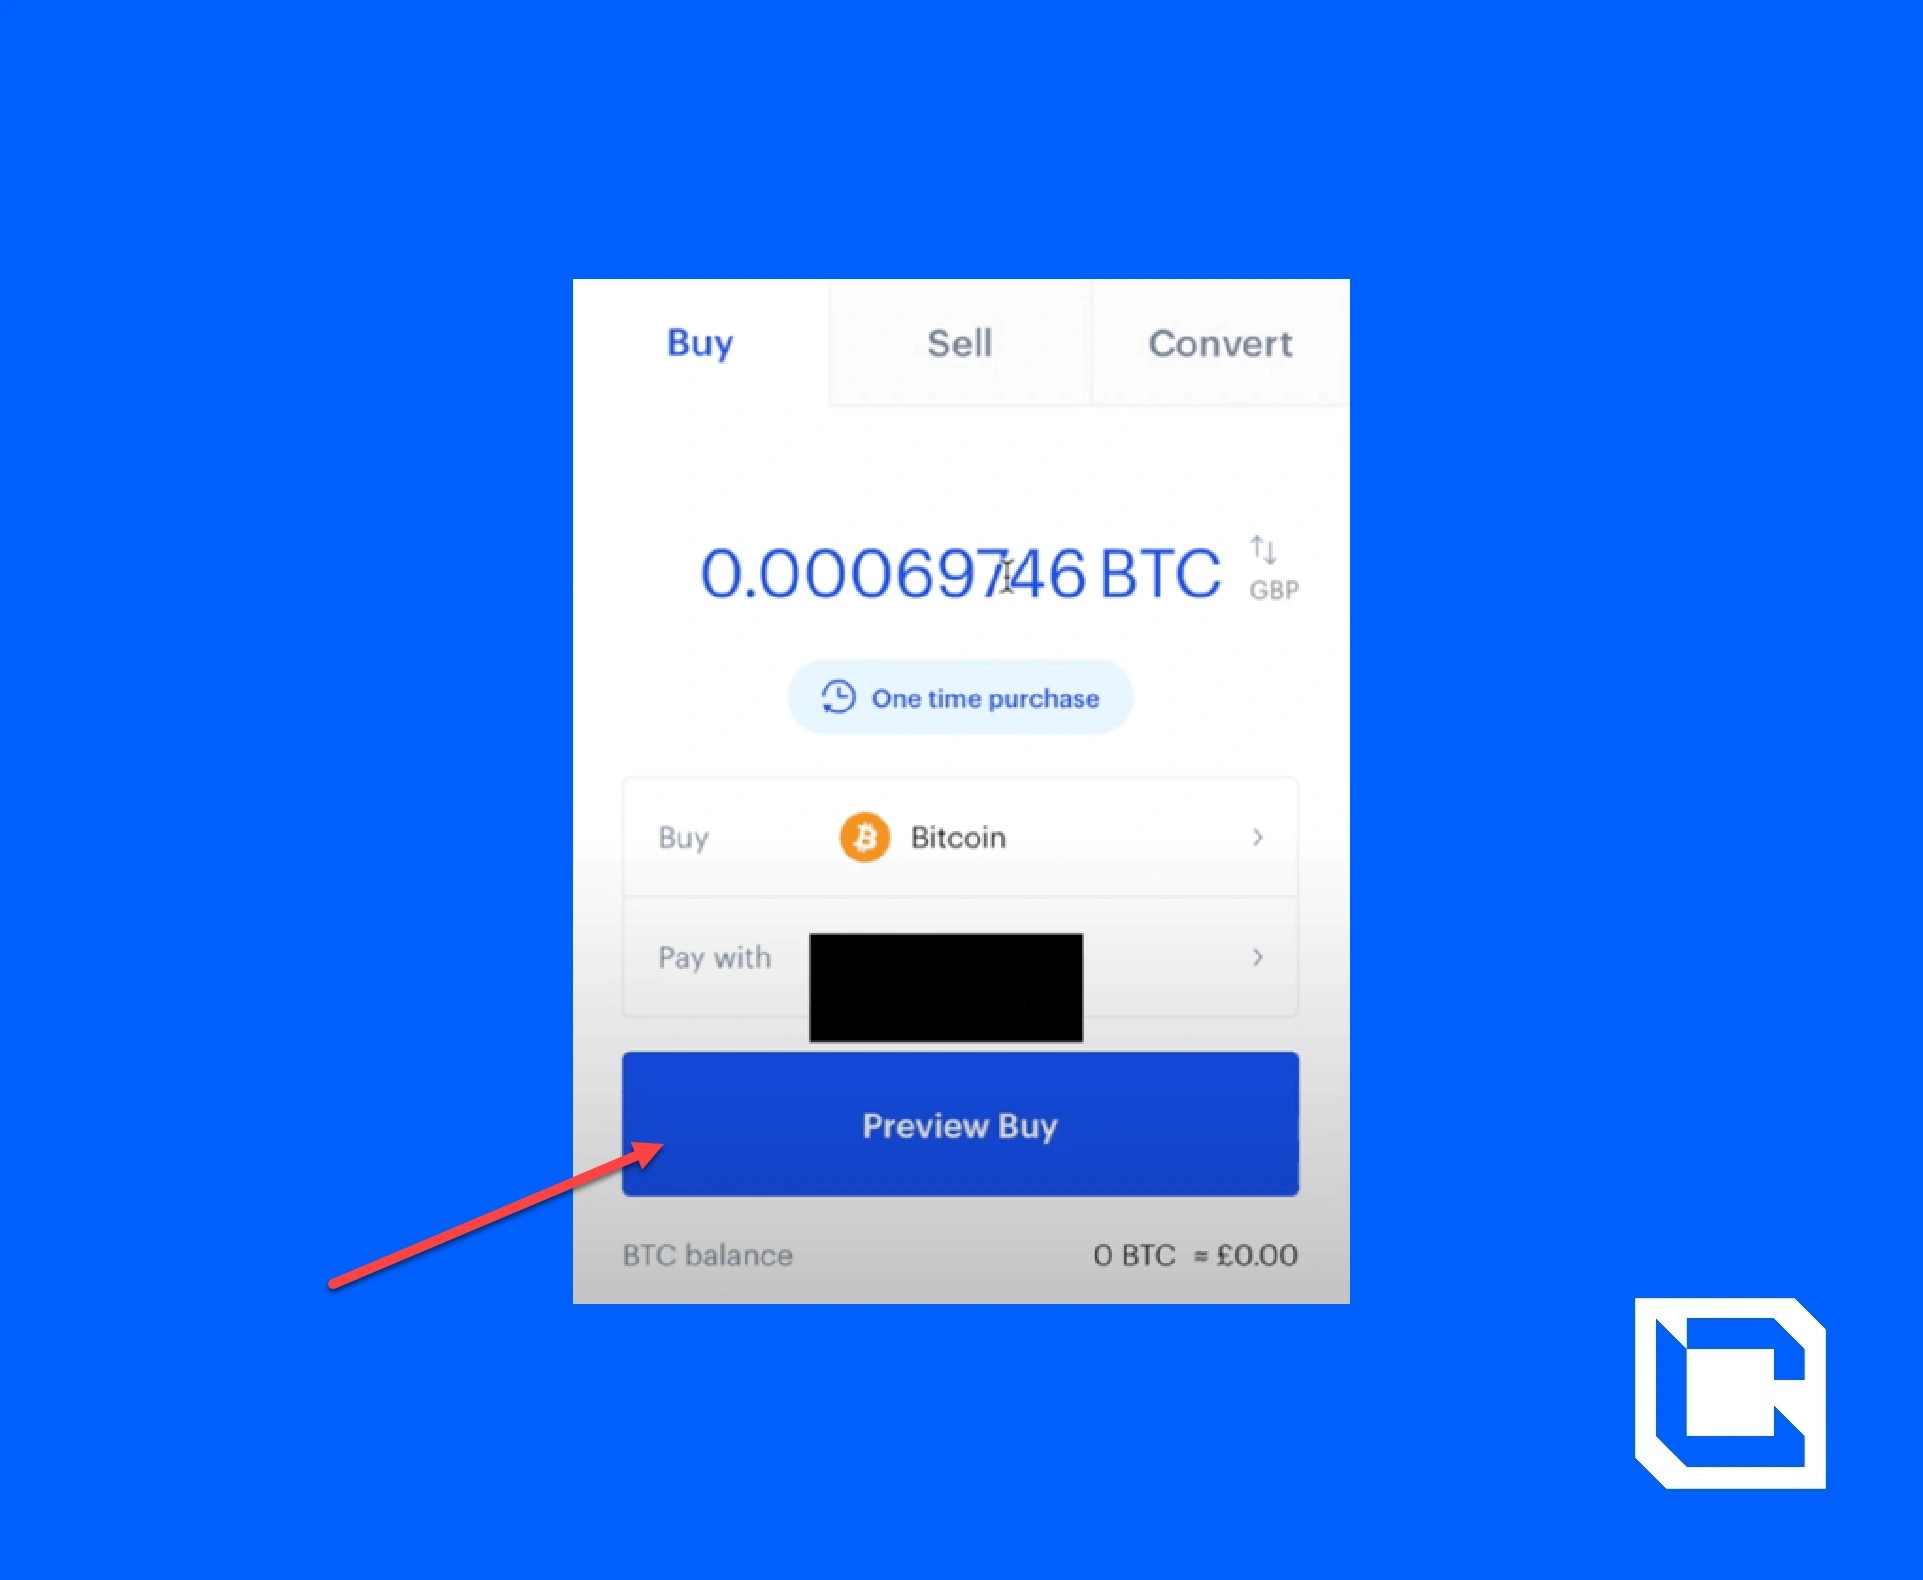
When you click on the 'preview buy' button, you will be shown a breakdown of your purchase.
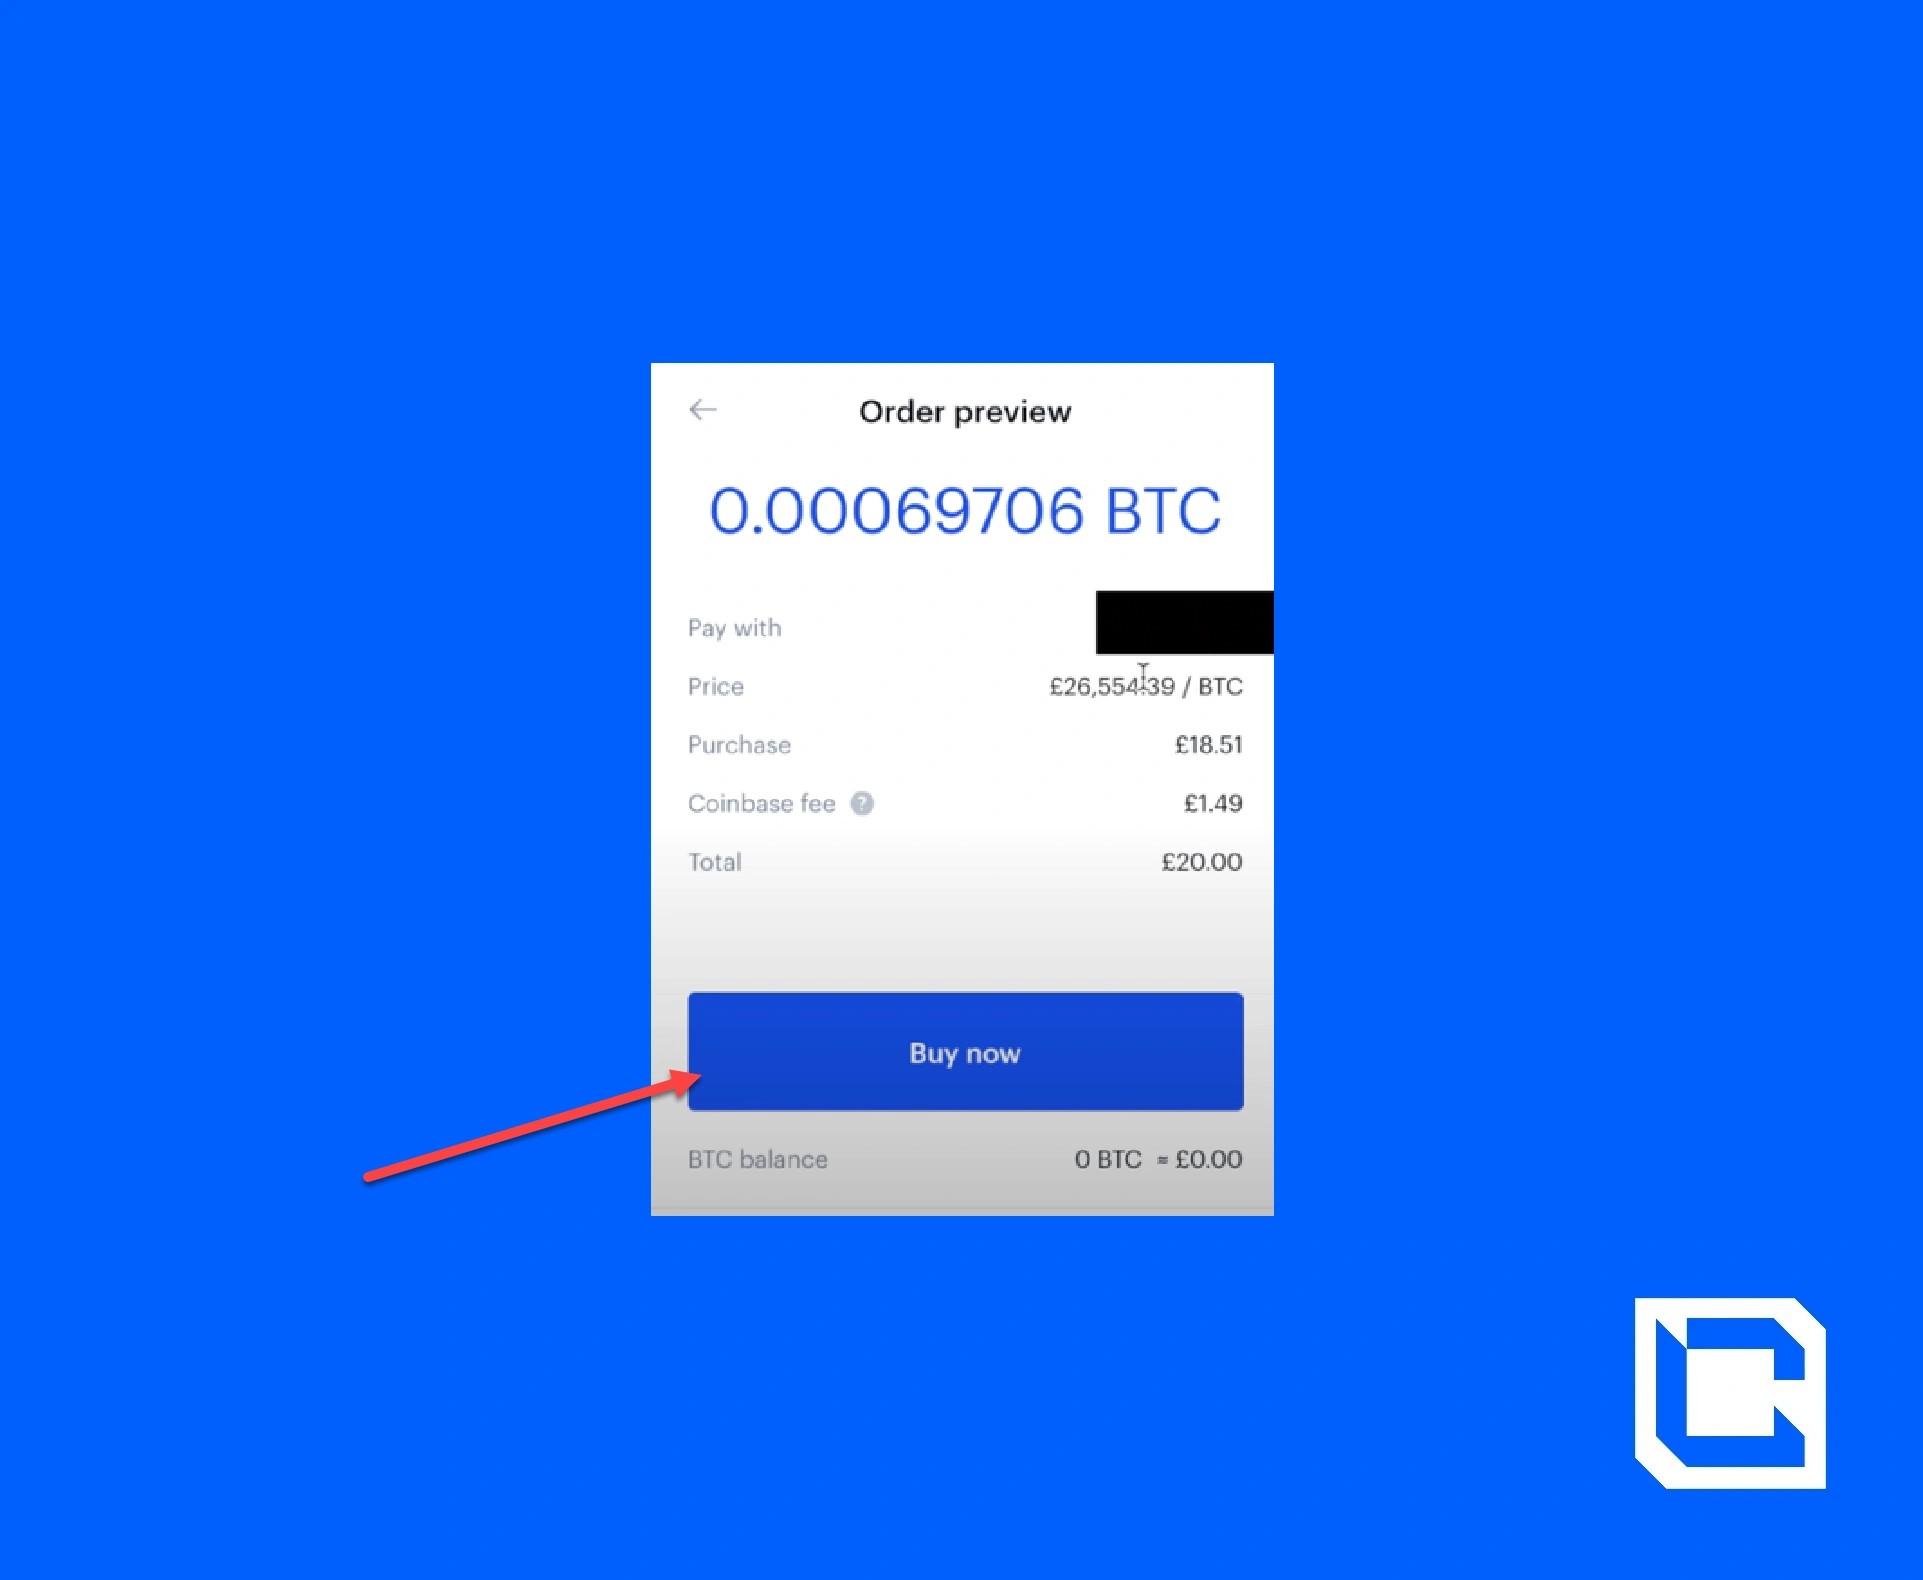
Here, you'll see how much of the cryptocurrency you are buying, the transaction fee that Coinbase charges, and the total amount you will pay in your fiat currency.
A downside of Coinbase is that it has relatively high transaction fees compared to other exchanges. The cheapest way to buy crypto on Coinbase is via bank transfer while using a credit card is generally the most expensive way.
By pressing 'buy now', the transaction will be processed. Note that you might be required to confirm the purchase with your bank before it fully goes through. After this, you should receive confirmation that your purchase was successful, and your crypto should be visible in your portfolio section.
Selling Crypto on Coinbase
Selling your crypto on Coinbase is very straightforward. All you have to do is click on the 'buy/sell' button in the top right of your account's screen and then select the sell tab in the pop-up screen that appears.
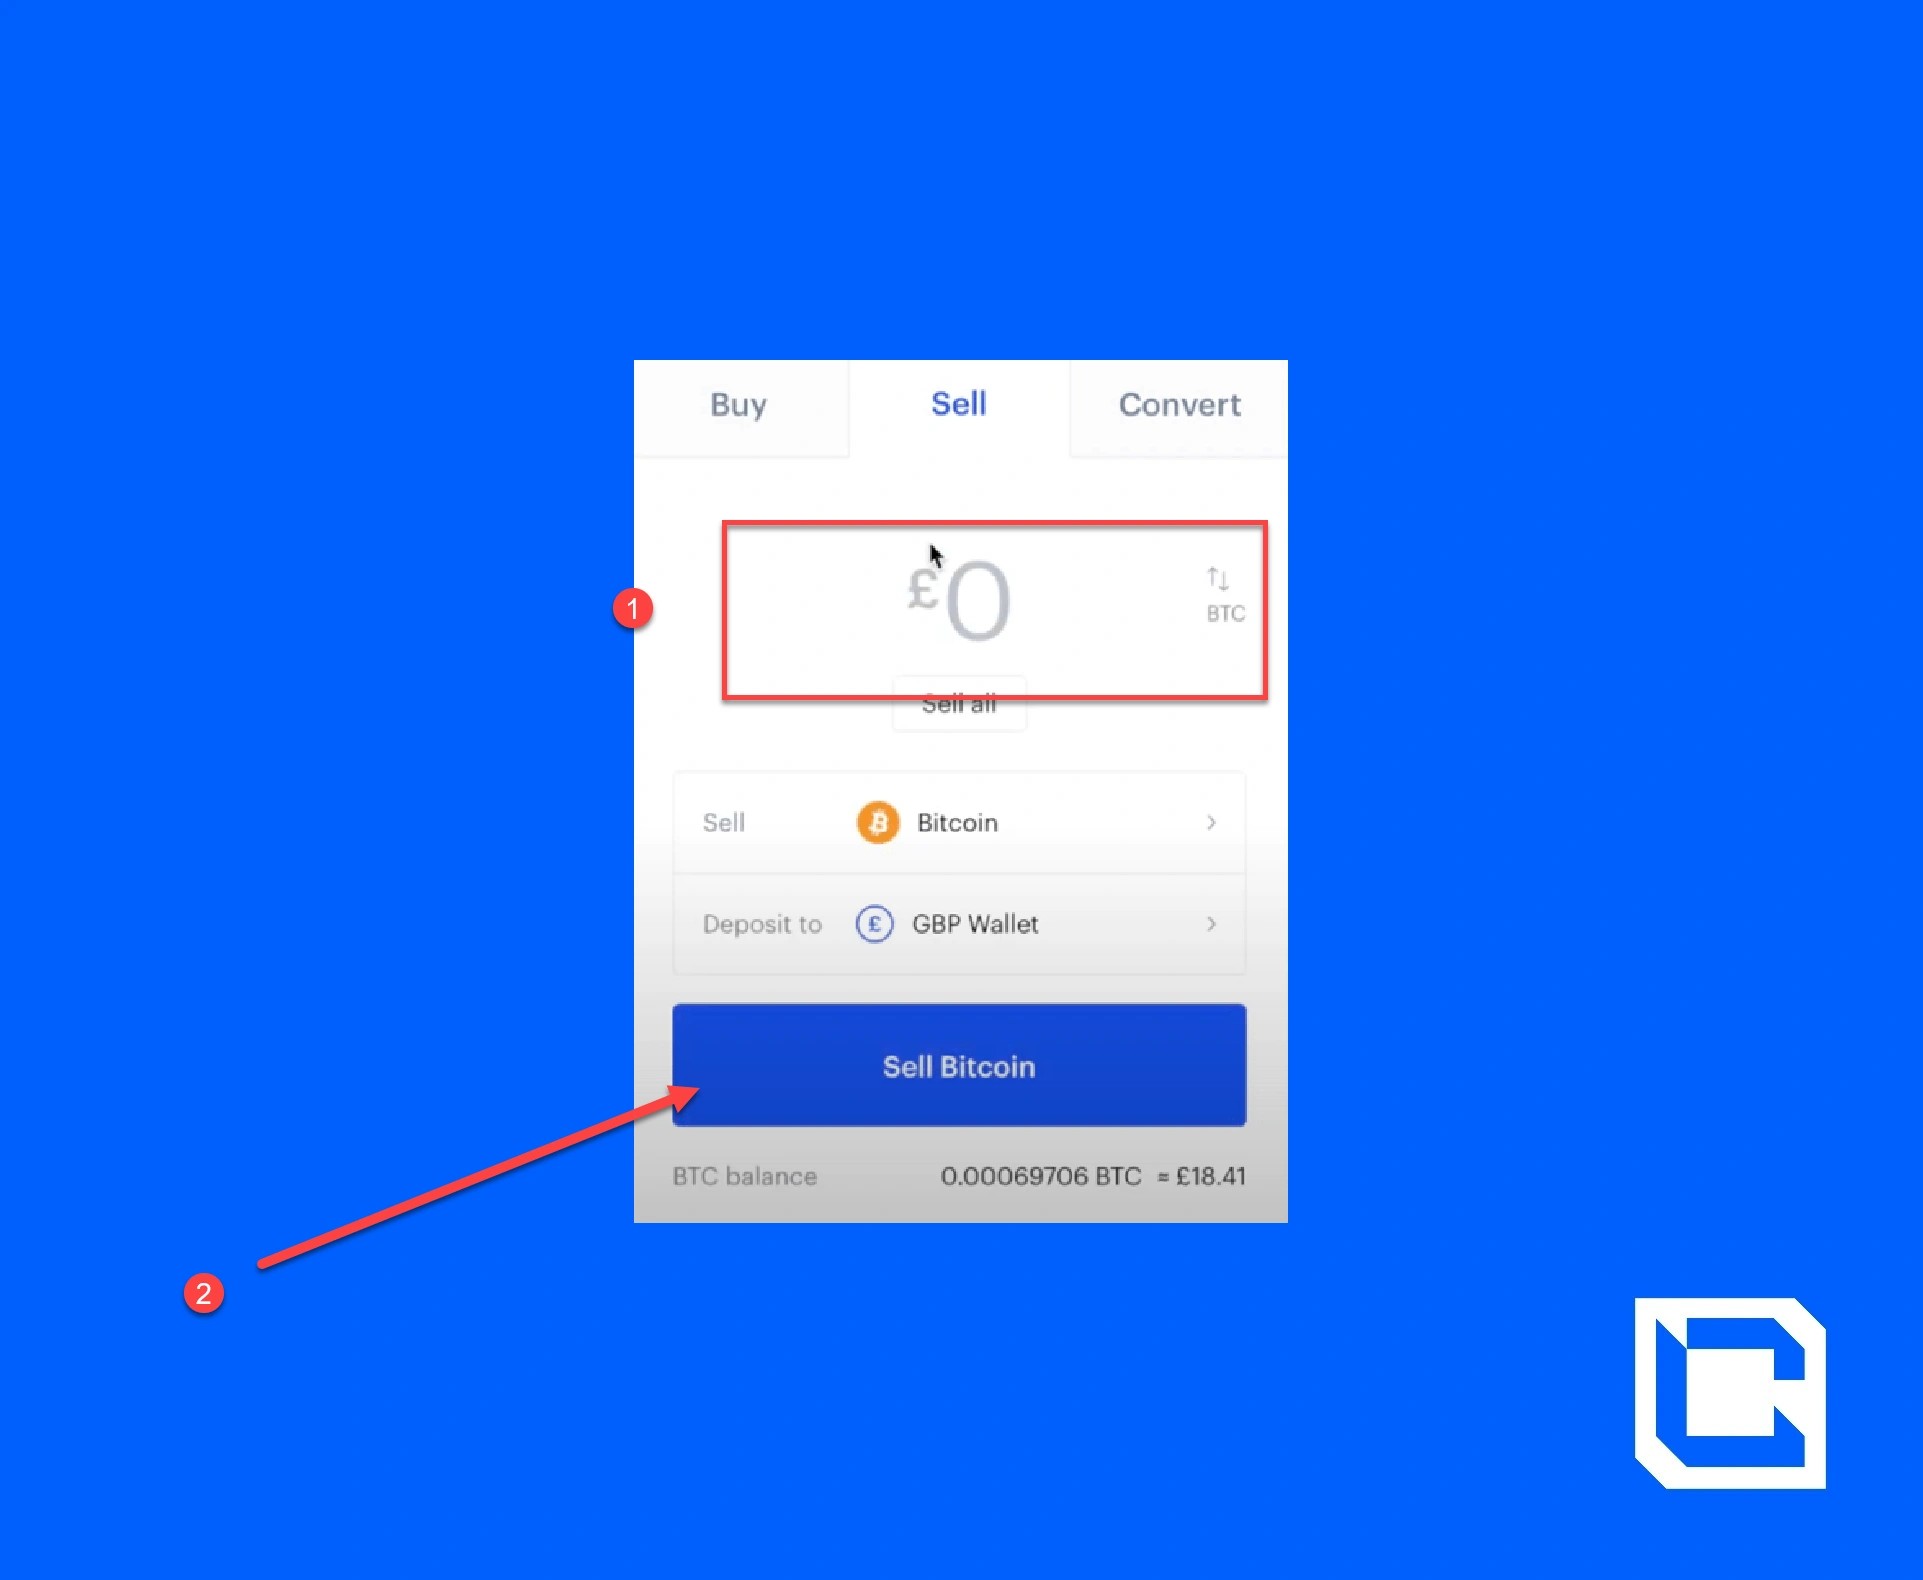
Select the cryptocurrency you want to sell, followed by the fiat currency wallet you want to deposit your earnings into. The type of wallet available to you (e.g. Euro, GBP, US dollar wallet) will vary according to where you live.
At the bottom of this pop-up screen, your cryptocurrency balance, as well as its value in your chosen fiat currency, will be displayed.
All you have to do now is type in how much fiat you want to earn from the sale (or by clicking on the arrow icon, how much of your crypto you want to sell) and press 'sell'!
Swapping/Converting Crypto
You can also convert or swap one cryptocurrency to another on Coinbase.Once again, click on the 'buy/sell' button in the top right and then select the 'convert' tab.
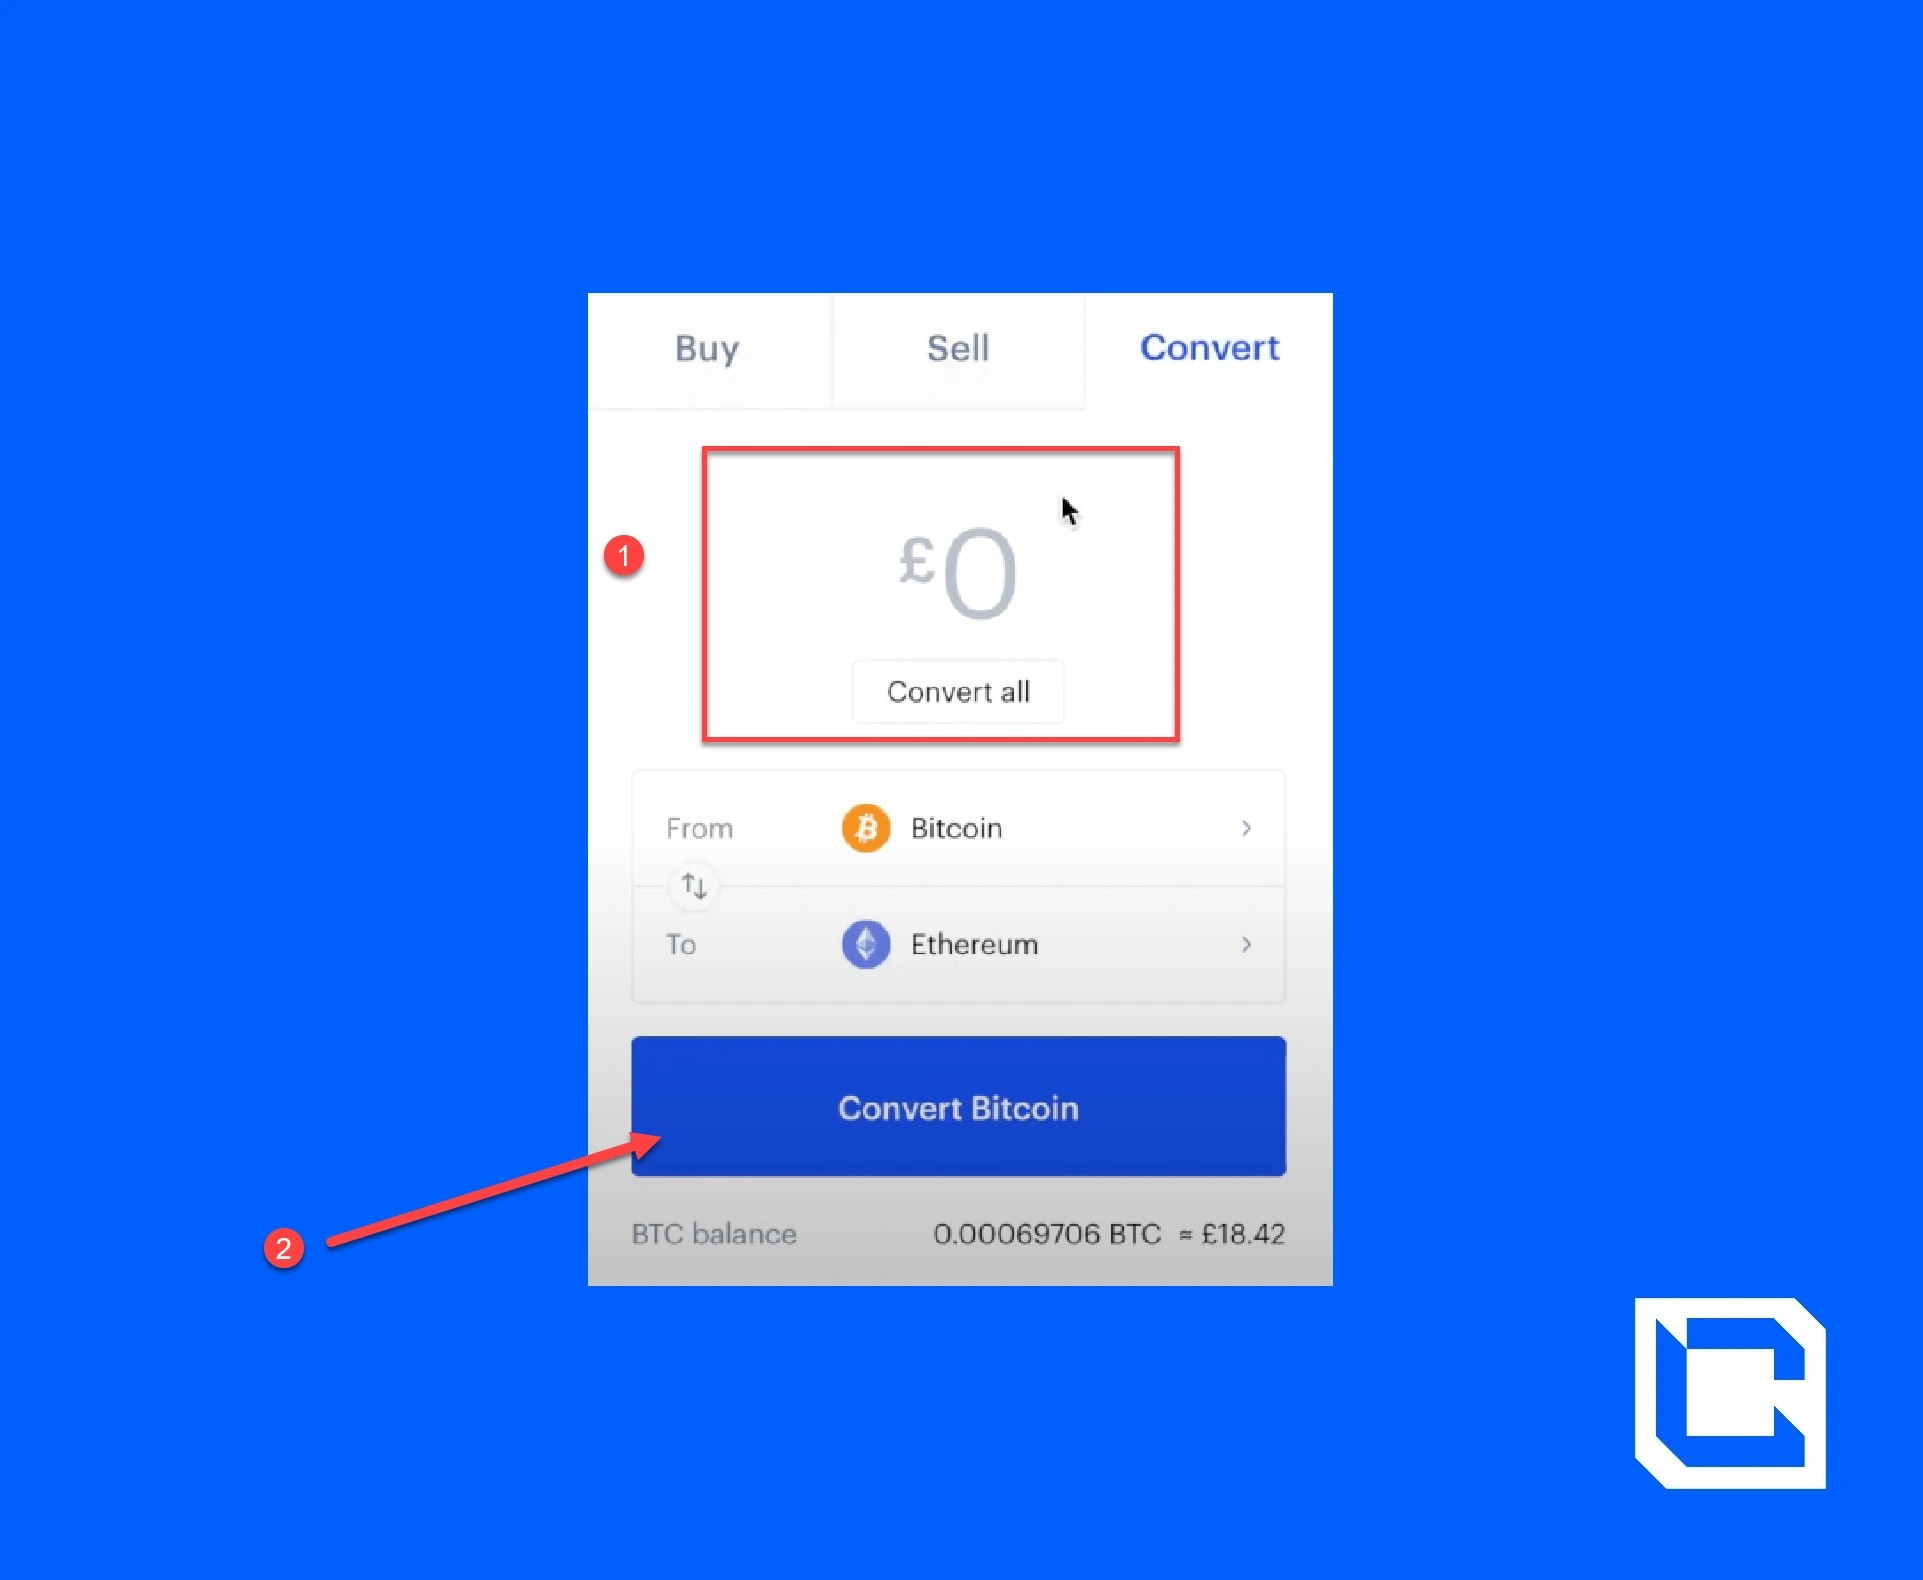
First, you'll need to choose the cryptocurrency you want to convert as well as the one that you want to convert it into.
Next, enter the amount of your crypto (in fiat currency) that you want to sell. You also have the option to use the 'convert all' button.
Similar to buying crypto, when you press 'preview convert', you'll be shown the transaction breakdown. By pressing 'convert now,' the swap will be processed.
Sending and receiving crypto on Coinbase
If you want to send some crypto from your Coinbase account, click the 'send/receive button at the top of your screen. A pop-up screen like the one below will appear.
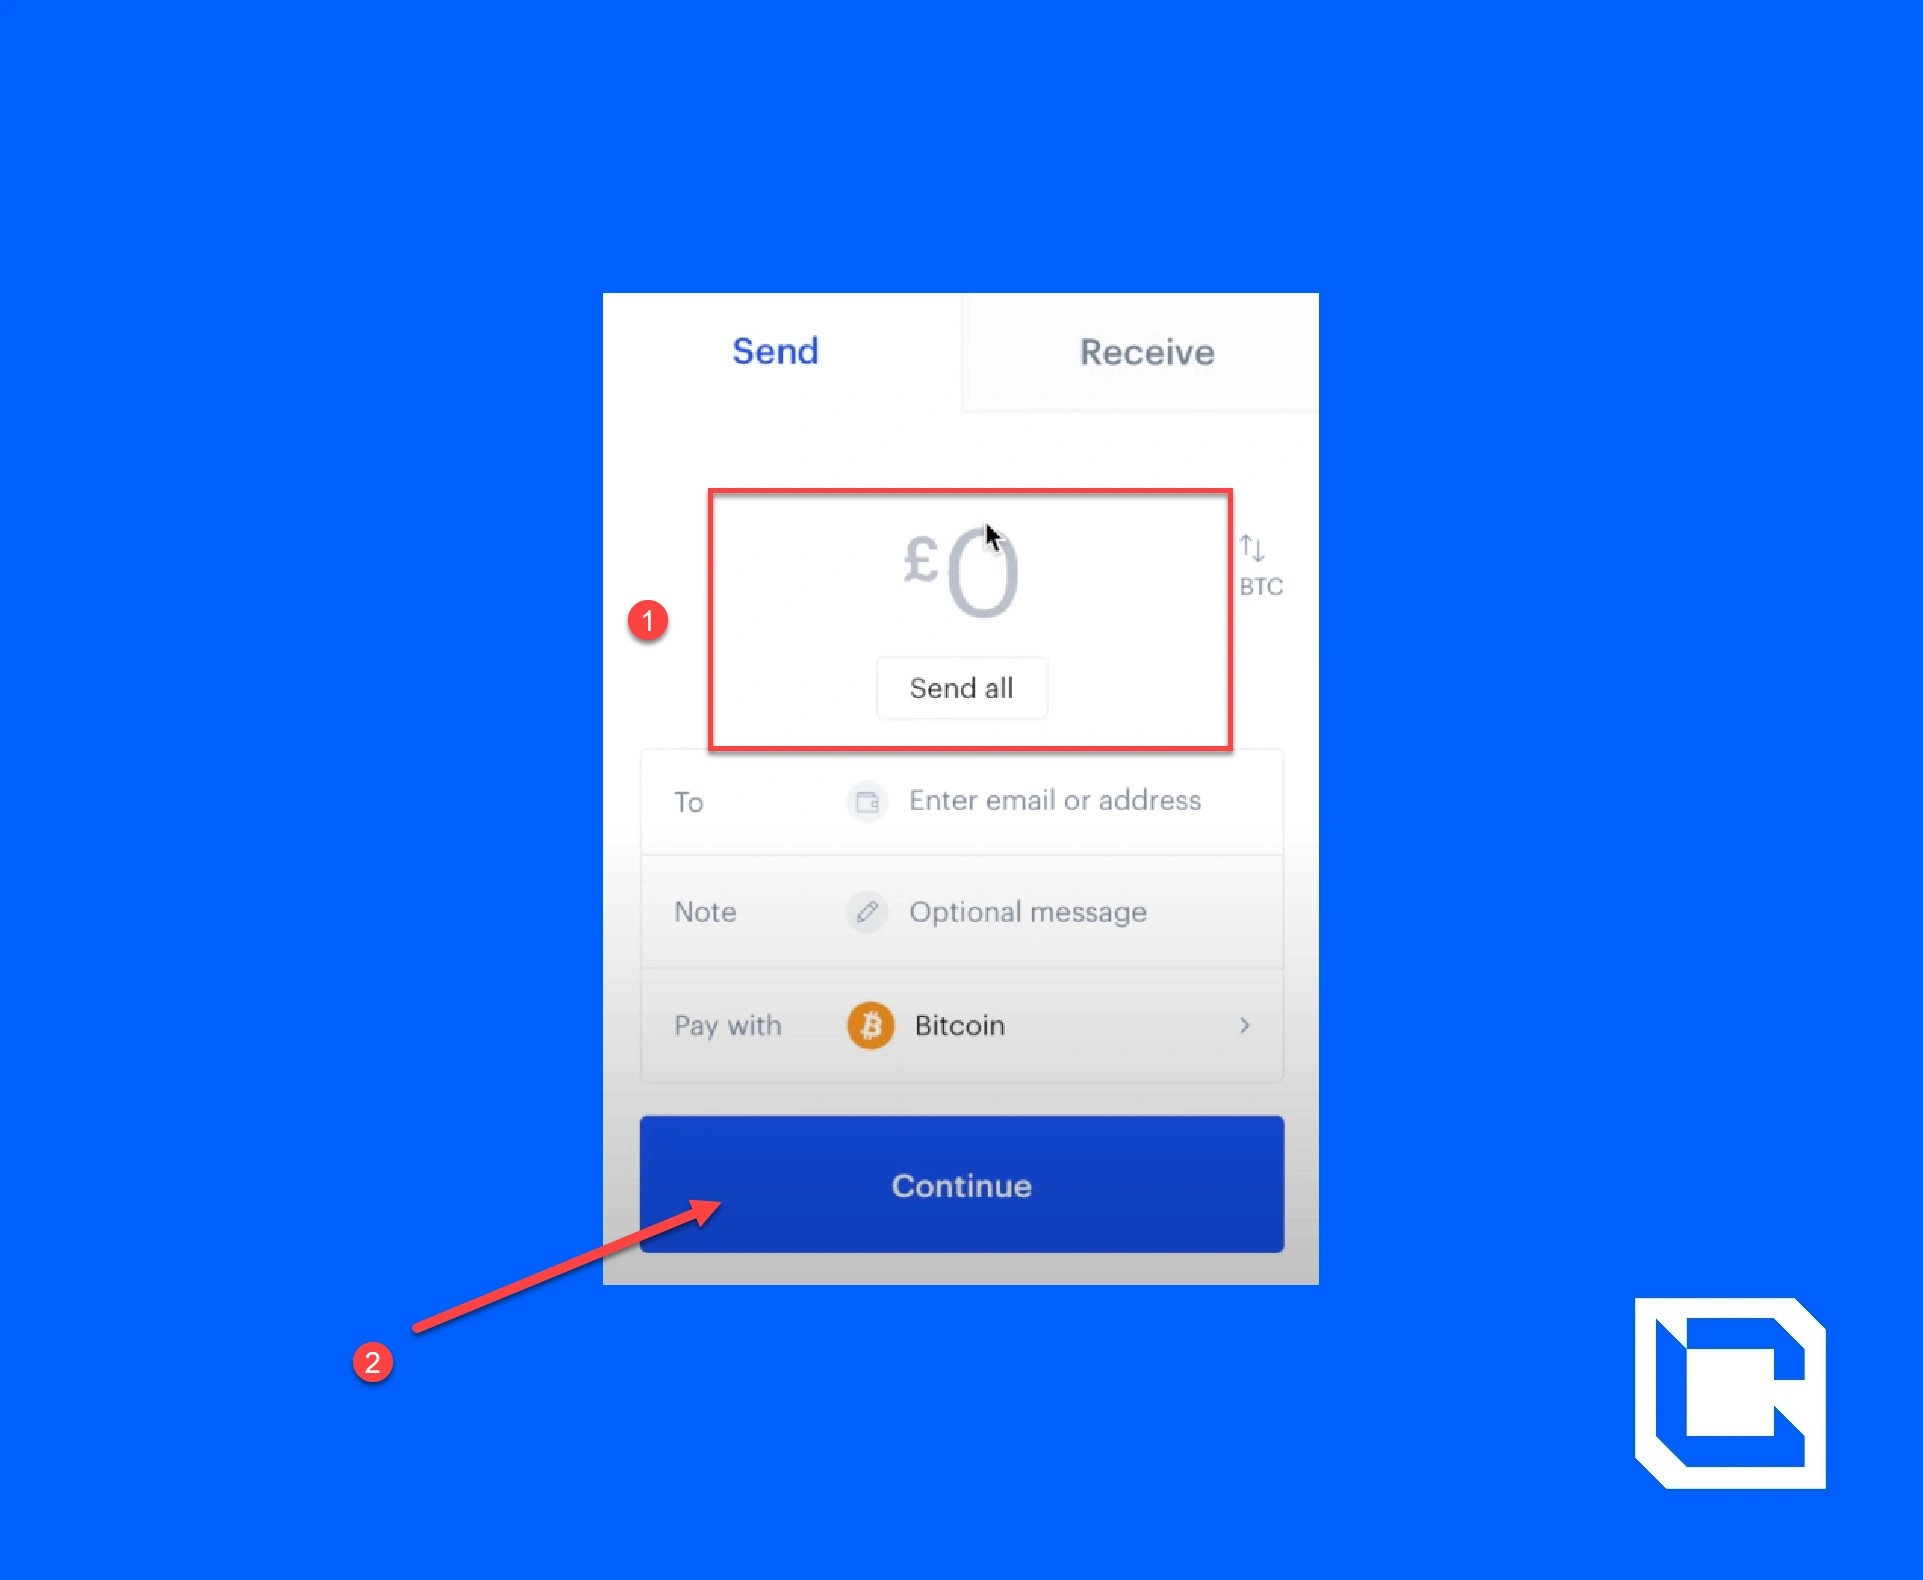
First, you'll want to select which one of your cryptocurrencies you want to send. Similar to the buying and selling options, you can enter the amount of the cryptocurrency you want to send as valued in your fiat currency, or you can enter the quantity of the cryptocurrency you want to send.
If you are sending crypto to another Coinbase account, then you can enter the email address linked to that account. Coinbase will perform this trade 'off-chain', meaning that you won't get charged any transaction fees. Note that the account that is receiving your crypto must have 'instant sends' enabled in their settings.
If you are sending crypto elsewhere, such as to a different exchange or storage wallet, then you'll need to enter the wallet's or account's cryptocurrency address.
Once you are happy, press 'continue' to finalise the transaction.
The process of receiving crypto into your Coinbase account is the exact opposite.
As previously mentioned, you can send crypto off-chain between Coinbase accounts. To enable this, all you have to do is click on your profile icon, click 'settings' and then, in the 'Privacy' tab, toggle the switch button beside the 'instant sends' option.
If you are receiving crypto from an account outside of Coinbase, you will need your Coinbase address. To retrieve this, click on the 'send/ receive' button and select the receive tab.
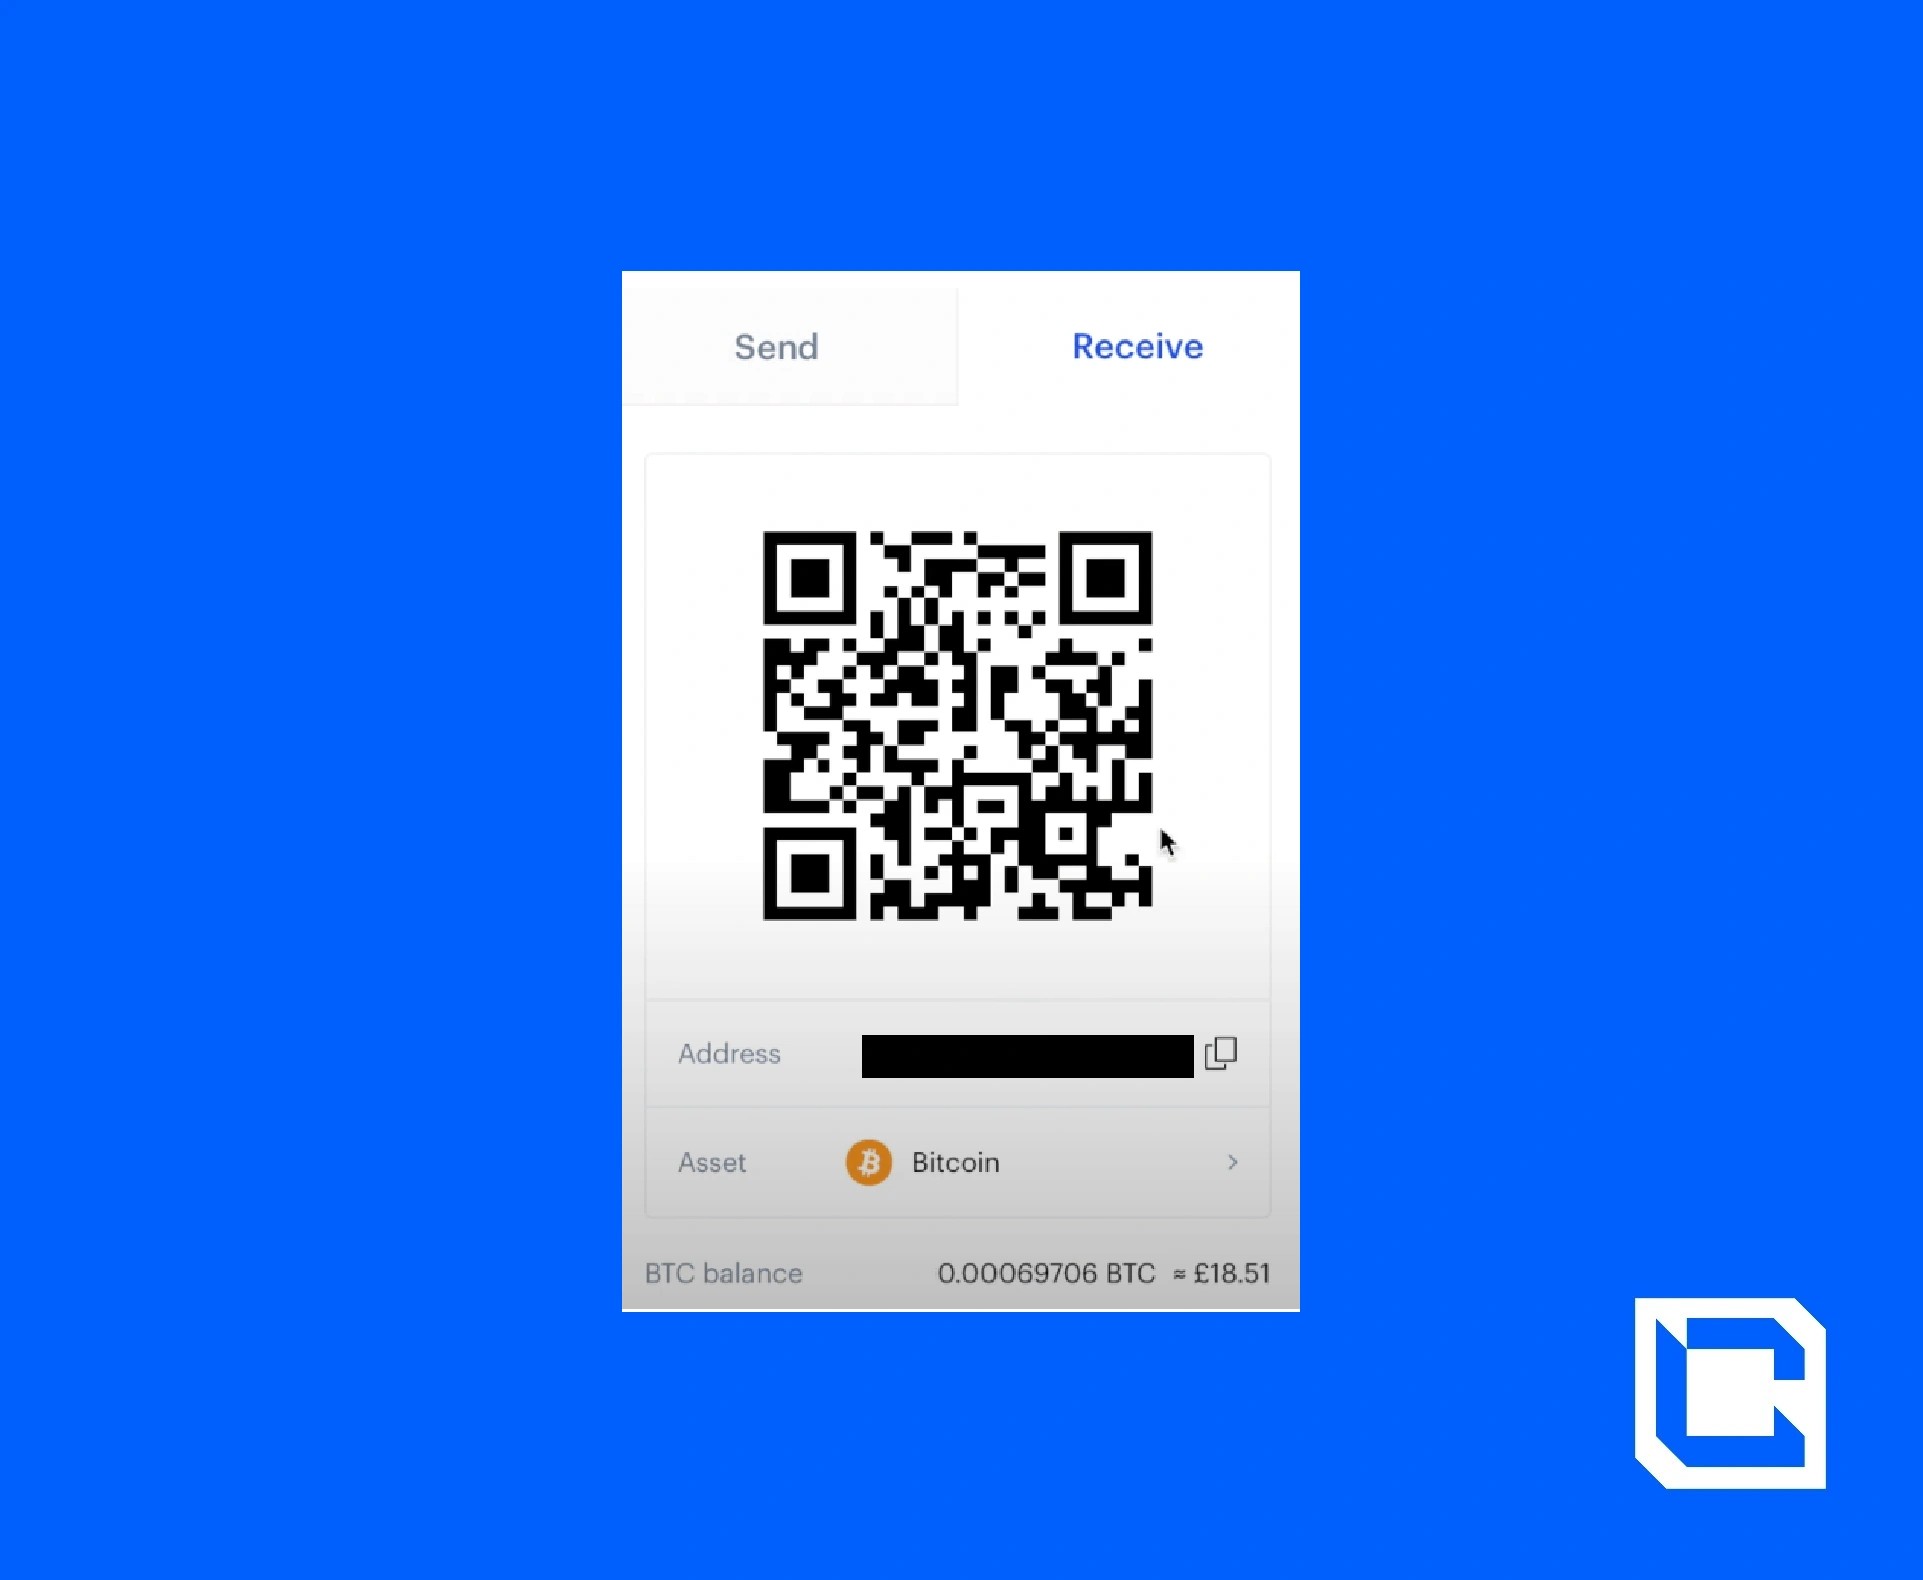
Note that in addition to each account on Coinbase having different addresses, each cryptocurrency that you have in your account will also have a unique address.
Because of this, you'll need to select the type of crypto you will receive to provide the sender with the right address. If you don't do this correctly, coins can become lost.
Any crypto you receive should appear directly in your portfolio.
Staking crypto on Coinbase
It is possible to stake certain coins on Coinbase. In simple terms, staking is where your crypto becomes part of the process that validates transactions on the blockchain.In exchange for putting your crypto 'to work', you'll earn interest or other staking rewards. Coinbase will receive these rewards from the blockchain on your behalf and will then credit them to you. You'll also be helping to reinforce the safety and reliability of the blockchain.
Currently, Coinbase offers users the option to stake four cryptocurrencies: Cosmos, Algorand, Tezos and Dai.
If you have any of these currencies in your Coinbase account and decide you want to stake them, simply go into settings and select the 'financial services' tab.
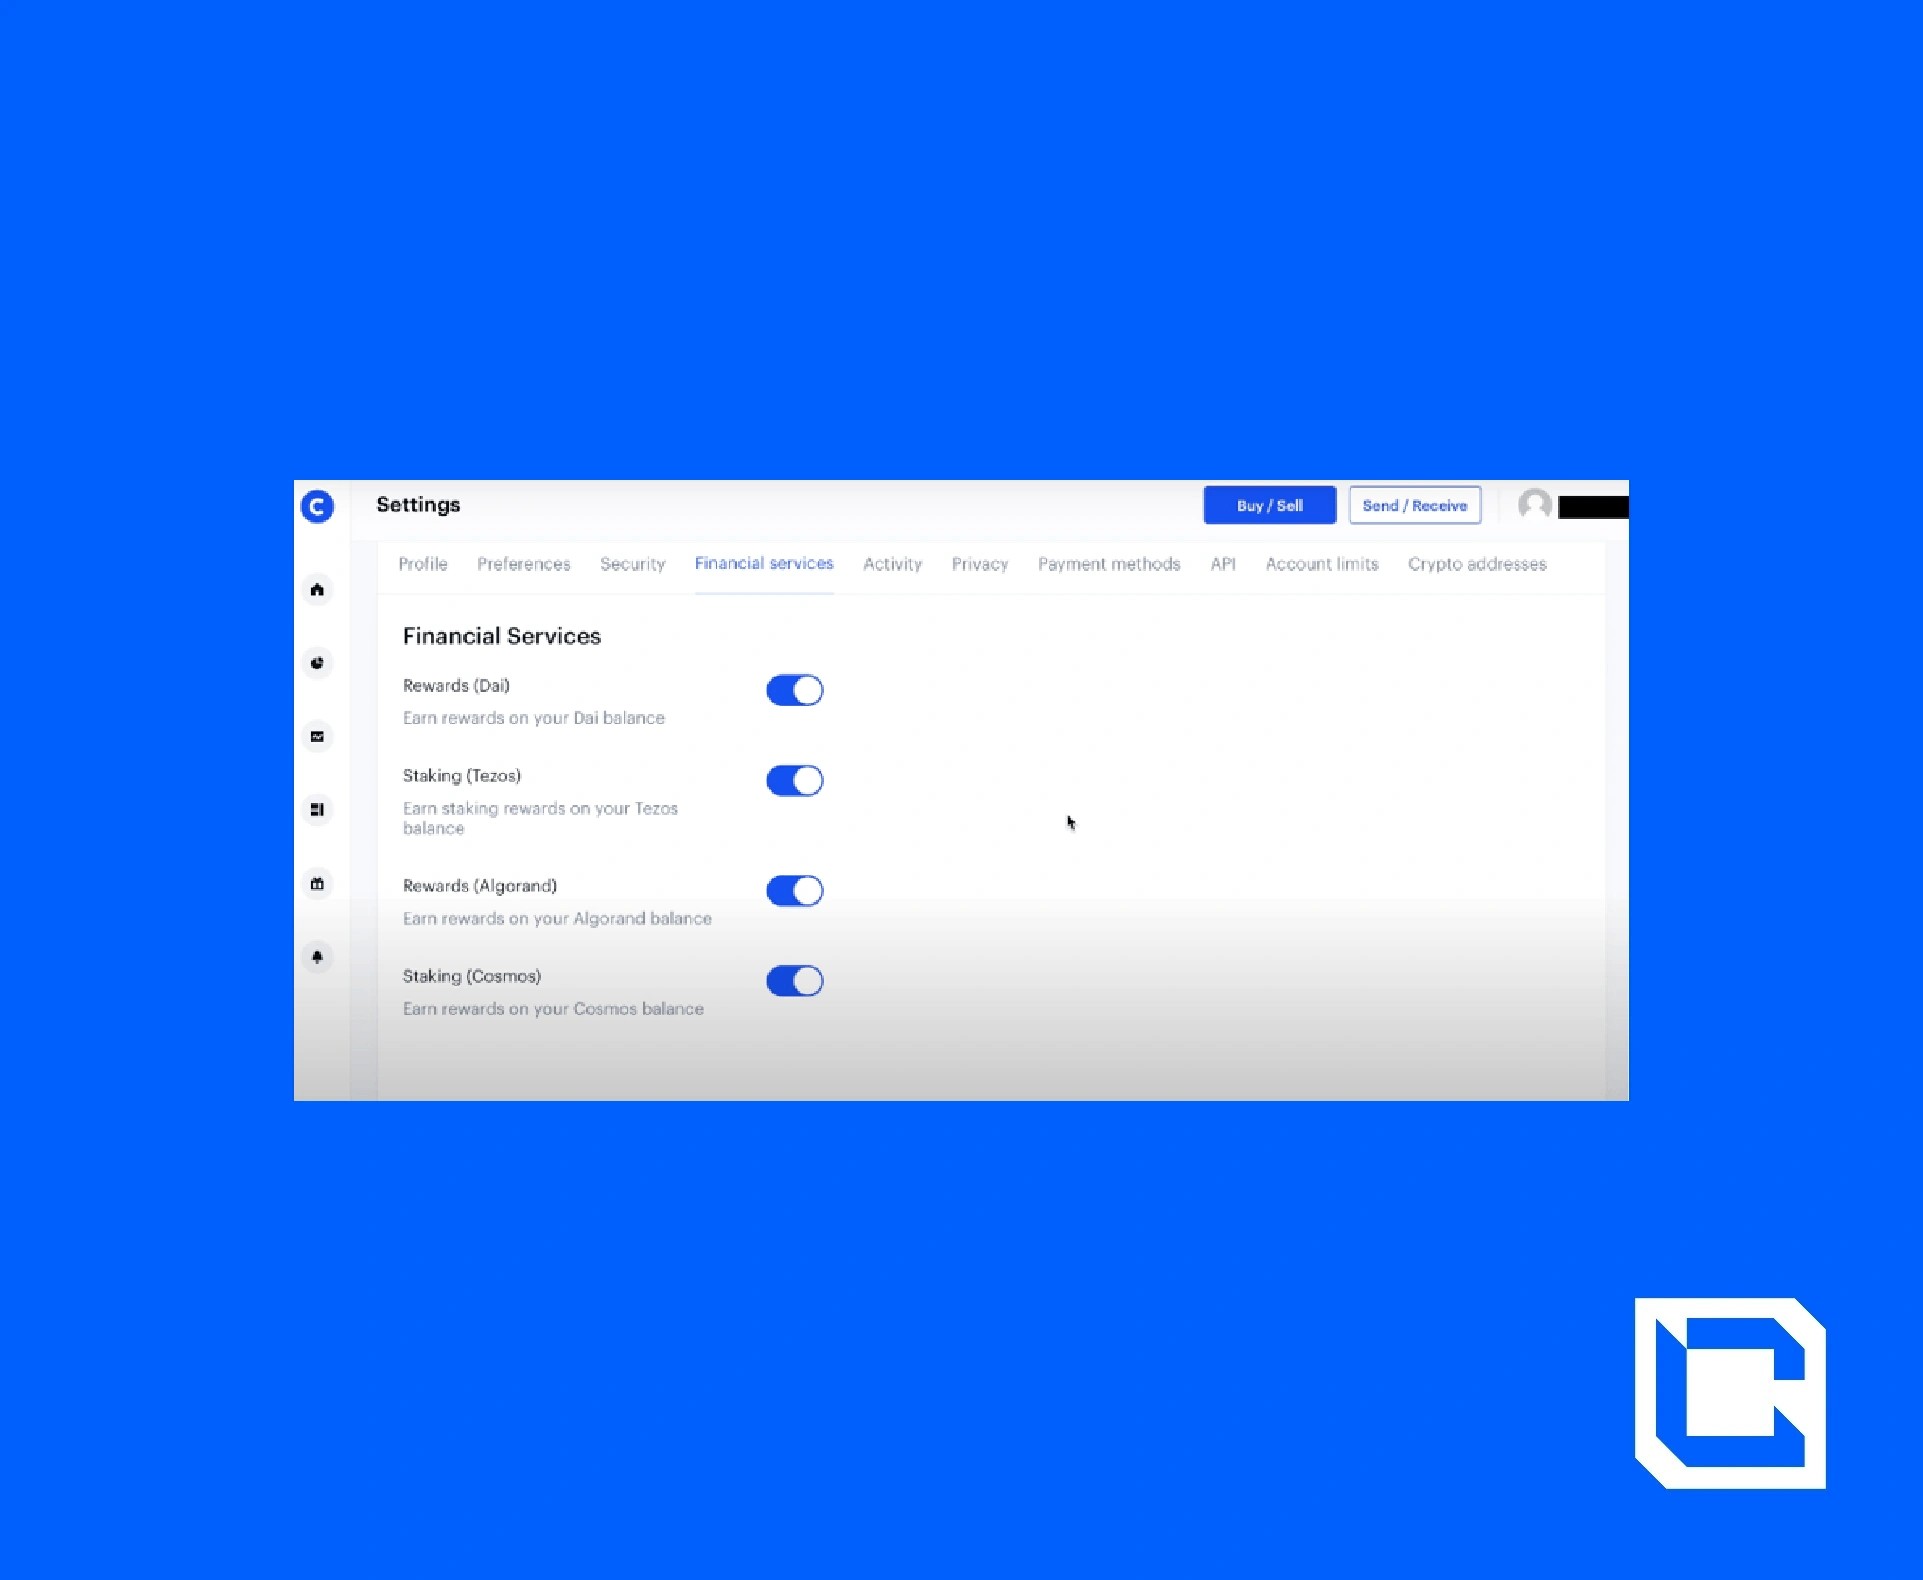
Press on the toggle switch beside the coins/tokens that you want to stake. Once you confirm your choice, your crypto will be staked!
If you found this tutorial useful, then keep an eye out for our advanced Coinbase tutorial, which will be coming soon! For now, read our MetaMask or PancakeSwap tutorials.
Disclaimer: NOT FINANCIAL NOR INVESTMENT ADVICE. Only you are responsible for any capital-related decisions you make, and only you are accountable for the results.
FAQs
Here are some FAQs on how to use Coinbase.1. What is Coinbase, and why is it popular for cryptocurrency trading?
Coinbase is a beginner-friendly platform for buying, selling, storing, and managing over 265 cryptocurrencies. It is widely used due to its ease of use, insurance against cyberattacks, and support for staking certain digital assets.2. How do I set up a Coinbase account?
To create an account, visit Coinbase's website, sign up with your details, verify your email and ID, and add a payment method like a bank account, credit card, or PayPal. The verification process may take a few minutes to several days.3. What features does Coinbase offer?
Coinbase provides tools to buy, sell, and swap cryptocurrencies, stake certain coins for rewards, send and receive crypto, view market prices, and set up recurring buys to invest consistently over time.4. What fees does Coinbase charge, and how can I minimise them?
Coinbase charges relatively high fees, but these can be minimised by using bank transfers or Coinbase Pro. Credit card payments generally incur the highest fees, so alternative payment methods are more cost-effective.5. What precautions should I take when using Coinbase?
Enable two-factor authentication for enhanced security, carefully verify crypto addresses when sending assets, and use features like "Instant Sends" for fee-free transfers between Coinbase accounts. Always review fees before completing transactions.Continue reading by joining Cryptonary Pro
$1,548 $1,197/year
Get everything you need to actively manage your portfolio and stay ahead. Ideal for investors seeking regular guidance and access to tools that help make informed decisions.
For your security, all orders are processed on a secured server.
As a Cryptonary Pro subscriber, you also get:
3X Value Guarantee - If cumulative documented upside does not reach 300% during your 12-month membership, you can request a full refund. Terms
24/7 access to experts with 50+ years’ experience
All of our top token picks for 2025
On hand technical analysis on any token of your choice
Weekly livestreams & ask us anything with the team
Daily insights on Macro, Mechanics, and On-chain
Curated list of top upcoming airdrops (free money)
3X Value Guarantee
If cumulative documented upside does not reach 300% during your 12-month membership, you can request a full refund.
Our track record speaks for itself
With over 2.4M tokens and widespread misinformation in crypto, we cut through the noise and consistently find winning assets.
Our track record speaks for itself
With over 2.4M tokens and widespread misinformation in crypto, we cut
through the noise and consistently find winning assets.


Frequently Asked Questions
Can I trust Cryptonary's calls?
Yes. We've consistently identified winners across multiple cycles. Bitcoin under $1,000, Ethereum under $70, Solana under $10, WIF from $0.003 to $5, PopCat from $0.004 to $2, SPX blasting past $1.70, and our latest pick has already 200X'd since June 2025. Everything is timestamped and public record.
Do I need to be an experienced trader or investor to benefit?
No. When we founded Cryptonary in 2017 the market was new to everyone. We intentionally created content that was easy to understand and actionable. That foundational principle is the crux of Cryptonary. Taking complex ideas and opportunities and presenting them in a way a 10 year old could understand.
What makes Cryptonary different from free crypto content on YouTube or Twitter?
Signal vs noise. We filter out 99.9% of garbage projects, provide data backed analysis, and have a proven track record of finding winners. Not to mention since Cryptonary's inception in 2017 we have never taken investment, sponsorship or partnership. Compare this to pretty much everyone else, no track record, and a long list of partnerships that cloud judgements.
Why is there no trial or refund policy?
We share highly sensitive, time-critical research. Once it's out, it can't be "returned." That's why membership is annual only. Crypto success takes time and commitment. If someone is not willing to invest 12 months into their future, there is no place for them at Cryptonary.
Do I get direct access to the Cryptonary team?
Yes. You will have 24/7 to the team that bought you BTC at $1,000, ETH at $70, and SOL at $10. Through our community chats, live Q&As, and member only channels, you can ask questions and interact directly with the team. Our team has over 50 years of combined experience which you can tap into every single day.
How often is content updated?
Daily. We provide real-time updates, weekly reports, emergency alerts, and live Q&As when the markets move fast. In crypto, the market moves fast, in Cryptonary, we move faster.
How does the 3X Value Guarantee work?
We stand behind the value of our research. If the documented upside from our published research during your 12-month membership does not exceed three times (3X) the annual subscription cost, you can request a full refund. Historical context: In every completed market cycle since 2017, cumulative documented upside has exceeded 10X this threshold.
TermsRecommended from Cryptonary